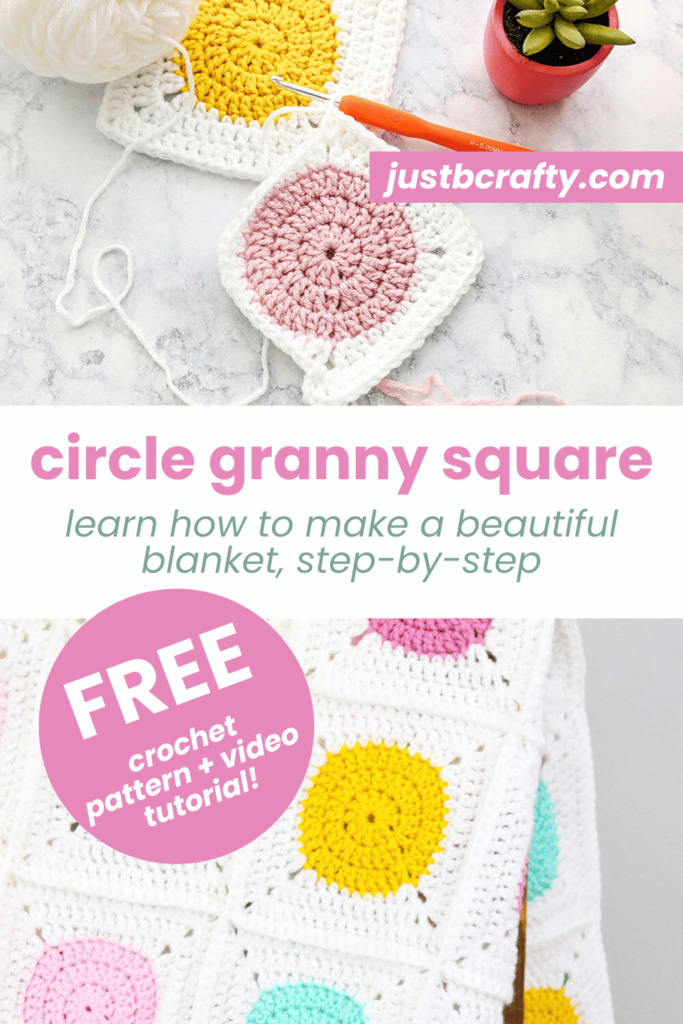
Ready to turn your Circle to Square Granny Squares into a beautiful, cozy blanket? In this post, I’ll walk you through exactly how to join your squares, lay out your color scheme, and add a simple border to finish it off.
Whether you’re following along from my original Circle to Square Granny Square pattern or just love a good modular crochet project, this guide will help you confidently put your blanket together—and make it look polished and cohesive.
💌 Want the full ad-free printable version of this blanket pattern? Grab it here in my Etsy shop, or get access to 45+ printable patterns in my full pattern library!

Before You Begin Joining
Joining granny squares can feel intimidating at first, but once you get in the groove, it’s surprisingly relaxing and satisfying. Before you start, make sure all your squares are the same size—blocking is your best friend here! Lay them out on a flat surface, and play around with color placement until you’re happy. You might be surprised how much shifting just one square can change the whole vibe of your blanket!
If you’re a fan of this blanket, I KNOW you’ll love this granny square blanket too!
Want To Come Back To This Pattern Later?
Be sure to save this pattern to Pinterest so you can pick up right where you left off! Click here to save to Pinterest or just click on the image below!
Ways To Customize Your Blanket
This pattern is super versatile! You could turn your squares into:
- A baby blanket using soft pastels
- A stash-busting scarf or wrap
- A pillow cover with just 6-9 squares
- A wall hanging using twine and tassels
- A full queen-sized blanket—just double the squares!
Mix and match solids, stripes, or textured yarns to make it your own.
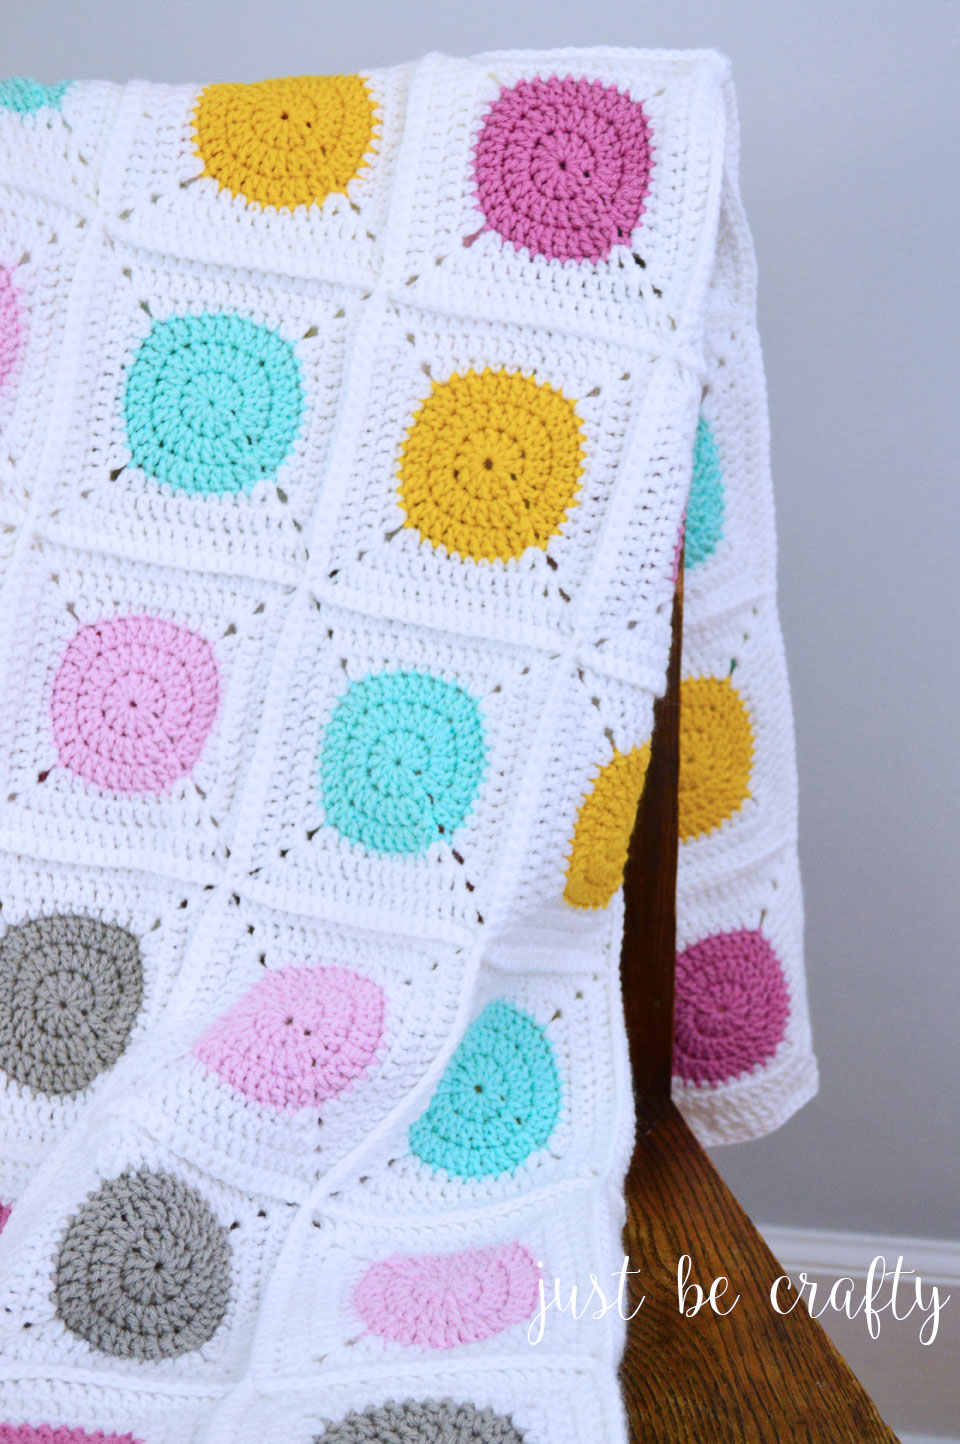
Circle to Square Granny Square Blanket
This post contains affiliate links. For more information please see my disclosures page.
Materials
- Big Twist Value Yarn (5 skeins in White, and 1 skein in each of the remaining colors: Gold, Teal, Soft Gray, Blush Pink, and Medium Rose)
- Size 5.0mm crochet hook
- Scissors
- Yarn needle
If you’re new to crochet grab my FREE crochet tools checklist here!
Finished Size
- About 36 inches wide by 66 inches tall
- Want a larger or smaller throw? Just crochet more or less squares!
How Many Squares Do You Need?
Each square measures 5.5″ x 5.5″ after blocking.
For a lap-sized throw (like mine), make 60 squares.
Don’t skip blocking! It helps everything line up and gives your blanket a clean, and more polished look. I like to pin my squares to shape on blocking boards and give them a gentle steam!
Still need to make your squares? Click here to get started!
Layout and Color Planning
Here’s the color grid I used for my blanket layout. But feel free to get creative with your own arrangement and color combinations!

How to Join Your Granny Squares
Joining method used: Single crochet join with the seam showing on the front side. This creates a really pretty grid look to the blanket and adds a bit of an unexpected texture and character to it!
If having the seam on the front isn’t your jam, go ahead and swap it for your preferred joining method, or simply slip stitch the squares together instead and make sure your slip stitching on the back of your work.
Joining Instructions
- Step 1: Place two squares with the wrong (back) sides together, lining up your stitches.
- Step 2: Single crochet the squares together (going through all loops).
- Step 3: Continue joining in squares as you go down the row. Cut yarn. Continue adding in new rows down the line.
- Step 4: Once all rows are finished, rotate your blanket and join all the columns in the same fashion. Cut yarn.
Blanket Border
After joining, we’ll add a simple hdc border to frame the blanket and clean up our edges.
Round 1: Starting in any corner, ch 2 (ch 2 does not count as a stitch), make 5 hdc, hdc in each stitch around the blanket, making 5 hdc’s in each of the remaining corners, join with the 1st stitch of the round using slip stitch.
Round 2: ch 2 (does not count as a stitch), hdc in each stitch around the blanket, making 3 hdc’s in each center corner stitch. Join with the first stitch of the round using slip stitch.
Cut yarn, and weave in all ends.
Enjoy!
Love this tutorial?


How many squares would you recommend from a baby blanket?
Each square is about 5.5 inches. For a baby blanket I would suggest making 36 squares with 6 rows of 6.
This is absolutely gorgeous! It’s so striking even though in essence it’s pretty simple 🙂
I am just learning to crochet (will be 3 weeks on Friday) but I am addicted and loooooooving it! This is one of those I won’t book to do later, as soon as I’ve finished the projects I am currently on, I will undertake this beauty! I will have to sub the wool choices though
Thank you for this pattern! Regards from South Africa
I started mine last night I have 24 squares done so far…woo this is fun though. Thank you for.this free pattern it’s beautiful
Wow!! You are super fast – I am so jealous! I’m so happy you are enjoying the pattern! 😀
I love spots and dots so definately feel dotty enough (lol) to make this rug especially since I have lots of scraps. Just need to buy the main colour to bring it all together
Hi Brittnay! This will be my next project the Big Twist Value yarn is no longer available from JoAnns would other options from their line be comparable (ie big twist Sincerely). Thanks!
– Christina
Hi Christina! This yarn is still available at my local JoAnn store, but you could you use any worsted weight acrylic yarn for this. (Red Heart Yarn would be a very similar substitute and can be found at Walmart, Michaels, AC Moore, JoAnn’s and possibly other stores.)
Love this pattern. My son saw it while I was scrolling through Pinterest. We were looking for ideas for a full size afghan for his bed. I’m using Premier yarns Everyday Worsted and have made 9 of 143 squares so far. I’d love to send you a picture once its finished so you can see the colors we used. Is there an email I can send it to?
Hi Meaghan! I’m so glad you are enjoying the pattern!! Your afghan is going to be a beautiful work of art when you are done! And yes, I would love to see it!! My email is brittany@justbecrafty.com
Also, are you on instagram?? If so, I’d love to be friends! Tag me @justbecraftyblog and use the #justbecrafty so I can see your work! Happy crocheting to you!! 😀
hello brittany please can you upload the video to join the granny? thank you
I actually do not have a video on how to join the squares yet, but I do have it on my list!
I scanned down to were the messages stopped and mine are not there. Are you one of these people that if they do not like a post you delete it. I am not impressed. You need to double check your pattern. STILL CAN NOT DO IT YOUR WAY.
HI Sheila, please see my response below. I hope this helps.
I have 3 blog posts that discuss this project. Please see below.
1. Circle to Square Granny Square Tutorial – This post features a photo tutorial of the squares. https://justbcrafty.com/2017/04/circle-to-square-granny-square-tutorial.html
2. Circle to Square Granny Square Blanket Pattern – In this post I talk about joining method and show a schematic of my squares. https://justbcrafty.com/2017/09/circle-to-square-granny-square-blanket-pattern.html
3. Circle to Square Granny Square Video Tutorial – In this post I walk the reader through step by step how to make a square in VIDEO form. I also talk about other tips and tricks with this project. https://justbcrafty.com/2019/03/circle-to-square-granny-square-new-video-tutorial.html
I have not deleted any of your comments, though I do reserve the right to remove comments that do not fit within my policy. My policies can be read about here (https://justbcrafty.com/disclosure.). Your comments were left on posts 1 and 2 (referenced above).
I truly want to help! In one of your last comments on post #1 you indicated you had completed some squares. Where exactly are you having an issue? This pattern has been replicated by many others and is correct as written. Have you followed the photo tutorial as written? Have you followed the video tutorial? Please let me know exactly where you are having an issue so that I can help.
Did you single crochet through both loops or just the front loops to join your squares?
Hi Rhonda! I crocheted through both loops but you could totally do just the front loops. Either way would work well!
Thanks for the great, easy-to-follow pattern. I’m not sure how to post a picture comment (if you can) but I made a Christmas themed blanket by drawing myself out a pattern and making a variety of squares varying the outside and inside colors of each! It turned out awesome and will be a great gift for someone!
Oh that sounds lovely!! If you are on Instagram, share by tagging me @justbecraftyblog and using the hashtag #justbecrafty or feel free to send me via email! brittany@justbecrafty.com I’d love for you to share with me! 🙂
Happy Crocheting!
Hello, I have done all 60 squares and joined them. this is gorgeous. I am just confused about the borders with 3 HDC in the center….I do not really get it.
Hello ! I am at the end of making this blanket but so confused with this pattern. I cannot visualise it. what do you mean by center corner ?
ch 2 (does not count as a stitch), hdc in each stitch around the blanket, making 3 hdc’s in each center corner stitch. Join with the first stitch of the round using slip stitch.
Hi Eva! For Round 1 of the blanket border, you’ll be making 5 half double crochets in each of your blankets 4 corners.
For round 2, once you get to each corner you should see 5 stitches from the row below. You’ll be making 3 half double crochets in the center stitch of that 5 hdc corner from the row 1. So this would be the 3rd stitch in, out of the 5 hdc’s created in each corner from the previous row.
I hope this helps! This is just to keep your corners from curling inward so that your blanket lays nice and flat.
Thanks for the colorful idea. Since I am in pandemic quarantine, I am going to start on this afghan for myself.
I am going to use the colors of the rainbow as this will cheer me every time I look at it. People are using rainbows in their windows to cheer up everyone that looks at them.
So again, thanks for sharing this pattern and be safe, please.
This is so much fun and the squares crochet up very quickly. I can’t wait to finish mine. Thanks for producing such great and easy to follow tutorials
Hi there. Extremely well written pattern. I have now made several squares. I am an extremely experienced knitter and crocheter (40+ years). I am encountering an inaccuracy with the last round stitch count. If each edge contains 15 dc, x4 edges, that comes to 60dc. Add in the 4dc in each corner (4dc x 4 corners = 16dc). Total stitch count the way I add it up is 76 dc, not 72 as stated. Have I misinterpreted something?