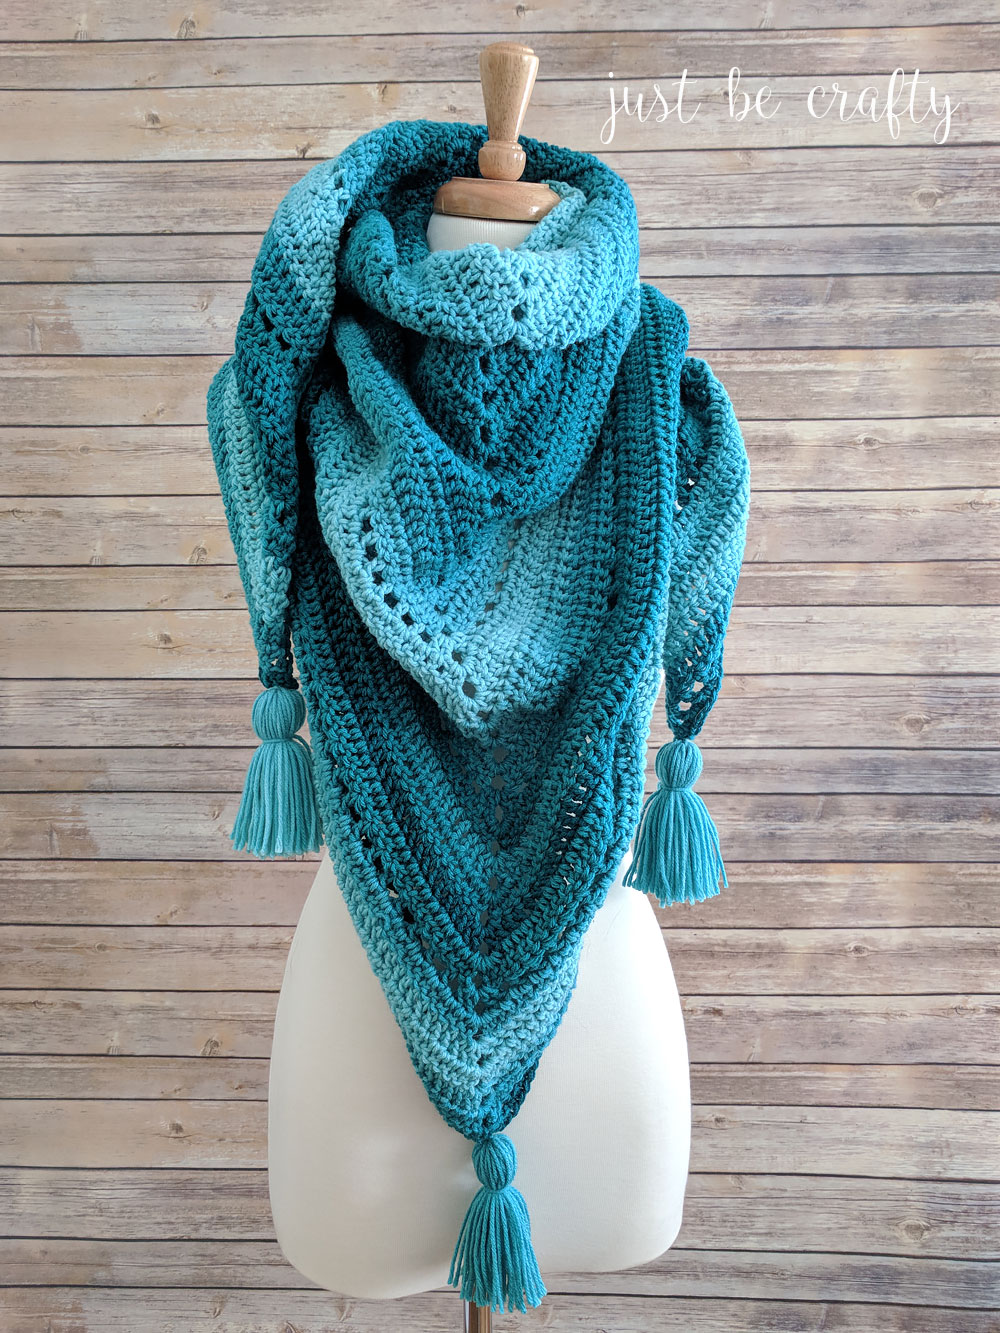
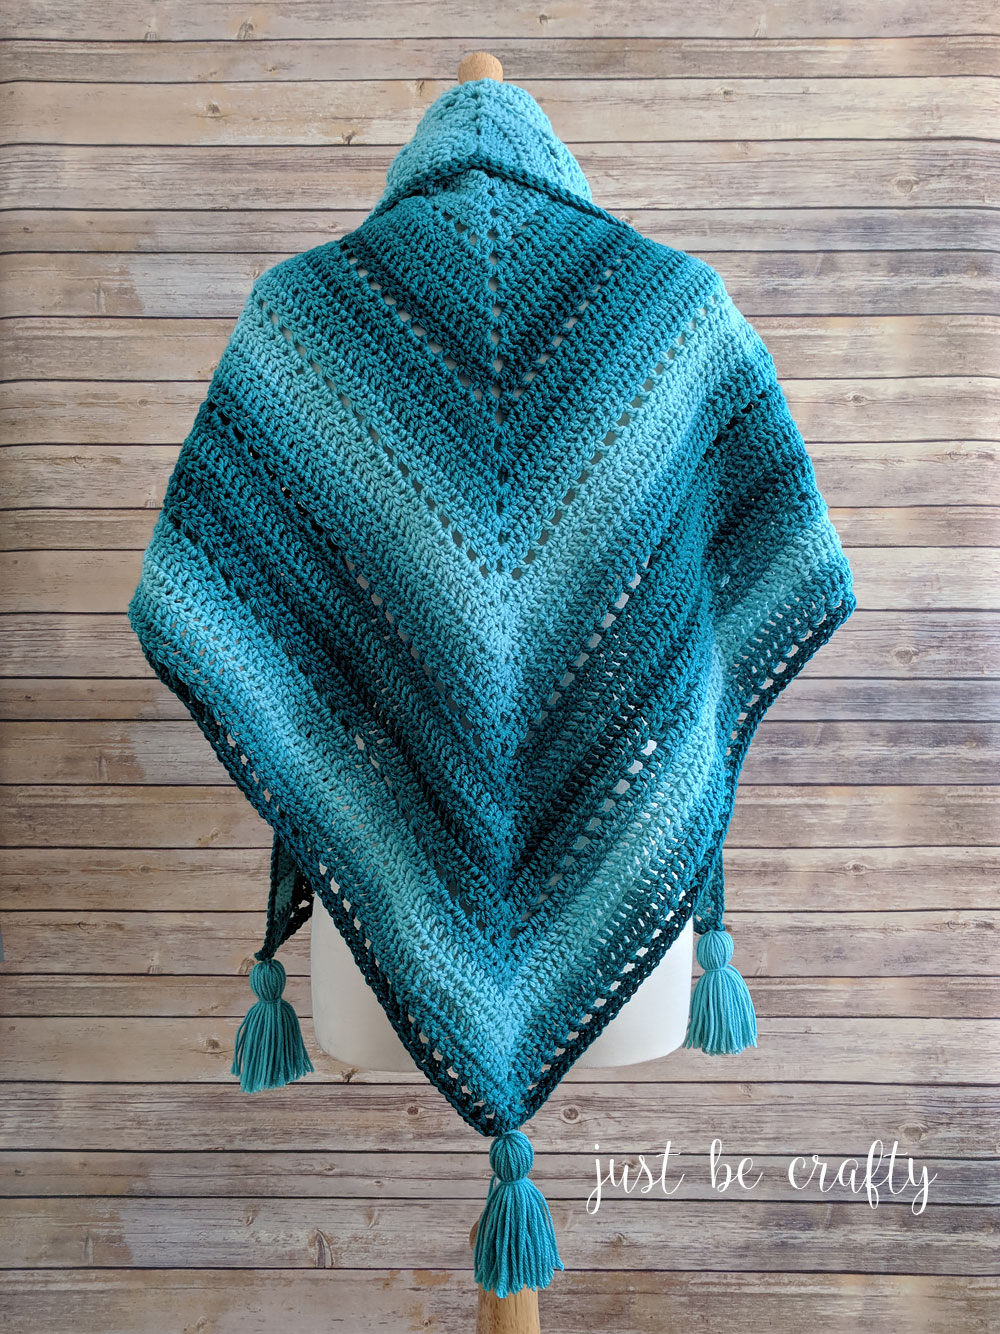
The Crochet Triangle Shawl is the perfect project to make as we transition into Spring. It’ll keep you warm when you feel a chill, but light enough to catch a nice warm breeze!
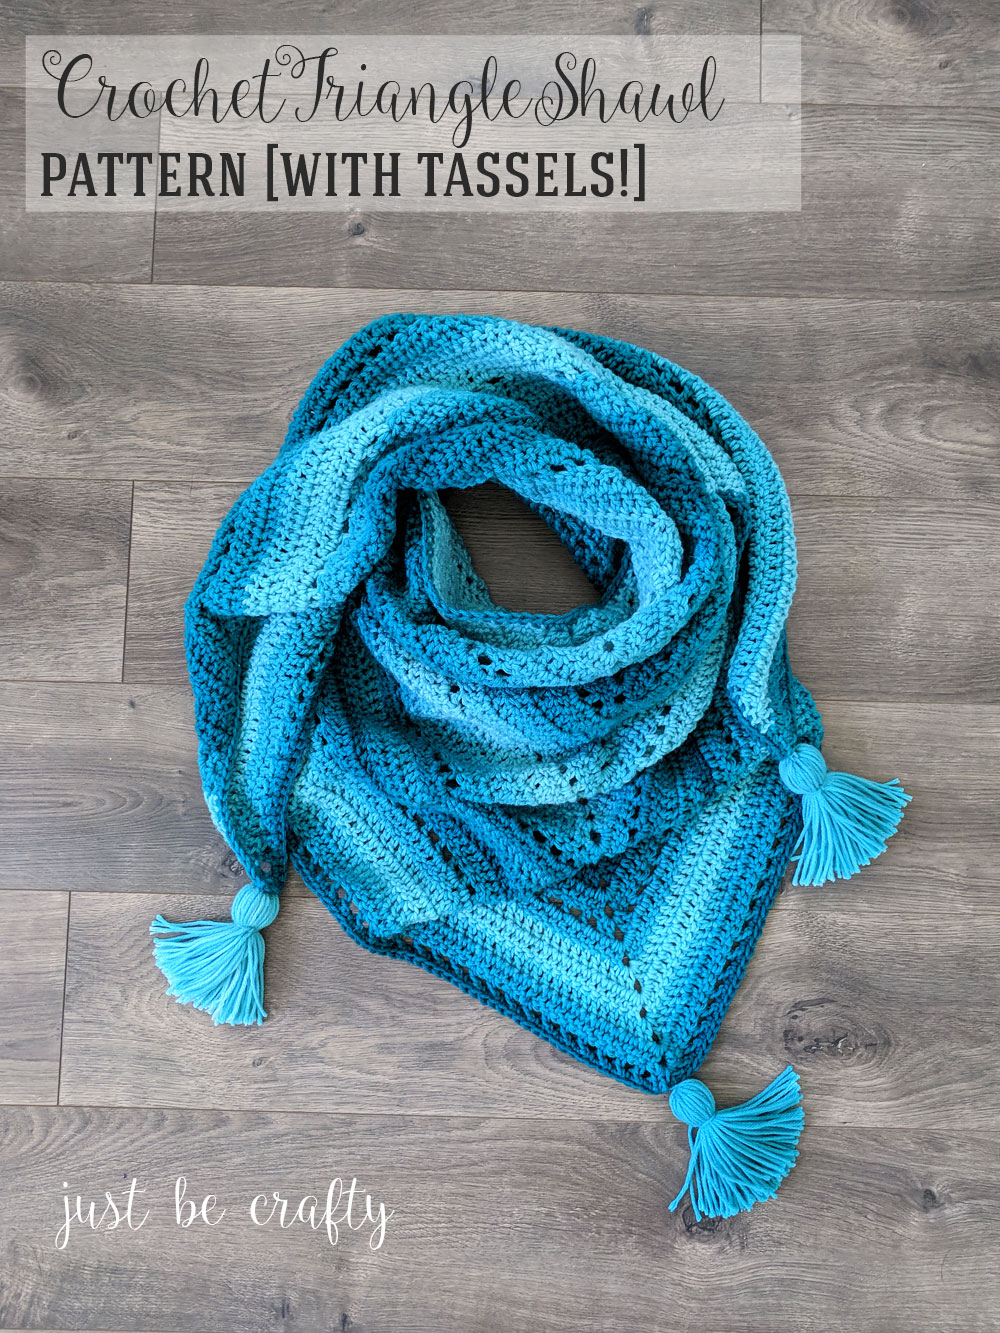
Today I am sharing the Crochet Triangle Shawl [with tassels!] Pattern! This simple and affordable project has the potential to be one of my top wardrobe staples as we transition from winter into spring and I think if you give it a try it will be one of your staples too!
Shawls are perfect for this time of year as you can easily wrap yourself up when you feel a chill and loosen it up a bit to fall around your arms and shoulders if you get too hot.
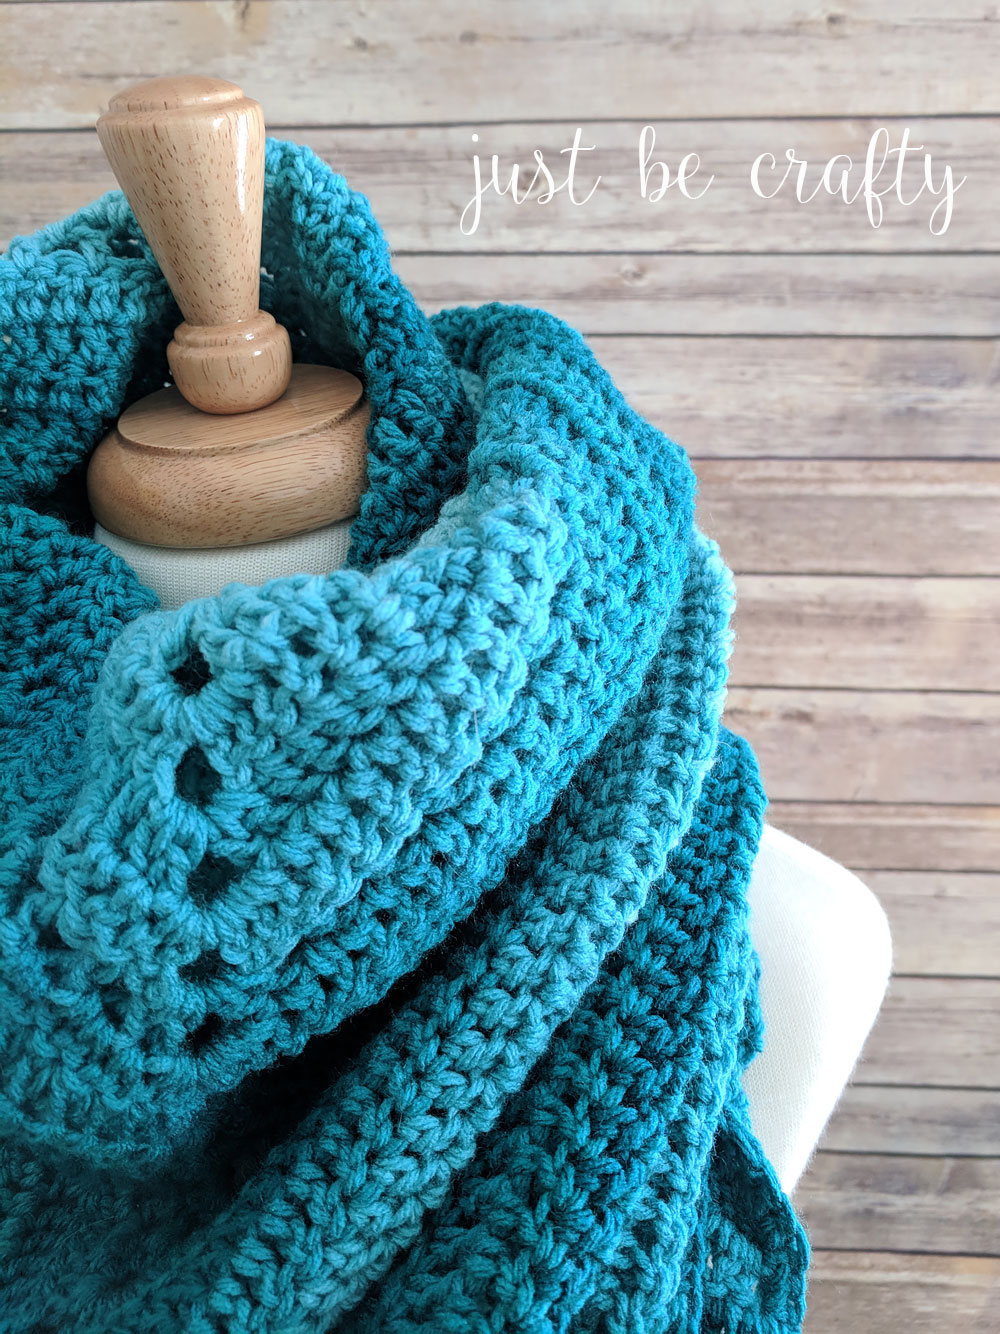
This pattern features Red Heart Ombre and I have to say I really LOVE how it turned out. The ombre effect gives off a beautiful monochromatic striping so you get gorgeous subtle color changes without having to change yarn colors and weave in any extra ends! (Umm… sign me up!)
This was my first time using Red Heart Ombre yarn and I really enjoyed it. I enjoyed it so much that I actually have another crochet scarf pattern in the works that will feature this yarn as well! So yes, Ombre is a keeper! 🙂
If you’d like to give this pattern a try for yourself, keep on scrolling!


This post contains affiliate links. For more information please see my disclosures page.
Crochet Triangle Shawl Pattern
Materials
- 2 skeins Red Heart Super Saver Ombre (Finished shawl pictured in Deep Teal; tutorial shawl pictured in Spearmint)
- 5.5mm crochet hook
- Sharp scissors (You want really sharp scissors for your tassels! So be careful!)
- 3″ by 4.5″ cut piece of cardboard or sturdy posterboard
- Yarn needle
Key
- ch – chain
- dc – double crochet
- sk – skip
- sl st – slip stitch
- sp – space
- st – stitch
Gauge
- 4 inches is equal to approximately 12 dc by 7 rows
Finished Measurement
- One size fits all
- Approximately 63 inches wide (along top edge) with a 39 inch depth (from middle top edge to triangular peak)
- Sizing notes
- For a larger size, purchase additional skeins and complete repeats until you reach your your desired fit.
- For a smaller size, make less repeats than what the pattern calls for. Make repeats until you reach your desired fit.
Note
- The starting ch 3 of each row will count as a stitch, unless otherwise noted.
Pattern
Row 1: In magic ring, ch 3 (counts as a dc) and make 5 dc, ch 2, 6 dc; turn (12)
You will be working back and forth in rows.
Row 2: Ch 3, dc in same st as ch 3, dc in each st up to ch 2 sp, make 2 dc, ch 2, 2 dc in ch sp, dc to end making 2 dc in the 3rd ch of the ch 3 from previous row; turn (18)
Rows 3 – 5: Repeat Row 2. (Please note that as you crochet each row, the stitch count will increase. So after completing Row 3, you will end with 24 stitches, and so on.)
Row 6: Ch 3, dc in same st as ch 3, ch 1, sk a st, *dc, ch1, sk a st; repeat from * until you reach ch 2 sp (you should end w/ a ch 1, sk a stitch when you arrive at the ch 2 sp); 2 dc, ch 2, 2 dc in ch 2 sp, ch 1, sk a st, * dc, ch 1, sk a st; repeat from * to end of row, make 2 dc in 3rd ch of ch 3 from previous row; turn.
Row 7: Ch 3, dc in same st as ch 3, dc in ch sp, dc in dc, continue making dc’s in each stitch and ch 1 sp until you reach the center ch 2 sp, 2 dc, ch 2, 2 dc in ch 2 sp, continue making dc’s until end of row, making 2 dc’s in the 3rd ch of the ch 3 from previous row; turn.
Rows 8 – 11: Repeat Row 2
Row 12: Repeat Row 6
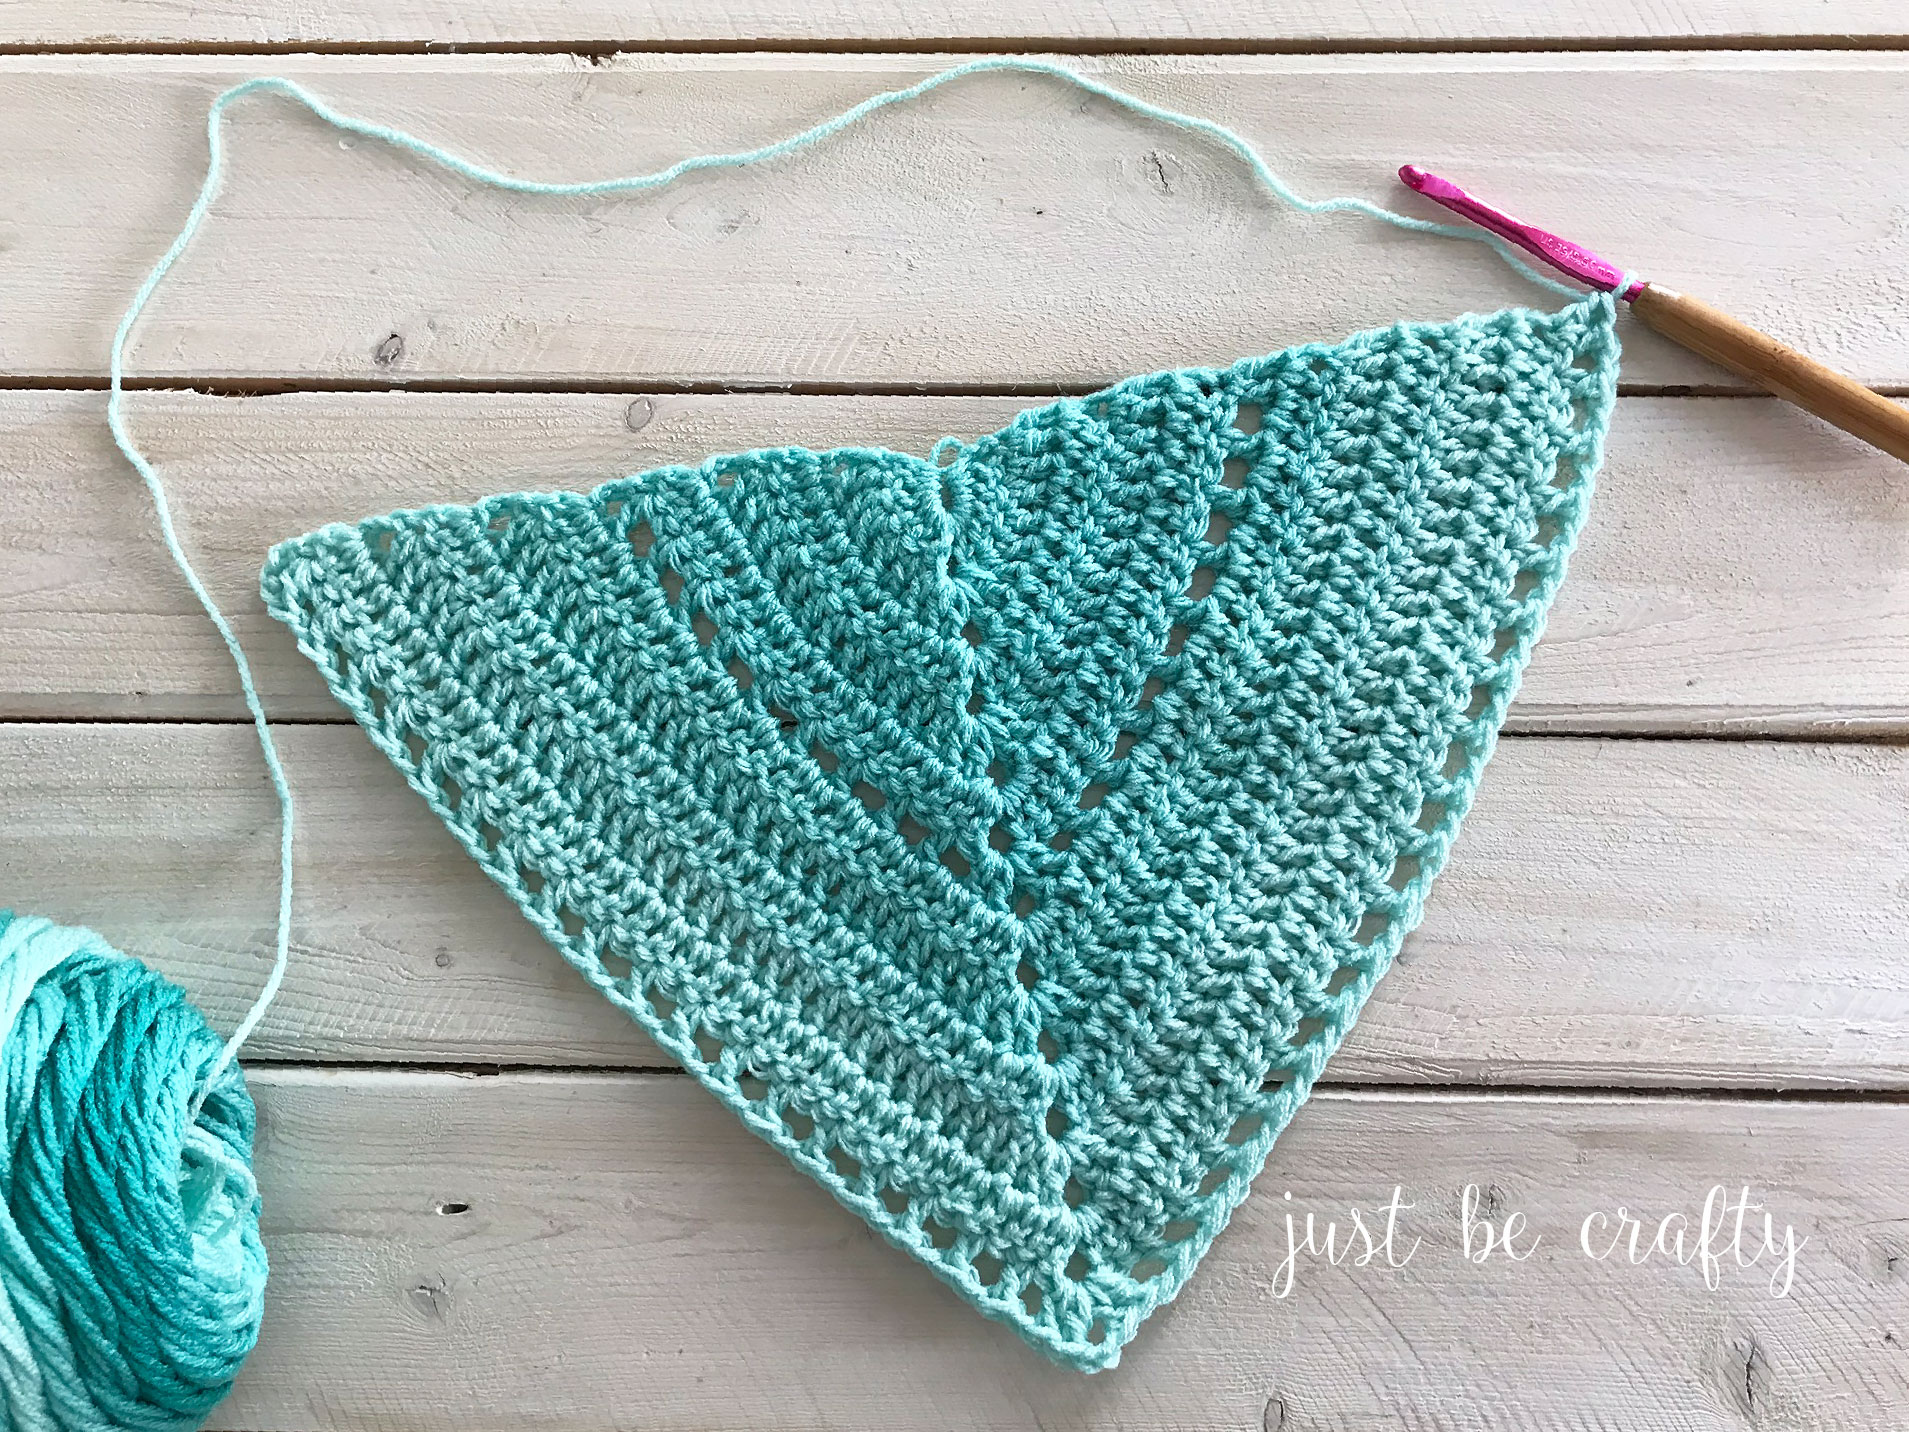
Repeat Repeat Rows 7 – 12, six times.
Border Round
Lay piece flat in front of you with whichever side you would like to be the front. Position so that the flat edge is at the top, and the triangular portion is towards the bottom.
Start at the top right corner. (If you are not already at the top right corner, cut yarn and secure. Attach yarn at top right corner.)
Ch 1, (ch 1 does not count as st) make 3 sc in corner stitch that you are currently in and sc across top edge, making 2 sc per row; in top center stitch make 1 dc; make 3 sc in second corner. I had approximately 187 stitches (not counting my corners) along my top edge – this doesn’t have to perfect! Sc in each st along triangular bottom, making 3 sc in the center ch 2 sp. Join with 1st sc of round using a sl st.
Cut yarn, weave in ends.
Yarn Tassel Tutorial [make 3]
See photo tutorial below!
See full size image here.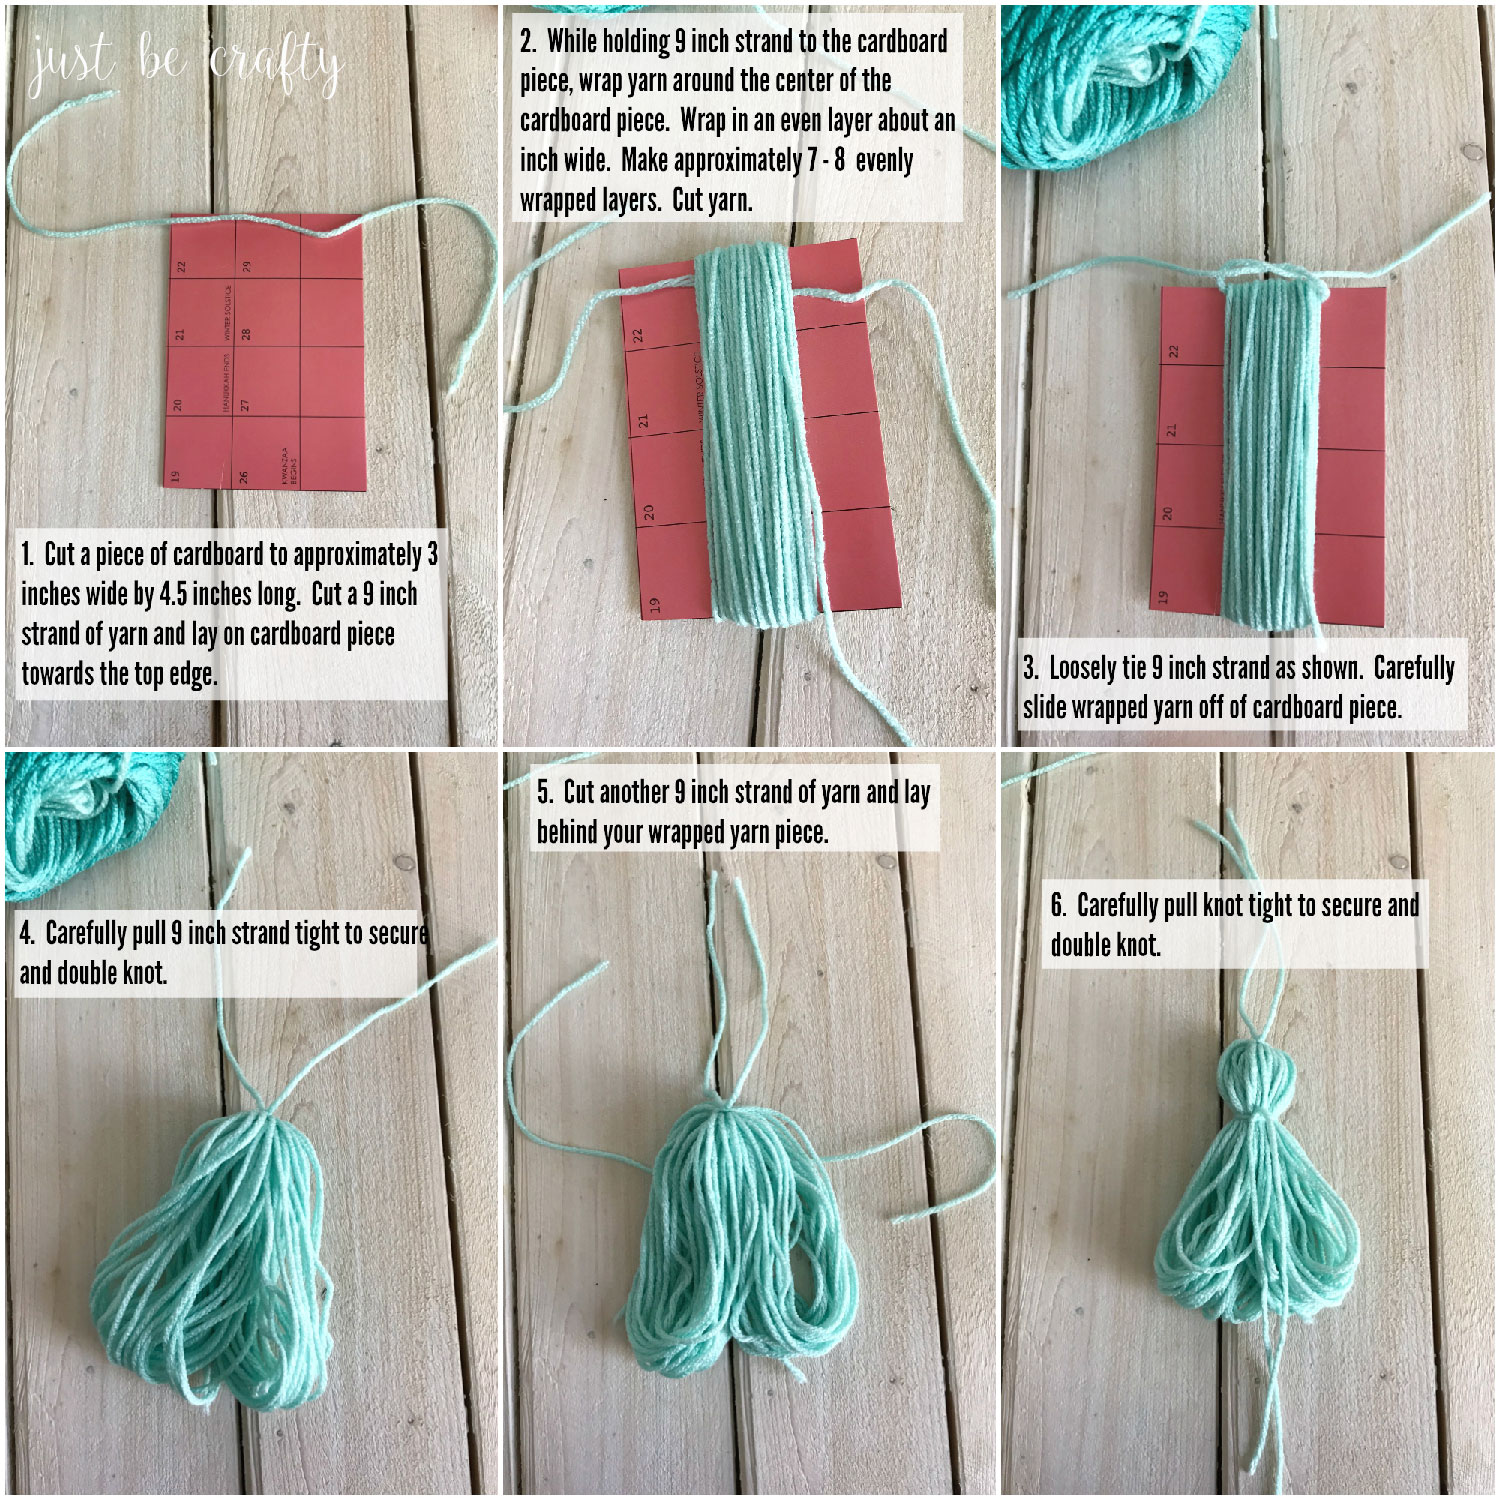

Tie tassels to each corner of the scarf and secure. Weave in any ends.


Enjoy!


Where can I download this pattern from.
Thanks mick
Hi Mick! There is currently not a downloadable version of this, but I plan to make it available soon.
Hi. There seems to be an error in row 7. It says to ch3 and DC in same st as Ch3 then DC into the ch space but that isn’t a ch space but a DC then the ch sp. Hopefully someone can clarify before I proceed.
Thank you for the well explained pattern.
i made one for my grandma 🙂
Hello- I am trying this as my first triangular shaped shawl and I was wondering about stitch counts for each row. Do you have that available? Mines turning into more of a kit shape and am wondering if I have been missing some stitches at the ends of each row… Thank you!
Hi Nikki! If I remember correctly – mine looked more like a kite shape for a while too until it got much bigger. Row 2 ends with 18 stitches, and in each row you are adding 6 stitches.
Thanks for this count info. Perhaps I can find where I’m either adding a stitch or need to add.
I’ve been crocheting for over 40 years and this count is trying to defeat me ROFL
I’m making my first one and noticed that I will be off one dc. Stitch count would be helpful
It’s a simple pattern and yet I get a stitch off. Ugh ?
I know this is very late lol – but I’m just finding this pattern now 🙂
I think the count gets off because of row 7. There are technically two stitches in the first stitch below, but row 7 says to do two in the first, then skip a stitch (dc into the ch sp) – BUT.. that’s ignoring the second stitch from the row below. Thus, off two stitches total each time we do a row 7. So I’ve been placing a dc into that second stitch, THEN ch1 sk1 like the pattern calls for.
What ply wool is this equivalent to in Australia. In the blog it says uts 4ply but in Australia 4 ply is mainly used for baby clothes and in the photos the yarn looks a lot thicker.
Hi Lorraine! I am not sure of ply equivalents between the US and Australia but if you check out the materials section of the pattern I share a link to the yarn I used. That link should show all the information about the weight and thickness of the yarn. It’s 100% acrylic and worsted weight. I hope this helps!
Greetings from Ontario Canada,
I think some confusion re stitch count may happen w row 7.
It doesn’t read clearly to dc in first dc, then the space….after the ch 3, dc in same st as ch 3 start
Otherwise u end up w an extra stitch on opposite side
Karen
After a closer look on the picture, I totally agree with you, there is a dc in the second (and second to last) dc of row 6, so that the row ends with 48 DC + ch2 space. I’m happy to notice it before I start, thanks !
I’ve finally done crocheting it! It turn out big on me but I still love it! I’m using cotton yarns with 5.5mm hook. Next time I will use a different yarns and hook. Btw it’s my first crochet shawl that I crochet for myself. Also your pattern is easy to follow! Thanks for the pattern.
Please help! If I’m understanding correctly, when starting row 7 you are saying to dc in same stitch as chain 3, then dc in ch1 space…but…there is another dc to dc in from row 6’s 2 dc in chain 3……
thanks for sharing this pattern! I especially love your chunky cowl crochet pattern. I love cowls as you don’t have to worry about them slipping off my neck or tying them. But I will try this pattern for holiday gifts. thanks again for sharing!
Hi. I’d love a video on this. Just to start. I see the one for the magic ring, but my o my, a video for a project makes it that much better and easier to follow for us newer crocheters! ?
Yes, I believe clarification of a few things in this pattern would be very helpful to people.
I figured it out and it was super easy!!!!! Now I’m making more in other colors! Thank you!
Tara, would you please share with the rest of us who are struggling with the count since you figured it out. It is most appreciated. Thanks!
Sorry, I never saw this before. I’d love to explain, but I’m not nearly good at that. I’m still rather a newbie. I’d just say keep trying at it!! I found no mistakes in the instructions once I got the hang of it. I hope it goes well for you!!:)
Hi, This is really beautiful. Do you sell these?
Thanks 🙂
Hi Shama! Thank you so much, you are very kind! I am not selling finished items at this time, but I do however give permission for those who make any items from my patterns to sell their finished product.
Hi! I’d love to make this for you. I would charge the materials and my time. Let me know if you would like me to.
Hi Sharma, I also love this pattern. I just now found it and tried it. I do in fact knit and crochet items for sale. I am a senior citizen and work with my hands to supplement my social security.
My email is yorkbeverly11@ Gmail.com you can contact me anytime if you wish homemade items for yourself or gifts.
Hi please can someone help me?
Row 2 says DC up to ch 2 space.
Then it says make 2 dc – but where? Followed by ch 2 and THEN 2 dc in ch sp.
I cannot fathom it sorry!!
Hi Kerri! In Row 2, you will be making 2 double crochet, followed by a chain 2, and then 2 more double crochet all in that chain 2 space referenced in the pattern. This is the center “peek” of your shawl.
This is a beautiful pattern. I would like to make it in a #5 chunky yarn. Approximately how many yards would I need? Thank you.
Hi Christi! Thank you very much! The shawl uses up almost exactly the two full skeins of Red Heart Ombre (which is a 4-medium weight yarn) and calculates to about 964 yards total. It’s hard to say how much exactly you would need without making it myself in 5-bulky, but using a larger yarn will make the shawl larger in size. I would assume you could get away with using the same yardage, but again I can’t be sure as I haven’t tried this myself.
Would you know off hand how big this will be with just one skein?
Thanks a bunch!!
I absolutely love this pattern. It’s easy and works up fast. Is there a way to buy a printed copy of this? I hate staring at my screen and can’t make notes on my screen lol
I am about 1/4 done and I am loving this pattern , I used mandela ombre and its really turning out lovely! Thanks for the pattern!
I love the shawl and not having any problems with it , but cannot understand the border for the life of me lol , any suggestions
Hi Vivian – I’m presuming you may be confused with the instruction “making 2 sc per row”? – if you lay the shawl as instructed, on the right side facing and the point at the bottom you will start in the right hand corner (connecting your yarn if you ended somewhere else), and ch1; do 3sc in that same stitch. You will continue across the top of the shawl making a sc in each stitch – note: because it’s a triangle, the top of the shawl is actually made up of ‘rows 7-12 pattern repeat’ or 6 rows of 2 per pattern repeat (you have to look at it sideways and you see how every 2 rows look different). So working a sc in each stitch is actually working 2 sc per row. Don’t forget though you must only work 1sc in that center stitch (the one you began the shawl with). Once you get to the top left corner work 3sc in that st and continue working a sc in each st going down the left side to the point. I hope this helps as I tried to explain it visually. Hopefully Brittany can explain better.
Can’t wait to start it. You have made it so simple to follow . I have crocheted for some time but I am 68 and starting to be forgetful so this is perfect. Thank you
Happy crocheting to you!