
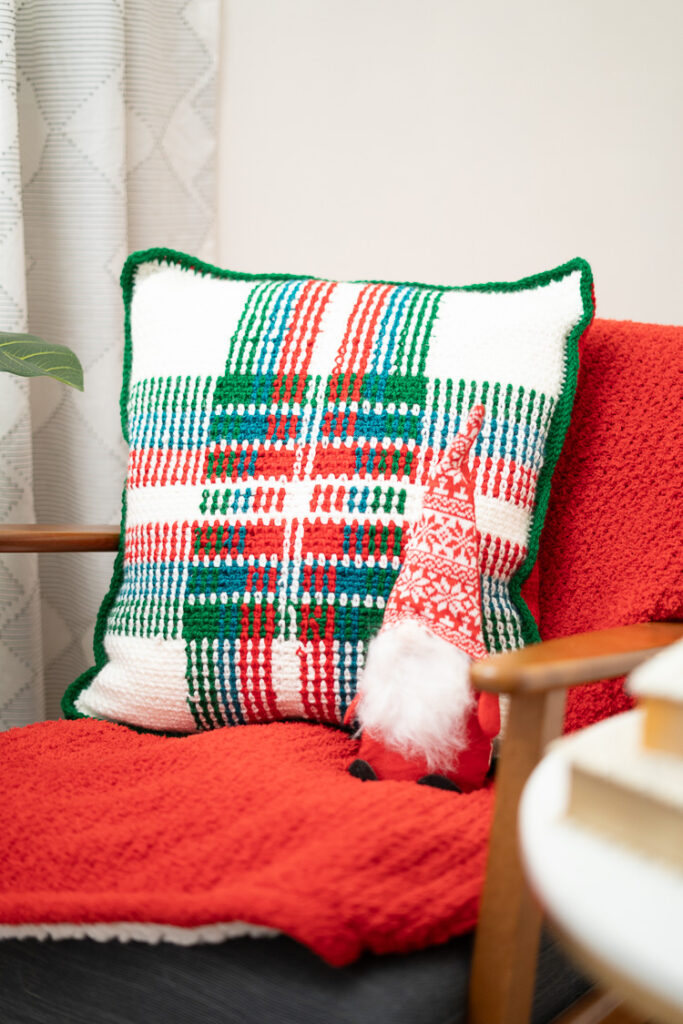
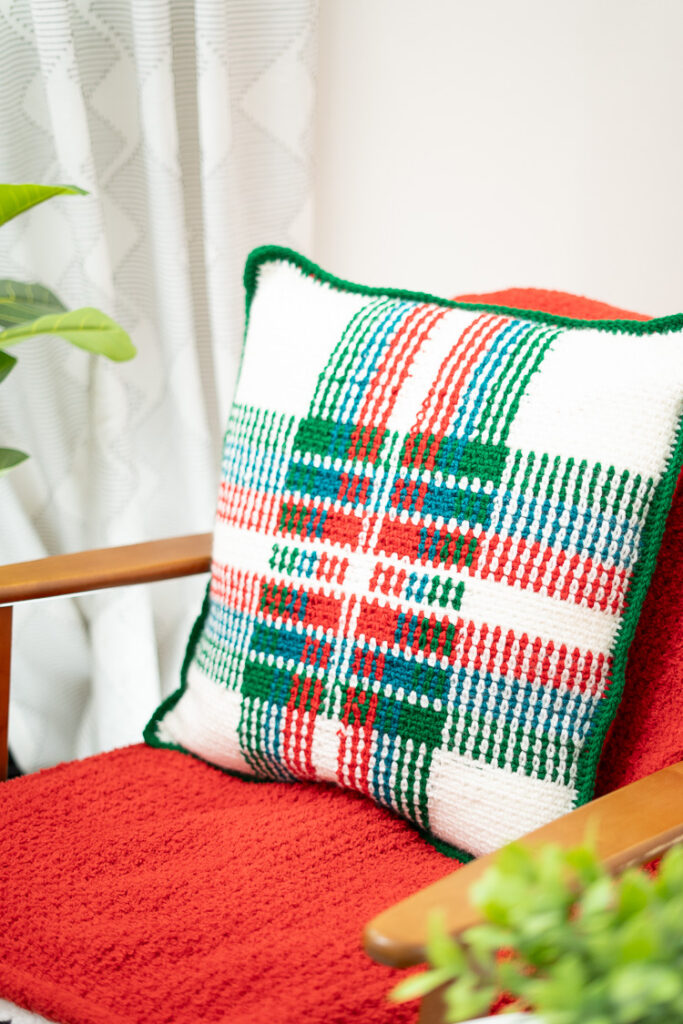
Get festive this holiday season with the Crochet Holiday Plaid Pillow! Make one for an accent chair or crochet a set of two for the couch, either way this pillow will give your home cozy holiday vibes.
Techniques used in this pattern
The Crochet Holiday Plaid Pillow Pattern utilizes the following skills:
- chaining
- single crochet
- double crochet
- magic knot
- slip stitch
- weaving in ends
Once you’ve mastered these above skills, I’m confident you can tackle this pattern.
Video help
I’ve created a video tutorial to assist you in making the Crochet Holiday Plaid Pillow. To view, the tutorial simply click on the play button below!

Crochet Holiday Plaid Pillow – Written Pattern
Purchase the ad-free printable PDF pattern here!
OR… gain instant access to this pattern PDF as well as my entire PDF pattern library! Click here for more information.
*This post may contain affiliate links. Please see my disclosures page for more information.
All patterns on this blog are for personal use only and may not be redistributed, copied, blogged, or sold as your own. You may sell items made by my patterns as long as the item is made by you personally (not mass produced) and that proper credit is given back to me and my site, Just Be Crafty. You may not use my photos for your online sales listings.
Materials
- Suggested Yarn
- Red Heart Super Saver Jumbo (744 yds, 681 m, 396 g) 100% acrylic, medium-4 weight
- MC – 1 ball Soft White
- CC1 – 1 ball Cherry Red
- Red Heart Super Saver (364 yds, 333 m, 198 g) 100% acrylic, medium-4 weight
- CC2 – 1 ball Real Teal
- CC3 – 1 ball Paddy Green
- Red Heart Super Saver Jumbo (744 yds, 681 m, 396 g) 100% acrylic, medium-4 weight
- Suggested Hook
- 5.5 mm (I use this set)
- Notions
- Scissors
- Yarn Needle
- 9 Bobbins
- Extras
- 20 in. x 20 in. (51 cm x 51 cm) pillow form (I used this one)
Gauge
4 in. (10 cm) = 9 stitches in moss stitch (sc + ch 1) by 16 rows
Finished Measurements
This pattern makes a pillow cover for a 20 in. x 20 in. (51 cm x 51 cm) pillow form.
Abbreviations
- ch chain
- dc double crochet
- sc single crochet
- sl st slip stitch
- st stitch
Notes
CONSTRUCTION
The pillow is made up of two panels (one front panel and one back panel). Both panels are worked flat using the moss stitch. For the front panel you will follow the color chart to create the plaid color work design. The back panel will be worked in one solid color.
COLOR WORK
To complete the plaid colorwork on the front panel, you will follow the color work chart. Each section of color will have its own bobbin of corresponding color. For example, there are two sections of green, you will be working with two bobbins of green as you work the chart. All color changes will be worked on the wrong side of the panel. I‘ve created a video tutorial (linked on page 3) to help you with color transitions as well as tips for managing your bobbins.
SPECIAL TECHNIQUES
Magic knot: In order to refill your bobbin as it runs out of yarn I suggest using the magic knot. Not only will this help you later with weaving in ends, but it keeps the back of your work tidier and makes working the project a little easier. Of course, this technique is optional, and you can choose to weave in your ends as you normally would, totally up to you!
Working around the foundation chain: For Row 1, you will be instructed to crochet around the foundation chain instead of into each chain.
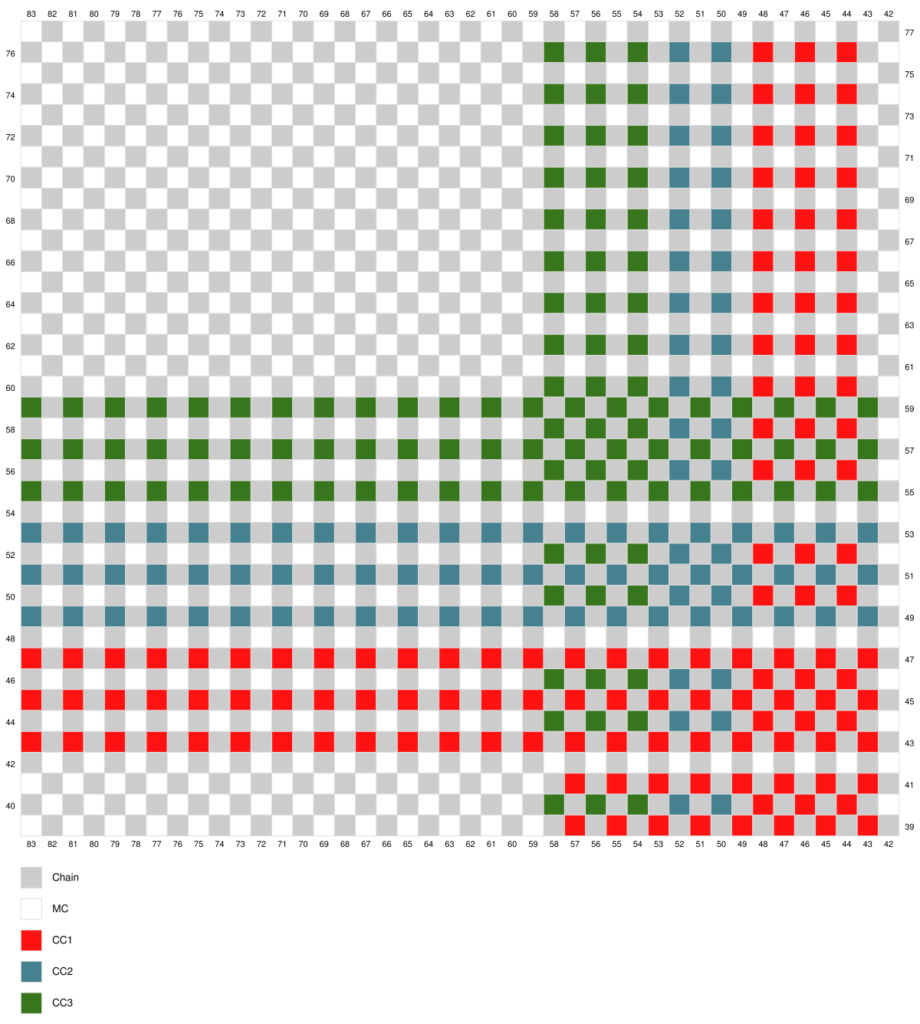
COLOR WORK CHARTS
Follow charts 1 – 4 to complete the color work. The vertical numbers represent rows, while the horizontal numbers represent stitches. For example, in order to complete Row 1 of the chart you will need to follow Row 1 on Chart 1, and then move on to Chart 2, to complete Row 1. Cross out each row as you complete it to keep your place. Gray squares represent the chain 1’s.
Chart 1

Chart 2
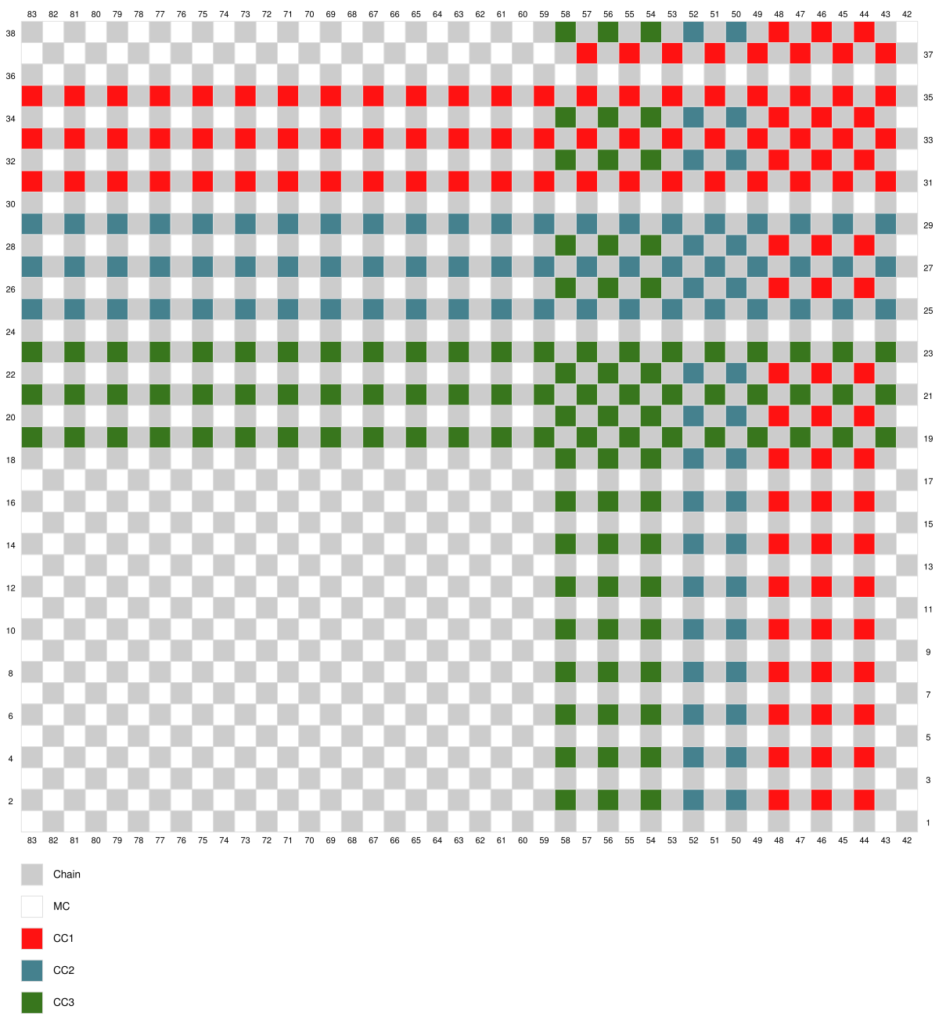
Chart 3

Chart 4
Crochet Holiday Plaid Pillow Pattern starts here:
Read pattern in it’s entirety before beginning.
MAIN STITCH
Ch 100 (make a chain that is about 25 inches long)
Row 1: starting in the 4th ch from hook, make a sc, *ch 1, make a single crochet around the foundation chain. Repeat from * until you have 43 sc stitches, turn.
Row 2: ch 2, sc in the next ch 1 sp, *ch 1, sc in next ch 1 sp; repeat from * to end of row; last sc of row should be placed in the starting ch sp from previous row; turn.
Repeat ROW 2 until piece has reach about 20″ in length OR until you’ve completed your color work chart. Do not cut yarn.
You will now work in the round.
BORDER
Make 2 more sc st into last st of the row you just completed. Work sc st evenly along each side edge making 3 sc in each corner stitch as you get to them. Join end of round with a sl st into the 1st st of the round.
Fasten off.
Front Panel (Make 1)
Follow instructions for MAIN STITCH, and at the SAME TIME begin color work chart.
Follow instructions for BORDER.
Back Panel (Make 1)
Follow instructions for MAIN STITCH using CC1.
Follow instructions for BORDER.
ASSEMBLY
Take back panel and lay flat in front of you, with the wrong side face up, and starting edge positioned towards the bottom.
Grab front panel and place on top of back panel with the right side face up, and starting edge positioned towards the bottom.
Round 1: Line up your edge stitches, and insert hook into corner stitch catching both panels, and attach CC. ch3 (counts as a dc) and make 2 more dc in same corner stitch. (as you work, tuck leftover foundation chains inside the pillow case)
Make sure to line up your stitches, join the panels by dc into each stitch catching both layers, once you reach next corner, place 3 dc in the corner stitch, and continue working in dc around the remaining sides. Make 3 dc in each corner st as you come to them. Keep working in this fashion until only the bottom edge remains open. Slide in pillow form and continue to dc the edges together to close up the pillow; end round by slip stitching into the top of the starting ch of the round.
Round 2: sl st into each st around. Fasten off. Weave in any remaining ends.
Enjoy!

Love this pattern?