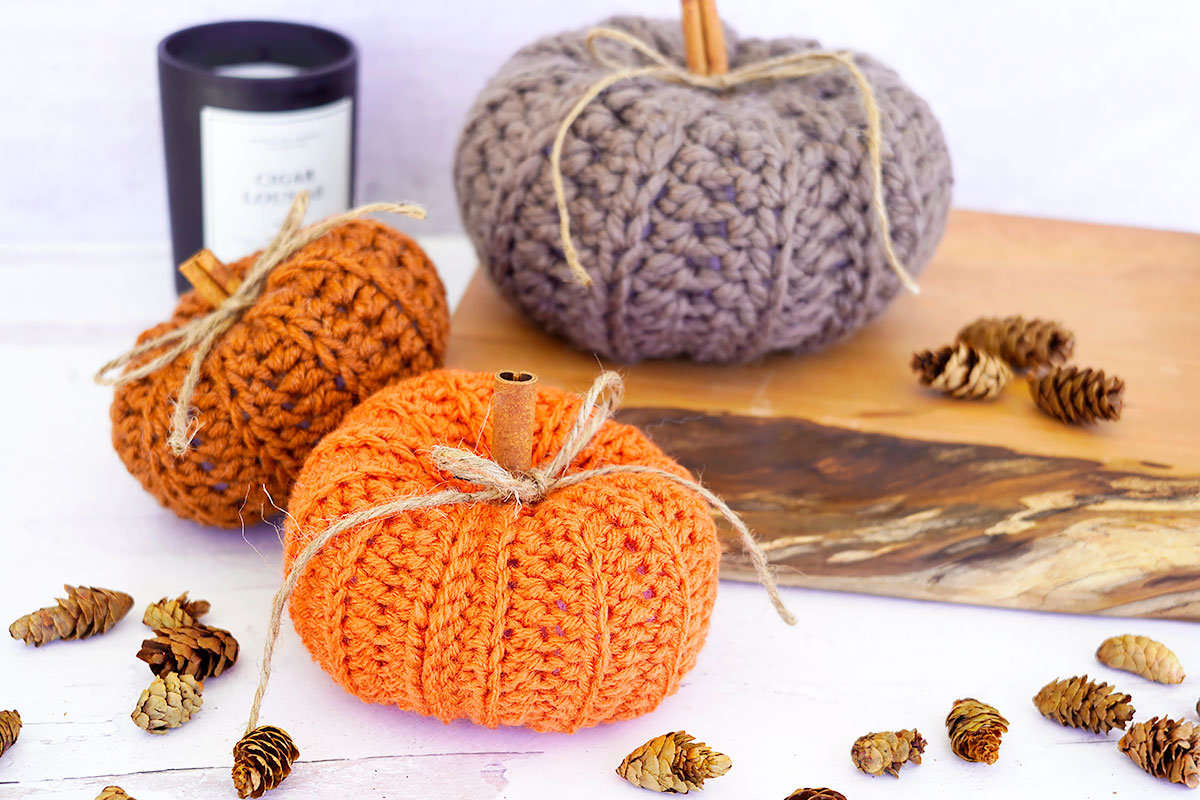
Fall is just around the corner, and what better way to welcome the season than by crocheting your own pumpkins? This fun crochet pumpkin pattern is perfect for decorating your home, making table centerpieces, or even gifting to friends and family. In this tutorial, I’ll show you how to crochet a pumpkin in three different sizes: classic (15″ circumference), bulky (14″ circumference), and chunky (21″ circumference).
How to Crochet a Pumpkin for Beginners: A pattern overview:
Crocheting a pumpkins is a great project for beginners, especially since it involves a basic stitch and simple seaming and cinching techniques. First, let’s go over the process step-by-step:
- Start with a Chain: You’ll begin by creating a foundation chain. The foundation chain determines the (approximate) height of your pumpkin.
- Work in Rows: After your foundation chain, you will work in rows of half-double crochet (hdc) stitches. This will form a rectangle, which you’ll later shape into the pumpkin. Depending on the size of your pumpkin, the number of rows will vary:
- Sew the Sides: Once you’ve completed your rows, fold the rectangle in half and crochet the sides together using slip stitch.
- Form the Pumpkin: To form the pumpkin, you’ll begin by cinching the bottom closed.
- Stuff and Close: Fill the pumpkin with polyfill stuffing to your desired fullness. Then, cinch the top closed.
- Add some shaping: To add shaping to the pumpkin, after its been assembled, we’ll sort of squish the top and bottom together to make a squat look, and use the tail sort to keep that form in place.
For the full written crochet pumpkin pattern and video tutorial, keep scrolling!

If Customizing, How to Know What Size Crochet Hook to Use
Playing with hook size can be super fun for this project. The hook size will directly impact the pumpkin’s texture, size, and how tightly the stitches are worked. Here’s a simple guide to help you choose the right hook for your yarn and pumpkin size:
- Yarn Type: For this pattern, it’s recommended to use worsted-weight yarn, a bulky yarn, or a super bulky yarn depending on the style of pumpkin you’re going for.
- For a tighter, more structured pumpkin, opt for worsted-weight yarn.
- For a chunkier, squishier pumpkin, use a bulkier yarn.
- Hook Size Guide:
- For worsted-weight yarn, use a 5.5 mm crochet hook.
- For bulky yarn, go for a 6.5 mm crochet hook.
- For super bulky yarn, I suggest using a 9 mm hook.
In addition, adjusting for tension is important. If you crochet more loosely, you may need to size down your hook to maintain the right structure for your pumpkin. Likewise, if you crochet tightly, consider going up a hook size. Therefore, it’s a good idea to test a small swatch of your stitches before proceeding with the full project.
What Do You Need to Crochet a Pumpkin?
Before starting, make sure you have all the materials ready:
- Yarn: Worsted-weight, bulky, and super bulky yarns in your preferred pumpkin color (orange, white, or any fall-themed color).
- Crochet Hook: Size 5.5 mm, 6.5 mm, or 9 mm depending on your yarn.
- Polyfill Stuffing: To give your pumpkin its shape and fullness.
- Yarn Needle: For sewing the seams and weaving in the ends.
- Scissors: To cut your yarn.
In addition, you can add embellishments like a cinnamon stick stem or fabric leaves to personalize your pumpkin!
How Do You Crochet a Different Size Pumpkin?
The beauty of this pattern is that it’s incredibly easy to customize to any size you prefer. In fact, we are essentially creating a crocheted rectangle that is twice as long as it is wide. For example, if you start with a foundation chain that’s about 6 inches wide, the width of your crocheted piece will be about 6-7 inches wide. Therefore, you’ll want to continue crocheting until the length is about 12-14 inches long.
If you want to make a much larger or smaller pumpkin, you can simply adjust the starting chain length and row count. Remember, more rows and a longer chain will result in a larger pumpkin!
How to Crochet Stems for Pumpkins?
No pumpkin is complete without a stem. Personally, I prefer to use a cinnamon stick or twig from outside to give a more rustic and natural look for my crochet pumpkins. However, you can crochet a simple stem instead! Here’s a quick and easy way to make a crocheted pumpkin stem:
- Create a Magic Ring: Start by making a magic ring. If you’re not familiar with this technique, you can start by chaining 2 and working your stitches into the second chain from the hook.
- Work in Single Crochet: Work 6 single crochets into the magic ring. Pull the ring tight to close the center.
- Increase the Stem’s Width: For the next round, work 2 single crochets into each stitch (12 sc total).
- Continue in Single Crochet: Work in continuous rounds of single crochet for about 5-6 rows, or until your stem reaches your desired length.
- Finish the Stem: Fasten off and leave a long tail to sew the stem onto the top of the pumpkin.
Furthermore, you can make your stem short and squat or tall and thin depending on your preference. Additionally, consider crocheting the stem in brown, green, or other contrasting colors to make it stand out!
Crochet Pumpkin Pattern Details
The Crochet Pumpkin Pattern Tutorial is geared for intermediate beginners and higher and assumes you already know the following skills:
- chaining
- half double crochet
- slip stitch
That’s it! Once you’ve mastered those skills, I’m confident you can tackle this pattern!
Below you’ll find both left and right handed tutorials!
Right-Handed Crochet Pumpkin Pattern Video Tutorial
Left-Handed Crochet Pumpkin Pattern Video Tutorial
Crochet Pumpkin Pattern – starts here
This pumpkin project is not a toy. Due to small pieces, children should be supervised at all times if/when around this project and/or finished piece.
Purchase the ad-free printable PDF pattern here!
OR… gain instant access to this pattern PDF as well as my entire PDF pattern library! Click here for more information.
*This post may contain affiliate links. Please see my disclosures page for more information.
All patterns on this blog are for personal use only and may not be redistributed, copied, blogged, or sold as your own. You may sell items made by my patterns as long as the item is made by you personally (not mass produced) and that proper credit is given back to me and my site, Just Be Crafty. You may not use my photos for your online sales listings.
For more information please see my Pattern Permissions Page.
Materials
- Yarn & Hooks
- Classic Pumpkin (#4 medium weight yarn) – SHOWN IN VIDEO TUTORIAL
- 1 ball Red Heart Super Saver in color Carrot
- 5.5 mm hook – I use this set
- Bulky Pumpkin (#5 bulky weight yarn)
- 1 Ball Lion Brand Color Made Easy in color Kombucha
- 6.5 mm hook – I use this set
- Chunky Pumpkin (#6 super bulky weight yarn)
- 1 Ball Lion Brand Wool-ease Thick and Quick in color Taupe
- 9 mm hook – I use this set
- Classic Pumpkin (#4 medium weight yarn) – SHOWN IN VIDEO TUTORIAL
- Fiber Fill (a few large handfuls per pumpkin)
- Ruler – similar
- Yarn Needle
- Scissors
- Cinnamon Sticks
- Twine – similar (I got mine at the Dollar Store)
- Glue Gun (optional)
Pattern Notes
- Pumpkins will be referred to as follows:
- Classic Pumpkin – uses #4 medium weight yarn
- Bulky Pumpkin – uses #5 bulk weight yarn
- Chunky Pumpkin – uses #6 super bulky weight yarn
- Pumpkins can be made in any size you like. Use below pumpkin sizing formula as a guide:
- Make the length of your crochet piece double it’s width (for example: if you make a foundation chain that is about 5 inches wide, you’ll want to work back and forth in rows until your piece measures about 10 inches total in length.)
- This pumpkin project is not a toy. Due to small pieces, children should be supervised at all times when around this project.

Gauge
- Classic Pumpkin (#4 medium weight yarn)
- 4 inches = about 15 stitches
- Bulky Pumpkin (#5 bulky weight yarn)
- 4 inches = about 12 stitches
- Chunky Pumpkin (#6 super bulky weight yarn)
- 4 inches = about 8 stitches
Finished Measurements
- Classic Pumpkin (#4 medium weight yarn)
- Flat crochet piece measurement: 5.5 in x 11 in
- Finished circumference = 15 inches
- Bulky Pumpkin (#5 bulky weight yarn)
- Flat crochet piece measurement: 4.75 in x 9.5 in
- Finished circumference = 14 inches
- Chunky Pumpkin (#6 super bulky weight yarn)
- Flat crochet piece measurement: 7 in x 14 in
- Finished circumference = 21 inches
Abbreviations
- ch – chain
- hdc – half double crochet
- hdcblo – half double crochet in back loop only
- sl st – slip stitch
- st – stitch
CROCHET PUMPKIN – Pattern starts here:
Classic Pumpkin
Leaving a long tail, ch 23
Row 1: Starting in 3rd ch from hook, make a hdc in the back bar of each ch across, turn. (21)
Row 2: Ch 2, hdcblo in each st across, turn. (21)
Row 3: Repeat Row two until piece measures 11 inches in length and your working yarn tail is on the same side as your starting yarn tail.
Do not cut yarn.
See assembly instructions.
Bulky Pumpkin
Leaving a long tail, ch 16
Row 1: Starting in 3rd ch from hook, make a hdc in the back bar of each ch across, turn. (14)
Row 2: Ch 2, hdcblo in each st across, turn. (14)
Row 3: Repeat Row two until piece measures 9.5 inches in length and your working yarn tail is on the same side as your starting yarn tail.
Do not cut yarn.
See assembly instructions.
Chunky Pumpkin
Leaving a long tail, ch 15
Row 1: Starting in 3rd ch from hook, make a hdc in the back bar of each ch across, turn. (13)
Row 2: Ch 2, hdcblo in each st across, turn. (13)
Row 3: Repeat Row two until piece measures 14 inches in length and your working yarn tail is on the same side as your starting yarn tail.
Do not cut yarn.
See assembly instructions.
ASSEMBLY – All Pumpkins
Seaming the pumpkin
Chain 1. Fold piece in half so that the starting and ending edges are touching.
Line up your stitches and sl st the outer loops of the stitches together to form a cylinder shape.
Fasten off leaving a long tail.
Cinching the bottom
Thread yarn needle with your yarn tail and whip stitch around the top edge. Pull tail to cinch closed. Stitch closed any remaining hole and secure yarn. Fasten off.
Filling the pumpkin
Insert a few handfuls of fiber fill into the pumpkin to desired plump-ness.
Cinching the top closed
Thread yarn needle with your yarn tail and whip stitch around the top edge. Pull tail to cinch closed. You will have a small hole remaining open at the top – leave this hole here, but make sure it’s tight! Knot and secure yarn. Do not cut tail yet!
We will use that hole to put in our cinnamon stick!
Shaping the pumpkin
With tail and yarn needle still attached, insert yarn needle into the pumpkin (near the center) and pull through to the bottom of your pumpkin (also near the center), pull tight.
Pull yarn needle back up through the top in a different spot (still near center), and back down through the bottom again.
Pull tight to sort of “squish” your pumpkin. Knot to secure shape. Pull yarn tail back through to the inside of your pumpkin and hide remaining tails
Finishing
Using proper safety precautions, cut cinnamon stitch down to desired size, and insert into the top hole of your pumpkin to create a stem. Use glue gun to secure in place if you so choose.
Use twine to tie a bow around cinnamon stick for added cuteness!

Before you go!
With this easy crochet pumpkin pattern, you can create charming pumpkins in various sizes to decorate your home for fall. Whether you’re a beginner or experienced crocheter, this project is both quick and enjoyable. Finally, don’t forget to add fun embellishments like leaves or vines to give your pumpkins extra flair!
Love this pattern?