This farmer’s market bag pattern is perfect for the determined beginner and seasoned crocheter alike! Made with 100% cotton yarn, this bag will be your best friend from spring through fall year after year.

This post contains affiliate links. For more information please see my disclosures page.
Hi there! I’m happy to share a brand new crochet project with you today – The Farmer’s Market Bag Pattern! This pattern has been in my brain for a little while now, but I finally brought it to life by crocheting it up this past weekend.
Want to print this pattern? Grab the ad-free printable version here!
The bag features a square shape, long handles, a solid bottom, and mesh body to allow for LOTS of stretch.
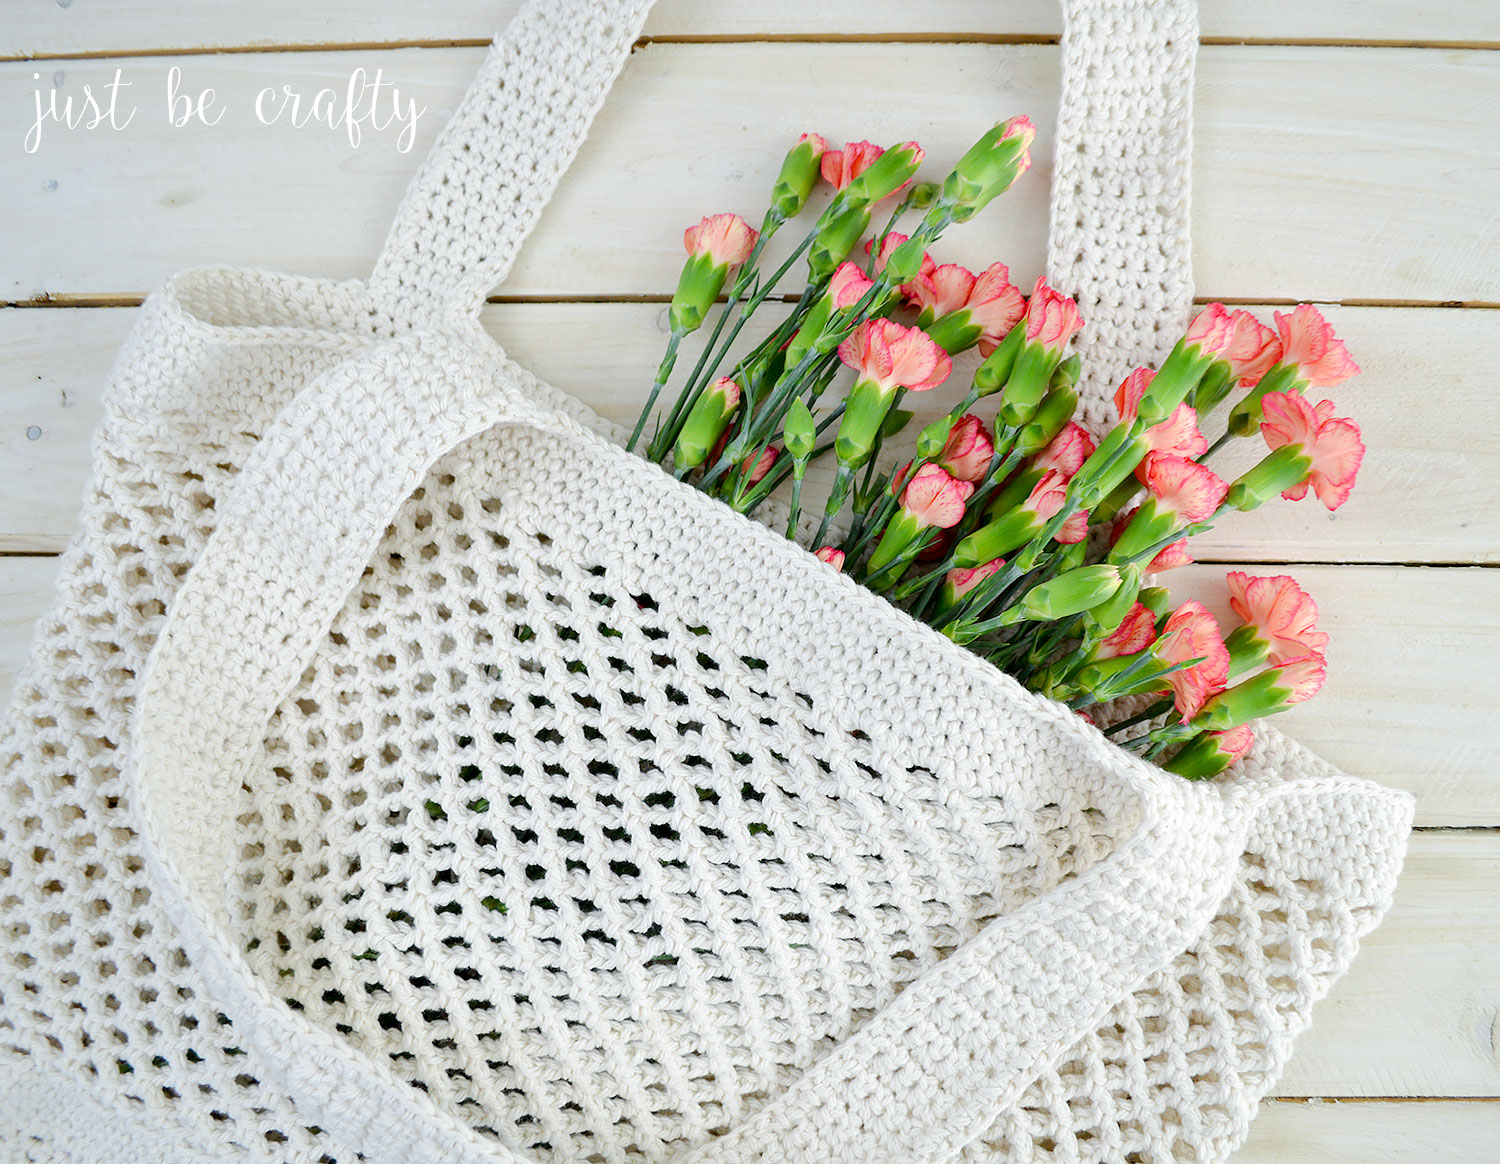
I designed this pattern with summer in mind, just in time for farmer’s markets and trips to the beach. You’ll be amazed with the amount of things that you can fit into this bag!
I hope you enjoy this pattern, and if you do be sure to share pictures of your finished project! Follow along on Instagram (@justbecraftyblog) and use the hashtag #justbecrafty so I can see your creations!
Farmer’s Market Bag Crochet Pattern
Like to crochet offline? Grab the ad-free printable version here!
Materials:
- 5.0 mm crochet hook
- 3 skeins of Lily Sugar n’Cream Yarn in color Ecru (4 oz balls)
- 4 stitch markers
- Scissors
- Yarn needle
Finished Measurement:
- Width: 17.5 inches
- Depth: 12.5 inches
Key:
- ch – chain
- sc – single crochet
- sl st – slip stitch
- st – stitch
- sk – skip
- sp – space
- “right side” – outer side of the bag (pretty side of the bag, front of work)
- “wrong side” – inner portion of the bag (inside the bag, or back of work)
Pattern
Bottom of the bag
Ch 17
Row 1: Starting in 2nd ch from hook, sc and sc in each chain across row, turn (16)
Row 2: ch 1 (ch 1 does not count as a st), sc in each stitch across row, turn (16)
Rows 3 – 56: Repeat Row 2
Body of the bag
*You will now be working in rounds. In order to keep track of your rounds, place a stitch marker in the last stitch of the round.
Round 1: ch 1, starting in same st as the ch 1 make a sc, and sc around the rectangle, making 2 sc in each corner.
**You should have 144 stitches total (56 stitches along long sides and 16 stitches along short sides.)
**NOTE: For the 2 stitches in each corner – one stitch will count towards the short side of 16 stitches, and one stitch will count towards the long side of 56 stitches.**
Join with the first sc of the round using a slip stitch.
Round 2: ch 1, starting in same st as the ch 1 make a sc, and sc around to the end, join with the first sc of round using a sl st.
Rounds 3 – 5: Repeat Round 2
Round 6: ch 1, sc in same st as the ch 1, *ch 2, sk next 2 st, sc in next st, repeat from * until you reach the last 2 unworked stitches of the round (ending with a sc), ch 2 and sl st into the 1st st of the round, sl st into the next ch 2 space. Move the stitch marker to the last ch 2 sp of the round.
You should have 48 ch 2 spaces total.
Round 7: ch 3, sc in next ch space, * ch 3, sc in next ch space, repeat from * to the end. Your last sc will go into the 1st ch space of the round. Keep replacing stitch marker into the last ch space of the round to keep your place.
Rounds 8 – 35: Repeat Round 7, 28 times or until the mesh portion measures about 8.5″.
Round 36: (The last st of round 35 counts as 1st st of round 36) sc in same ch space as 1st st, sc in next sc, *2 sc in next ch sp, sc; repeat from * to end, ending with 2 sc’s. Join with the 1st st of round with a sl st.
Round 37: Ch 1 (starting in same st as the ch 1) sc, and sc in each st to the end of round, join with the 1st st of the round with a sl st.
Repeat Round 37, 4 times.
Cut yarn, and secure.
Making the handles
Lay the bag flat in front of you, with the sides together and the “right side” facing out. Make sure the bag opening is flat and the stitches are lined up as evenly as possible. Place one stitch marker on farthest left and right sides of the opening of the bag.
Working on the side facing you, count 15 stitches in from your left stitch marker. Mark this stitch with another stitch marker. Repeat this on the right most side as well. You have just marked your handle guides. See below photo for reference.

Row 1: Starting at the right most handle guide, attach yarn, ch 1 (starting in same stitch as the ch 1) sc, and sc in next 4 st, turn (5)
Row 2: ch 1 (starting in same stitch as ch 1), sc and sc in next 4 st, turn (5)
Repeat Row 2 until your handle measures approximately 26″, ending after completing a “right side”.

Using below photo as a guide, line up the last handle stitch with the left most handle guide, and attach stitch marker to that last handle stitch. Make sure your five handle stitches are lined up with the bag opening stitches and sl st the handle to the bag.
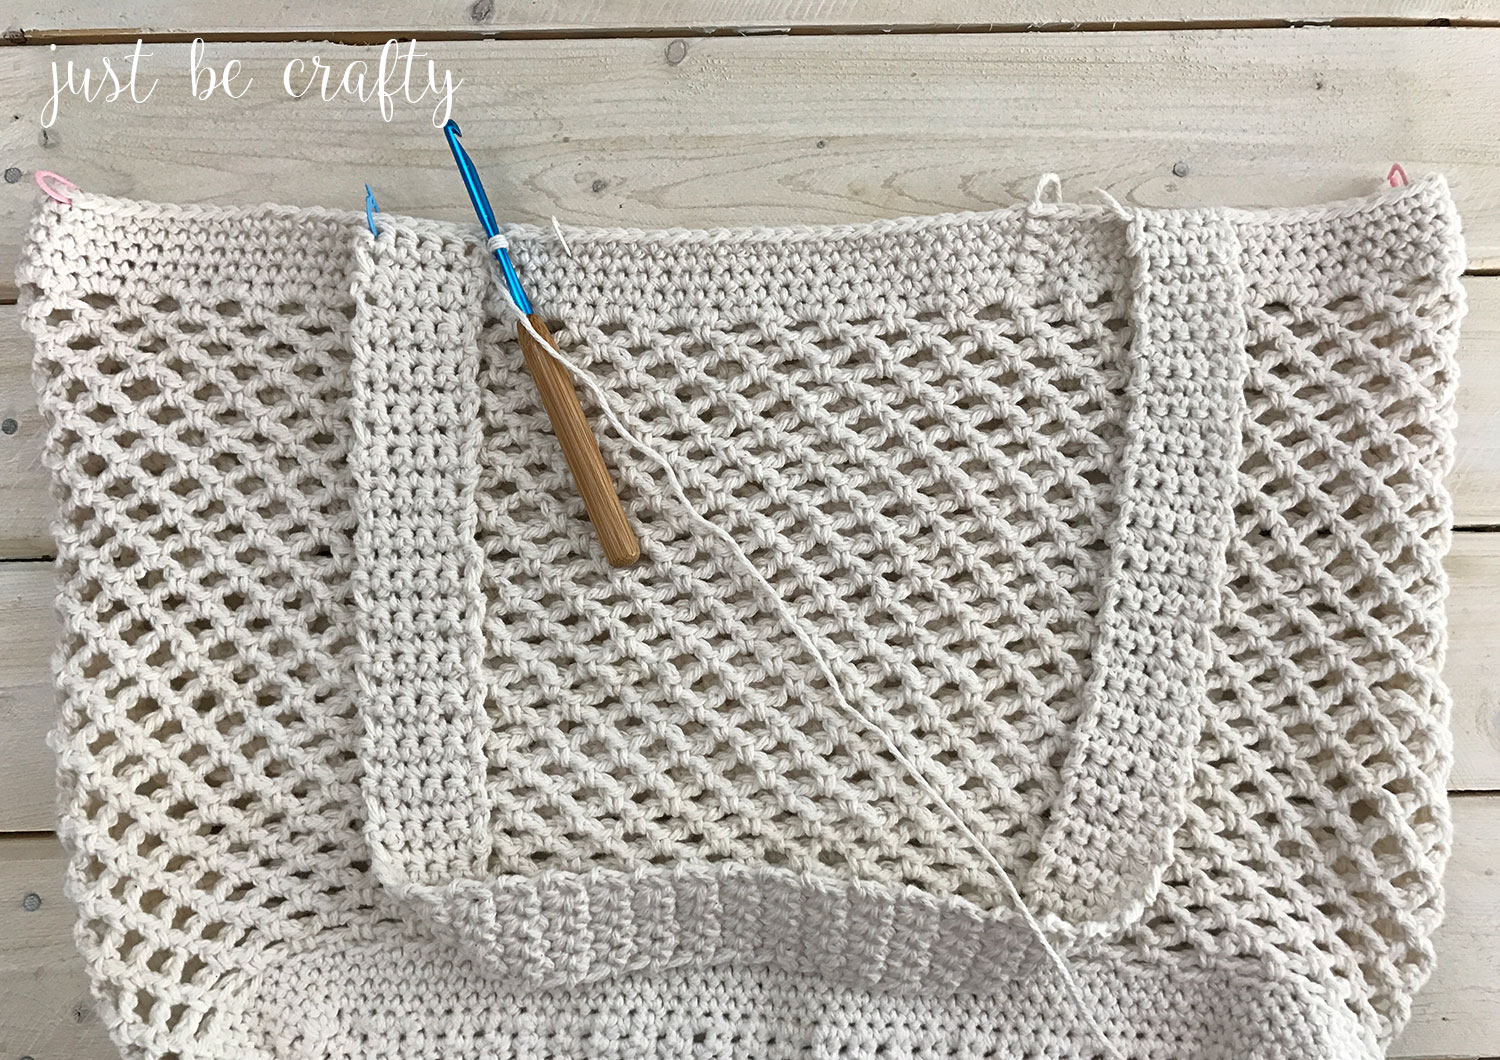

Cut yarn, and secure.
Repeat the above process on the other side for the second handle.
Bag Edging – Outer Handle Portion
Starting on the outer edge of the of the bag and on the right most side of a handle, insert your hook in the stitch where the handle meets the bag’s top edge.
Ch 1, and starting in same stitch as the ch 1, sc, make 1 sc in each row of the handle and in each stitch along the opening of the bag until you reach the other handle and continue to sc until you reach back around to where you started, and join with the 1st st of the round using a sl st. Cut yarn and secure.
Bag Edging – Inner Handle Portion
Repeat this process on the inner handle and edge of the bag (under the handles). Cut yarn and secure.
Weave in all ends and enjoy!

Love this pattern?


I couldn’t find a way to email you but I was wondering if I can sell things I make from your patterns. I only do craft fairs around my town. But I love your patterns?
Hi Jennifer!
Thank you for reaching out and yes! I do allow items made by patterns to be sold, but I do ask that proper credit is given back to me and my blog. Please see my patterns permissions page for more information: https://justbcrafty.com/pattern-permissions
Thanks!
I’m making the bag right now with Peaches an Cream cotton I like it as gift for friends
How did you figure 144 stitches total around the rectangle base if there are 16 on each short side, 56 on each long side, and you have to add an extra sc in each corner?
Each of the corner stitches will have 2 stitches, but one will be counting towards the 56 stitches on the long side, and one will count as one of the 16 stitches on the short side.
I just love this bag. I’ve restarted it 4-5 times now, I just can’t seem to get it. My stitches are off, my chain 2’s are off….my seam was going diagonal. Guess I’m not ready for this type of project yet. Thanks!
Hi Tara! When you finish the bottom of the bag, and make your single crochet’s around the bottom edge working in the round, you’ll want to make sure you end up with 144 stitches. If you have 144 stitches in the first round of the body of the bag, it should work out.
(You should have 16 stitches along the short side and 56 stitches along the long side of the bag bottom, and there should be 2 stitches in each corner. One of the corner stitches will be counting towards the short side of 16 stitches and the other corner stitch will count towards the long side of 56 stitches.)
When you join your rounds in crochet, you end up with a bit of a crooked seam. But once you move onto the mesh portion, you will be working in continuous rounds and should not have a seam.
Please let me know if you have any other questions!
I still don’t quite understand when the bottom is finished, how do I manage getting 16 stitches? Do I SC and skip stitches? How to get from 56 stitches down to 16?
Hi Marilou,
After completing the first round of the bottom of the bag you should end up with 144 stitches total. The bottom of you bag should look like a rectangle. On the long sides you should have 56 stitches and the short sides you should have 16 stitches. 56 + 56 + 16 + 16 = 144.
The 56 stitches along the long side and 16 stitches on the short side don’t really need to be perfect, you just want to make sure that you end up with 144 (or any multiple of 3) stitches so that the mesh portion of the bag works out.
Hope this helps!
Would this size also work as a beach bag.
Yes it would! The bag grows as you put items into it, and because it’s mesh, it will be airy and dry quickly :).
I’m making this right now and really enjoying it!
Awe, thanks Amber!! Happy crocheting! 🙂
Will this bag work well using acrylic yarn or is cotton yarn better suited for it?
Hi Jennifer! Yes, it would still work, but it may not be as durable as it would be if you use cotton yarn. I haven’t yet tried it with acrylic, so you’ll have to let me know how it goes! 🙂
I LOVE this bag!! I’ve made two and am working on my third now. They make fabulous gifts! Thank you so much for this pattern.
Hi Brittany,
As irrelevant as this is, I just wanted to let you know that I’m probably one of your younger fans. I started getting interested in crafting at around 4-5th grade (I’m starting 8th, before high school). While I was still in my *beginning* level, I came across your mesh bag tutorial (I’m pretty sure it was made in 2014). I KINDA LOVED IT?? I did love it. The bag was really simple and your instructions were clear, so I shared the pattern with my mom, but I didn’t really have the right size for the hook, or weight of the yarn, whatever. I still crochet to this day, and my skills have improved a lot. I wondered if I could find this blog again, and I’m v e r y glad to see that you still post regularly. I’m just hoping I can learn to knit so that I could try some of those tutorials. :))
Hi Chelsea! Thank you so much for your comment, you totally made my day! 🙂 I’m so happy you enjoyed the tote pattern, and entered into the world of crocheting! Once you start crocheting/knitting, it sorta turns into an addiction! Feel free to share you current works in progress on Instagram with me, I’d love to see what your working on! 🙂
Hi, Brittany
Thank you the beautiful bag.
I’m afraid that the handles will stretch… Or is it impossible?
Marianne
Hi Marianne! Yes the handles will stretch depending on the weight of the items in which you fill the bag. If you’re worried they will stretch too much, you can shorten the handles by crocheting less handle rows.
Would u b interested n making a bag twice this size and in a different color(s)???? What would b your price? Would I b able to pay 1/2 to order and the other 1/2 when a tracking number for me to receive is established???
Plzzzzz consider this for me!!!
You put 2 sc stitches in each corner only in the first round? Just 1 stitch in corners on following rounds? The sc on the long sides go in every sc row?
Hi Marcia! Yes, you will put 2 sc’s in each corner for the first round only. And yes, 1 sc should go into each row on the long side. Happy Crocheting!
I finished the 56 rows for the bottom of the bag but it looks odd. Should the bottom really be 28″ long? Am I doing something wrong?
Please help!
Yes! Yes!Yes! I did it. Thank you for the pattern and the time it took to share it with us. Your time and kindness of sharing is greatly appreciated.
Hi Glenda! Yay! I am so happy you enjoyed the pattern, you just made my day! 🙂
I just finished a bag and love it! Thank you for the pattern. I’m starting another one.
Hi Sherry! That’s wonderful! I’m so glad you found the pattern useful! 🙂
I just finished my first attempt at this bag (also my first project ever!) and my chains in the mesh were far too loose and my bag is huge and flimsy. I was thinking I’d add more mesh to make it taller so it still works as a bag of some kind. I just thought you might want to add something early in your pattern about making your chains tight. I guess I should have known from the picture, but again it was my first real project and my first time following a full pattern.
Once I finish making this one useable, I plan to try again! I love this bag and I want a whole collection for shopping. Thank you so much for this!
Hi Kathie! That’s awesome that you tackled this bag as your first project ever – thats a huge accomplishment! I think my first project was a square LOL! As for the issue with loose chains, this will depend upon the yarn and hook size you used for the project (and if it differed from what the pattern called for), as well as your yarn tension. Having an even yarn tension was the hardest obstacle for me when I first learned to crochet, but once I got a few projects under my belt I found what worked best for me. If you find your stitches are typically too loose projects, you might want to swap out for a smaller hook size.
I am half way through this bag and I love it! I am on vacation with my 86 year old mom and now she has started one too! Thank you so much for such a nice and easy pattern!
Hi Cindy! That’s so fun!! Happy crocheting on your vacation!!! 🙂
can u put tins/cans in this bag ???
Yes! This bag is sturdy enough to put any of your groceries in! 🙂
Just wondering if you do video tutorials? The written pattern makes more sense when I see it done!
Thanks
🙂
Hi Caz! I do have some video tutorials (https://www.youtube.com/justbecrafty), but I do not have one of this bag yet… but I hope to get it out soon!
Mild confusion here. When making the base, you do the first row then ‘turn’. Do you mean to turn and go back the way you just worked or work the other side of the original chain (basically going round in an oval shape to complete the base), or is it just a straight rectangle that’s made on one side of the original chain, like when crocheting a dish cloth?
Hi Shirley! When constructing the bottom, you will crochet back and forth across each row – making a rectangle, just as you would a dishcloth.
Hi Brittany
Just wanted to let you know I love this bag! Your pattern instructions were clear and really easy to follow.
I made it a little bigger than your dimensions (and had to fiddle a little with the stitches) and it’s just fab!
I used an acrylic/cotton (0.5cm thick stretchy) yarn and plan to use it for the beach. I think it’s going to be great!
Very happy with it! Thanks for sharing your pattern (I love crocheting but can’t make this stuff up by myself!)
Hi Ivana! Thanks so much, I’m so happy you liked the bag and that you were able to customized it to fit your needs! I’d love it if you shared it on Instagram – use the #justbecrafty so I can see it! 🙂
Hi! If I want to make a smaller version of this, how do I make the changes? I want to give it as a Christmas gift to my girl friends 🙂 Thank you !
Hi Jude! To make the bag smaller, when constructing the “bottom of the bag” you will want to make less rows, but make sure that the amount of rows you make are divisible by three – this will be important when starting Round 1 of the “body of the bag”. You will need to end Round 1 with a stitch count divisible by 3.
I made the first size and then a smaller version. I did 12 across for 48 rows and then followed the pattern. I did the chain 3 rows for 6.5 inches and handles at 18 inches. It worked out perfect. I made 4 so far as Christmas gifts. Finishing up my last ones. This pattern is fantastic! Thank you!
Hi Deanna! I’m so glad you enjoyed the pattern! 🙂
Brittany,
Loved the pattern and enjoyed making this bag!
Thank you,
Hi Brittany,
Just wondering if you’ve ever done or would ever do a video for this bag I’m having trouble with round 6- starting the mesh.Im basically a self taught crocheter and have relied a lot on videos & tutorials.
Hi! I hope to have a video tutorial on this soon!
Hi, I am trying to do this market bag, but having trouble understanding how to do a sc in the same chain stitch, row 3-6, mine looks strange!
I have manage get correct # of 144 stitch’s.
is there a tutorial for this pattern?
I love this bag and I’m almost done with it (and it’s the first bigger crochet project for me), but I am having trouble with attaching the handle to the bag. I am ending up with 5 loops on my crochet hook – 1 from the first slip stitch, 2 from the stitch on the handle, 2 from the stitch on the bag to which I attach the handle. What am I doing wrong? Am I supposed to just slip stitch through all these 5 loops?
Hi there! Yes, you’ll slip stitch through all of those loops.
Thank you very much for the fast answer!
Question
When you start the body of the bag in the first round are you increasing by one in the corners?
I am brand new to crocheting and trying to find a you tube video and can’t seem to figure this step out ?
Thanks in advance!
Hi!
The second row of the bag body, with 3ch and then sc on the 2ch space below, have 47 or 48 spaces ?
The 2ch sp row have 48. Does the others one have too? Or 47?
Thank you 🙂
Hi Bruna! In rounds 1 – 5 of the body of the bag, you should have 144 stitches. Round 6 is where you will begin with the chain spaces. At the end of the 6th round you should end with 48 chain spaces, and you should have 48 chain spaces for each round after round 6, up through round 35. If you have any other questions please let me know! Happy crocheting!
Hello! This has been such a fun project! I am almost finished making this and am noticing the top is really big and floppy. Do you have any idea why this would be? I feel like the sides are going to droop down when it’s being carried. Is this normal?
The top of mine was floppy, too. But when I did the last five rows of single crochet across the top (prior to the handles) I made them really tight and that seemed to pull everything back together!
Hi! Your patterns are awesome! And you are so kind to share them with us. Like several other commenters, I too would love a video tutorial. I tend to make too many mistakes when I follow a printed pattern. If you ever post a video tutorial, thank you in advance!
Michelle
I am confused. The very beginning of the pattern says to make your chain, and then “sc and sc” into the row across. Then turn, and single chain across again. Yet, it says I should still have 16 stitches. How would I still have 16 stitches if i am putting 2 sc’s into each chain link on my first row?
Hi Jessica! You are making 1 sc in the 2nd chain from the hook and making 1 sc in each of the remaining chains for a total of 16 sc’s. Happy crocheting!
Hello. I feel like I did something wrong. My bag was not square when I finished. The top of the bag was bigger than the bottom of the bag and the dimensions weren’t the same size as yours either. Even though I used the same hook you recommended. Is this normal?
Hi Shelly! Did you use a different type of yarn? You may have been crocheting with a larger gauge than when you first started, or you may have accidentally increased your stitch count at the top of the piece.
Hi! This is my first big crochet project I’ve ever done and I’m really proud of how I’ve done thus far. I am just a little confused about how to do round 7. Since in round 6 we skipped two stitches, I understood how to make the mesh-creating domes. But I dont understand how to do round 7. If I chain 3, and single crochet every stitch, after the round 6, wouldn’t that increase the number of dome/loop things for each row? As I am doing this my yarn is getting bunched, cramped, and crowded, so do I only single crochet in every two stitches?
Thank you so much for sharing a detailed project! The bag looks so beautiful!
Hi Olivia! Starting round 7 you’ll place your sc’s in the space created by your chains (not in the chains themselves), this is what creates the mesh fabric. Please let me know if you have any additional questions! Happy crocheting!
Just made this bag and I’m super pleased with the results 🙂 I do want to mention that I purchased 3 balls of the Lily yarn as instructed and found it to be enough to make the body of the bag, but not the handles. I frogged a few rows to make do with the amount of yarn I bought, but I just wanted to give everyone a heads up!
I got 144 stitches for round 1 of the body. Then I ch 1, sc in the same stitch as the chain 1, and then sc around. And i have done that about 8,000x and keep getting 146 stitches. What am I doing wrong?!
Hi Tasha! I am not sure… if at the end of Round 1 of “the body of the bag” you have the correct count of 144 stitches, then Round 2 you should have the same stitch count as there were no increases. My suggestion would be to put a stitch marker in the last stitch of Round 1, so you can see exactly where your last stitch and first stitch of the round are. You may be making a couple extra stitches a the end of the round. Let me know if that helps!
Is there a video tutorial at all? I am not processing where to put the first sl st in round 1
I made a poncho when I was a teenager, now I’m 67 have not crochet since that one time. I don’t even know how I did it. I would really love to make a Farmer’s Market Bag my other issue is that I’m left-handed. Would you recommend me starting with something else ?
Hi Dawn! Welcome back to the world of crochet! If tackling this market bag seems a bit tough, I would suggest starting with a crochet dishcloth to get your muscle memory back. I have a few different crochet dishcloth patterns. Let me know if you give one a try!
I love this pattern and want to make a beach bag for my holiday – I’ve got some cotton DK for which label recommends a 4mm hook. I note that you recommend a 5mm hook. Any thoughts on which would be best? Thank you!
Hi Suzanne! I would suggest to use the hook that the yarn calls for, but just note your finished size will be a little smaller than the original pattern. Let me know how it goes!! I just know it will be beautiful!
if you are consistent with the mesh count [48 per round] , you do not end up at a corner when this portion is completed. is that the way it was intended?
Yes – Where the round ends really doesn’t matter because you’ll be cutting that yarn, weaving in the ends, and attaching the handles separately.
I tried making this bag and I am having so much trouble I am an experienced crocheter so I thought this would be easy but for some reason it won’t make a bag shape even when I keep working it up and it keeps getting wider it got to 23 inches in width by row 11 of the mesh stitch is that supposed to happen? I counted my chain spaces and I actually had 47?
Hi Siera! If you consistently keep the same amount of chain spaces for the entire project, your back should turn out. The mesh portion is super stretchy so that may be what you are seeing. Once you get to Row 36, you will make the top band of the bag by completing a few rows of single crochet. Those rows of single crochet is what will give the bag it’s shape. I hope this helps!
Hi. Can I please ask what size the base of this bag is please ?
Mine seems way too long.
Thank you.
Hi. This is my first project using a pattern. I have done pretty good untill the end. I am so confused about the edging for some reason lol…. are we just going around the opening of the bag? Or around the handles also? Love the bag and I can’t wait to finish
Hi this is my first time doing a project from a pattern. I’ve done pretty good until the end and I am so confused about the edging lol… are we going just around the opening of the bag? Or around the handles also? I love this bag and can’t wait to finish. Thanks for any help you can provide!
Hi Ashley! You’ll be crocheting around the opening of the bag and the handles!
I started this project when my mother was ill in August of 2017. She was so excited that she insisted on helping me. I started the first third of the bag, she worked the middle third and I finished it off 2 months before she died in January of this year. I’m so happy to have the last thing she worked on and will cherish this bag as I pass it down to my daughter. Thank you very much for your lovely pattern. I really enjoyed working on it with my mom.. Sereta Sims
Hi Sereta, thank you so much for sharing your story. I am so sorry for your loss. It is so beautiful that you have a special project that both you and your mom worked on. There is a lot of love woven into your bag :). It warms my heart that you and your mom enjoyed the pattern and made something very special out of it. Sending hugs your way!
Just wondering if these are usa stitches or au/british?
I am self teaching from videos and this will be my first from a written pattern. Thank you.
Hi Jay! All of my patterns are written in standard US Terms. Welcome to the world of crochet!! 🙂
Love this bag! My daughter and I are each making one and we’re working on it together. She just learned to crochet in December, and although I learned to crochet as a child, I am only just beginning to read patterns and make things other than simple scarves or small blankets, lol! We have had trouble with the first row of the body of the bag, but I finally got it to work out and I’m helping her to get it. Post a picture when we finish!
Hi Jen! Yay! I am so glad you and your daughter are enjoying the pattern! I can’t wait to see your finished photos!!!!!!!!!! Happy crocheting to you!
Great pattern, easy to follow. I was excited to use 3 skeins of the sugar n’ cream yarn I had in my stash. Unfortunately, they were only enough to finish most of the body of the bag. Then I realized you used the “super size” skeins instead of the more common 2.5 oz skeins. I had to buy more yarn to finish, and I wish I’d just used a cone of yarn to begin with — no ends to weave in on the mesh portion!
Hi, making this bag with Caron cakes. In Round 36…can you explain *2 sc in next ch sp, sc: Is it 2 sc in the chain space and then sc in the connecting sc. ?
I just frogged up to this row because it looks like I increased, the sides were not straight, it was larger at the top
Hi Peg! For round 36 you will be making two single crochets into the chain spaces and making a single crochet into the next single stitch from the previous row.
Already gone and bought the wool. Going to attack this bag tonight.
Very excited.
Wonderful, its a fun one! Happy crocheting to you! 🙂
When starting the 2nd round for the body of the bag do I still do 2 single crochets in the corner, or only 1? Same question when doing the mesh portion. Thanks!
Hi Natalie! No, there will be not be any more increases for Round 2 and on.
I followed this pattern to a T, and it was very easy to follow. At no time was I confused, which I appreciate. However, the finished product ended up being ridiculously large. Filling it with shopping items would cause it to stretch to the ground. I would love to attach a photo because it is quite comical. However, excellently written pattern. Thank you!
I have been trying with this pattern. I just wondered when you work in the round do you slip stitch—I have just been going around and around without slip stitching. Then I stopped at row 14 thinking I may be doing this all incorrectly.
Thank you
Hi Glenys! For rounds 7 – 35, you will not be slip stitching, so you should be good to go! Happy crocheting to you!
Thank you for that info (and the pattern).
Hello Brittany,
I’ve read through all of the comments and didn’t find any regarding the rows around the handles. I’m finding that when I come to single crochet in front of and behind the handles – I’m having issues. Do I fold over the handle to catch the thread behind it? I’ve made two of the bags so far and the first one – I totally nixed the inside round. The second one – each handle area looks different. 🙁 I made one flower to cover up the faux pas on the first bag and it’s ok. I’d rather it look consistently finished. I’m not sure what I”m doing wrong to get a sc in that handle area – as the leader thread is “behind” the handle. I can’t get it without bending over the handle and grabbing the other side.
Any tips would be appreciated. I’m a beginner too – but I completely understood the pattern and after the first one – it gets easier. I’ll be starting the third soon.
Thanks much!
Pam
Hi Pam! After completing the bag edging – outer handle portion, you’ll want to cut your yarn and secure.
To complete the bag edging – inner handle portion, you’ll attach a new piece of yarn in a space under the handle. You can really attach it anywhere in that space, and then single crochet around the bag edge / inner handle portion.
Let me know if this helps! Happy crocheting to you!
I know this is an old pattern, but I was wondering about the yarn yardage. It says 3 of the larger Sugar and Cream balls which is about 600yds total. Did this take the entire 3? I am thinking of making this in a Caron Cotton Cake but it is 536 yds, will that be enough?
Hi Michelle! This project used up almost the entire yardage. Caron Cotton Cake – if I remember correctly might be a little thicker than Lily’s so you may eat through the yarn a little quicker. I’d try to get two balls of caron cotton cake – just to be safe. (You can always keep your receipt and return it if you don’t end up using it!) Happy crocheting!
Hi!
I was wondering how did you measure the width of the bag? Because I measured the bottom of the bag (after finishing the base) and for me it came out to be 13 3/4 inches. I might be crocheting a bit tighter because I’m used to do amigurumi. Also I’m using lily sugar n’ cream cone (14 oz) and it might be a lil bit thinner than the normal one. It came out cheaper, because unfortunately I can’t get the 4 oz balls here in the UK, only 2 oz one. (At least from the local yarn shop I chose, gotta support them!) For me also more convenient to make the bag from a single ball (or cone in this case) of yarn rather than multiple small ones. Love the pattern, easy to follow, and even if it will be smaller than yours it will be big enough 🙂
Hi Suzi! When I finished the bag, I measured the width of the middle of the mesh portion of the bag which should be roughly the same as the bottom of the bag width. Yes, crocheting tighter would result in a smaller width measurement. I think you should be safe though because the great thing about this bag is that it stretches as you fill it up! 🙂
When talking about how I measured the bag width, I forgot to mention it was laying flat!
Thanks ! 🙂 I measured it like that and actually it’s spot on. I made the handles a little bit shorter, I’m a short person so I figured it would almost touch the ground if I packed it full. Haven’t tested that out yet, but I love the bag 🙂 And feeling proud I fnished it, maybe I’ll make some more for the family as gifts!
Oh good to hear! And that’s a good idea to make the handles shorter! They can tend to stretch so you can totally get away with shorter handle! Happy crocheting to you! <3
Thank you for this lovely pattern. I’ve really enjoyed making this bag. I didn’t have any cotton yarn so used a chunky acrylic plus a line of cotton thread to add some strength. I used a 5.5 hook for the bottom and mesh and a 4.5 hook for the top band and handles (which helped to keep the shape and reduce the stretch) It really is a lovely bag , it worked up really quickly and I’m so pleased with it. I’ve always been able to do basic granny blankets but during the lockdown I taught myself some new stitches and how to read a pattern. I haven’t looked back and am well and truly ‘hooked’ ?
Hi Mary! This makes me so happy, I’m so glad you enjoyed the pattern! You’ve entered a whole new world with endless possibilities now! Happy crocheting! 😀
Hi! Sorry if I missed this, but I was wondering what the gauge is? I’m planning on using a different yarn than what you used.
I’m a total beginner and thought this looked beginner friendly enough to attempt.
I altered it slightly in size as I was using a chunkier yarn. And oh my goodness I love it! I love how much it stretches when I fill it up. I cannot wait to take it to the beach! ?
Hello, Brittany! Lovely crochet work! I want to try to make that bag for myself one day and I really appreciate the free pattern your provided. I actually am planning to include your work and your market bag pattern inside my college assignment. I will definitely reference you inside my assignment and will not pass it off as my own work. Is it okay if I could use your work?
Hi Brittany! I am also confused on the putter and inner edging. I understand to reattach the yarn in the handle and sc around… But where/how does the handle go? The only way I could reach the yarn was to fold the handle over and and go through the bag body and the handle. Is that correct? And do that twice? Inside and outside?
Otherwise super fun, easy pattern, thank you so much!
Hello, I’m pretty new at crochet (I have only made three pieces). I have started making this bag for my mother’s 65th birthday. If I would want to make it a bit bigger how should I proceed to calculate it ?
Thanks in advance