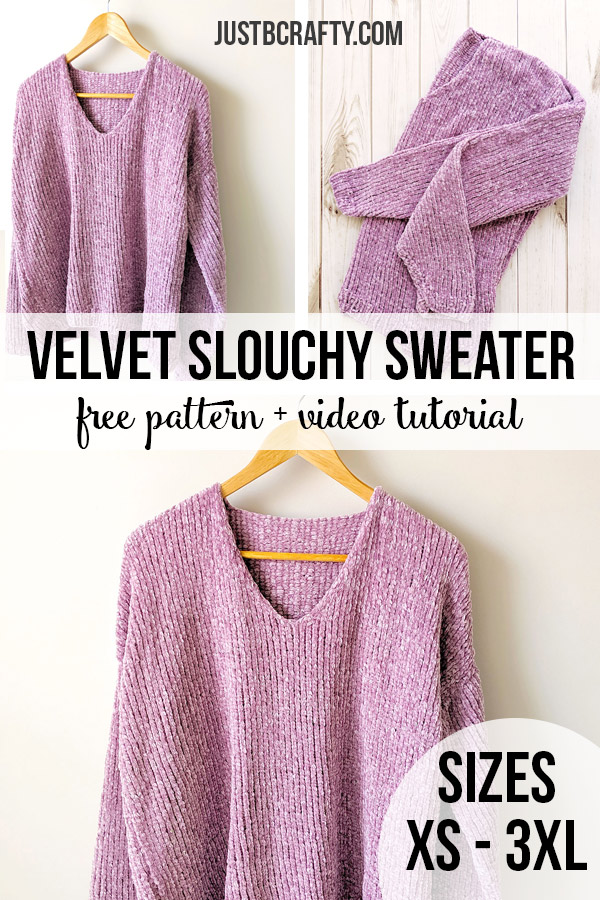
This post is Part 1 of a three part series on how to make the Velvet Slouchy V-Neck Knit Sweater. In Part 1 we will go over how to make the front and back panels of the sweater. Stay tuned for Part 2 were we will make the sleeves! The ad-free printable version of the complete pattern is available here.

Hello and welcome back to my blog! I’m so happy you’re here today, well I am always happy you’re here, but today is a little different because I am sharing a new project type that I haven’t yet shared before! Dun dun dun… a sweater! A sweater that can actually be worn *wait for it* …outside the house!
In all honesty I never thought I would be able to make something like this, let alone figure out how to design a pattern for it AND have it in multiple sizes! Did you know that there is a ton of math involved!? I unfortunately assumed as much and that’s what stopped me for so long lol!
Until I really sat down and drew up a design I finally realized calculating size measurements wasn’t too bad after all. It may be a little time consuming, but far from impossible and totally worth it!

This pattern will be broken up into parts…
This post is Part 1 of a three part series on how to make the Velvet Slouchy V-Neck Knit Sweater! I break it down step by step and even made video tutorials so that we can knit along together!
Below is the breakdown of the series and what you can expect to learn in each part:
Part 1 – Making The Front and Back Panels
In today’s post we will go over the following to get you started on your Velvet Slouchy V-Neck Knit Sweater:
- Sizing and fit
- All the materials you will need for this project
- Written pattern for the front and back sweater panels
- Video tutorial to use as a companion to the written pattern
Part 2 – Making The Sleeves
Part 2 of this project will cover the following information and will be released Tuesday, August 13th, 2019. Update: you can read about here!
- Written pattern for the sleeves
- Video tutorial on how to make the sleeves
Click here to view Part 2.
Part 3 – Assembly
Part 3 of this project will cover the following information and will be released on Tuesday, August 20th, 2019. Update: you can read about it here!
- Written pattern for assembly
- Video tutorial on how to assemble everything together
Click here to view Part 3.
To continue on with Part 1 of the tutorial, keep reading on below!

Velvet Slouchy V-Neck Knit Sweater Video Tutorial
In this video I will go over step by step how to make the front and back panels for the Velvet Slouchy V-Neck Knit Sweater. This pattern and tutorial is designed for advanced beginners and higher and assumes you already know how to complete the following skills:
- Casting on
- The knit stitch
- The purl stitch
- Knit in the front and back loop increase (kfb)
- Knit two together decrease (k2tog)
- Slip slip knit decrease (ssk)
- Casting off
With that said, once you’ve mastered the above skills, I am confident you can tackle this pattern!
To view the video tutorial, click on the video play button below!
Don’t have time for this now, but want to come back to the tutorial later? I have you covered…
Click here to save on Pinterest and check out it later!
Velvet Slouchy V-Neck Knit Sweater – Written Pattern: The Front and Back Panels
*This post may contain affiliate links. Please see my disclosures page for more information.
All patterns on this blog are for personal use only and may not be redistributed, copied, blogged, or sold as your own. You may sell items made by my patterns as long as the item is made by you personally (not mass produced) and that proper credit is given back to me and my site, Just Be Crafty. You may not use my photos for your online sales listings.
An ad-free printable PDF version of this complete pattern is available for $3.99 here.
OR… gain instant access to this pattern PDF as well as my entire PDF pattern library! Click here for more information.
Sizing & Finished Measurements
SIZES: XS, (S, M, L, XL, 2XL, 3XL)
Finished Measurements (in inches)
[table id=1 /]
Sizing Notes:
- The fit of this sweater is slouchy, relaxed and super comfy! Shoulders are drop seams and will lay past the shoulder on the arm. Arm is fitted around wrist and loosens up as it meets the shoulder.
- Sleeves are long and hang past wrist to mid hand, perfect for rolling to 3/4 length if desired.
- Size up or down depending on your preferred fit.
- Sweater is pictured in size XL.
- You will never want to take this sweater off!
This post may contain affiliate links. For more information please see my disclosures page.
Materials
- 29 inch circular knitting needles in US Size 7 and US Size 8
- (or grab this interchangeable set!)
- Yarn needle
- Gauge Checker
- Measuring tape
- Scissors
- Lionbrand Vel-Luxe in color Lilac, 5.3 oz / 246 yds each
- 3 (4, 4, 5, 5, 6, 7) balls
- Stitch markers
Difficulty
- Advanced beginner and higher. Click here to see all the skills you’ll need to know before tackling this project.
Gauge (after blocking)
- 13 stitches by 24 rows in Stockinette Stitch = 4 inches using US Size 8 needles
Key
- BO – bind off
- CO – cast on
- k – knit
- k2tog – knit two stitches together (decrease slants to the left)
- kfb – knit into the front and back loop increase
- p – purl
- ssk – slip slip knit (decrease slants to the right)
- sl – slip
- st – stitch

Front Panel – worked flat:
With US Size 7 circular needle CO 51 (59, 65, 71, 79, 85, 91)
[Ribbing]
Row 1: *k1, p1; repeat from * to last stitch, k1
Row 2: *p1, k1; repeat from * to last stitch, p1
Repeat Rows 1 and 2 until ribbing measures 2 inches from cast on edge. End after completing a Row 2 repeat.
Continue with US Size 8 circular needle.
[Body]
Row 1: k across row
Row 2: p across row
Repeat Rows 1 and 2 until piece measures 15 (16, 17, 18, 18, 19, 20) inches from cast on edge. End after completing a Row 2 repeat.
[Shaping the neckline]
Mark center stitch with a stitch marker; 26 (30, 33, 36, 40, 43, 46)
Knit across row until you reach the stitch marker. BO stitch with the stitch marker.
This BO stitch marks the center of v neck neckline. There should be 25 (29, 32, 35, 39, 42, 45) stitches on each side of the neckline. Replace stitch marker on needle directly in the middle separating the neckline sides.
Continue to knit across remainder of row.
Purl across up until the stitch marker.
You will now be working the neckline sides separately. Turn your work. (you can move the right side neckline stitches to a stitch holder or leave them on the circular needles and disregard for now – that’s what I did)
– Left side of neckline –
Row 1 (dec row): sl first st, k2tog, k across row; (24 (28, 31, 34, 38, 41, 44))
Row 2: p across row
Row 3: k across row
Row 4: p across row
Rows 5 – 24: Repeat Rows 1 – 4 six more times; (18 (22, 25, 28, 32, 35, 38))
Row 25: Repeat Row 1; (17 (21, 24, 27, 31, 34, 37))
Row 26: p across row
BO. Cut yarn and secure.
– Right side of neckline –
With front of work facing you, slide live stitches to right end of circular knitting needles. Attach yarn.
Row 1 (dec row): k across row until you reach the last 3 st, ssk, k1; (24 (28, 31, 34, 38, 41, 44))
Row 2: p across row
Row 3: k across row
Row 4: p across row
Rows 5 – 24: Repeat Rows 1 – 4 six more times; (18 (22, 25, 28, 32, 35, 38))
Row 25: Repeat Row 1; (17 (21, 24, 27, 31, 34, 37))
Row 26: p across row
BO. Cut yarn and secure. Your front panel should resemble the below image.

Back Panel – worked flat
With US size 7 needle CO 51 (59, 65, 71, 79, 85, 91)
[Ribbing]
Row 1: *k1, p1; repeat from * to last stitch, k1
Row 2: *p1, k1; repeat from * to last stitch, p1
Repeat Rows 1 and 2 until ribbing measures 2 inches from cast on edge. End after completing a Row 2 repeat.
Continue with size 8 needles.
[Body of Sweater]
Row 1: k across row
Row 2: p across row
Repeat Rows 1 and 2 until back panel measures 23 (24, 25, 26, 26, 27, 28) inches ending after completing a Row 2 repeat.
BO. Cut yarn and secure. Your back panel should resemble the below image.

Once your finished with Part 1 of the Velvet Slouchy V-Neck Knit Sweater check back next Tuesday, August 13th when Part 2 will be released. In Part 2 we will go over how to make the sleeves!


I really like this sweater. When will the pattern be available to print? Using an iPad with this is difficult.
Thank you! The full printable pattern will be available by next Tuesday at the latest when I share the portion for the sleeves. The link to the printable pattern will be included in each of the 3 posts associated with this sweater.
Great, but where do I find the link? Do I have to go on Pinterest or something? I received part 2 but still can’t find it. Thanks.
HI Kathy! The PDF is now available here (https://www.etsy.com/listing/728927083/knitting-pattern-velvet-slouchy-v-neck) in my Etsy shop. This link is also listed in my posts as well. Thanks!
Your pattern just arrived today and I can’t wait to get the yarn and get started! This is just what I’ve been looking for. Thank you
Hi Jean, I’m so glad! I hope you enjoy!
This is written in pink! You can’t even see the Instructions when you print it out. I wasted all that time paper and time to find this sweater only to find out you can’t read it!
Hi Kelly, unfortunately I cannot guarantee a proper printout from the blog post due to differences in browsers, printers etc… I do however offer my patterns in a printable PDF that can be purchased from my Etsy shop (https://www.etsy.com/listing/728927083/knitting-pattern-velvet-slouchy-v-neck) for a small fee. I put extra time into designing the ad-free PDF which features a large easy to read and printer ready format.
I know this is a late reply, but it may help others. On many printers, you can choose “Black cartridge only” or Black only. This would make the pictures not quite as exciting, but your copy would all be readable.
Hi Kelly! I’ve created an ad-free printer ready format of the pattern that can be purchased at the link below.
I think this may be helpful! https://www.etsy.com/listing/728927083/knitting-pattern-velvet-slouchy-v-nec
Sorry – this is a late response, but it may help someone else. On most printers, there is an option for Black only or “Black Cartridge only”. The pictures won’t look as pretty, but all of the copy will be readable.
Nice sweater!
Hi Kelly! I’ve created an ad-free printer ready format of the pattern that can be purchased at the link below.
I think this may be helpful! https://www.etsy.com/listing/728927083/knitting-pattern-velvet-slouchy-v-nec
I only have a 19″ cable for my circulars, is that okay?
Hi Alyssa! Yes, that should work you’ll just want to be careful to not let your stitches slide off the needle since they might be a little more crowded.
Hi. Can u use regular needles instead of circular needles ?
Hi Jackie! For the sleeves you could get away with using straight knitting needles, as your needles would just need to be about 9 inches. As for the body of the sweater, you would need a 29 inch length needle or longer and I don’t believe they make straight needles that long.
I followed your patter and the jumper came out Beautiful. But after I washed it, I dont know how but I have all this loose loops on my knit. I wish I could post u a pic. 🙁
Hi Dee Dee! Oh no – this makes me so sad to hear!!! How did you wash it (regular, gentle, delicate, etc)? For a fix, I suggest essentially re-blocking it by soaking it in cool water for about 5 – 10 minutes to relax the stitches and then remove from water bath and press the water out between two towels (do not wring). Once you get the excess water out of it, lay it out flat in a space where you can let it dry.
Then, wherever there is a loose loop, use a knitting needle to gently pull and loosen the tight stitches around the area to help smooth out the loose stitches. This may take a lot of time, but should greatly help. Let me know how it goes!
The longest circluar needles I have are 24″. I am knitting a small and xsmall, do you think I will be ok with only 24″?
Hi Madeline! I think that should be fine, you’ll just want to be careful that the stitches don’t fall off the ends :).
Hey, I was wondering if you have any suggestions to help with the curling that is happening to my front body piece once I started with the kint row aand purl row. I read this is common with stockinette stitch so I don´t know if there is some trick to avoid it or if it may go away once the piece reaches a certain length? Thank you
stockinette stitch usually curls, yeah! it won’t do that once you finish the sweater and attach all the pieces together at the seams. it curls bc the knits and purls are uneven, since all the knits are on one side and all the purls on the other. it’s okay! 🙂
hi I want to make this jumper, but the yarn that i have seems to have a smaller size (suitable for needle size 4) is it still possible to follow exactly as pattren? because in my country it is very difficult to find yarn that have a larger size
Hi Steva! I would suggest playing around with needle sizes and making a test swatch, and then comparing your gauge to the gauge listed in the pattern. It’s imperative for the gauge to match in order to ensure the sizing comes out correct.
If you’re using a smaller yarn, than your ending sweater size will more than likely come out much too small. If you are able to obtain a gauge that isn’t too far off from mine, you might be able to get away with making a size up from your regular size. Unfortunately I am only able to verify what I have personally tried and suggest in the pattern.
I hope this helps, and please let me know if you have any other questions!
Thank you!
Hi Brittany,
I love your pattern and can’t wait to start making this! I’m working on trying to get your gauge, but I’m having troubles matching it. I’ve made 3 swatches using size 8, 9 & 10. Well, I’m in the middle of the 3rd one (Size 10) and I’ve measured it as 15 stitches for 4 in. I’m considering trying to size up again to 10.5, but I’m just nervous about the sweater feeling too loose by sizing up so much. Do you think it’s ok to do this to be able to get your gauge?
Thanks,
C
Hi C! What kind of yarn are you using?
I’m using the same yarn as you. The velvet yarn and the weight is 5!
Hmm…. do you tend to pull very tight on your stitches? Would it be possible to send me a photo of what you have? I think I might be able to better help if I can see it :). Also, my gauge measurement is taken after blocking. But you shouldn’t have to size up that much on your needles. My email is brittany@justbecrafty.com
Hi Brittany,
I emailed you when I saw this comment, but didn’t hear back from you. Maybe it was in spam? I had some follow up questions when you have the time to answer.
Thanks,
C
Hi C! Thank you for following up! I’ve just sent you a reply! 🙂
Hi! How many balls of yarn would this sweater require? Thanks!
Hi Bianca! Sizes are listed as such: XS, (S, M, L, XL, 2XL, 3XL). In the “materials” section you’ll find yarn ball amounts for corresponding sizes. Happy knitting!
Hi Brittany!
I’m very excited to try this pattern as I’ll be making two for Christmas gifts (I know, early…lol!) for two of my really close friends. I am planning on using a different yarn which is the Lana Grossa Cool Air Fine (if you were interested in that info). It’s surprisingly not too far off in measurements compared to the Vel-Luxe yarn. It makes about 4.5 stitches/1″ and there’s even 16 extra yards of yarn per ball compared to the Vel-Luxe…plus it’s on sale so it’s like a win-win-win! They should both take mediums and I’m still sticking with 4 balls for a medium, since I used a yarn calculator and each one said around 4 balls to meet your equivalent. So my question is, do you think I’ll still be able to follow your pattern with the same amount of cast on stitches and everything like that? My main concern is the “V” on the front panel…I just don’t want it to be cockeyed! Haha!
Thank you!!
Hi Hannah!
With knitted gifts – Christmas comes around waay too fast, I completely get it lol!!! And that sounds lovely! To be sure, you might want to knit up a 5 by 5 inch or so swatch and measure how many stitches is inside of 4 inches – you’ll get a more accurate reading measuring your gauge over a larger area. As long you match the gauge listed in the pattern (you may have to adjust needle size) you should be ok to follow the pattern as is.
As for the v-neck as long as you knit the same number of rows and/or same length of rows on both sides of your v-neck, it should come out even. If you have any other questions please let me know! Happy knitting!
Pretty design for everyone. It looks so beautiful and attractive.
Could you advise how this yarn behaves after washing? Does is fall apart? Is Bernat velvet good option as well?
Hi Tanya! I would suggest either hand washing or washing on a gentle/handwash cycle in your machine and then laying flat to dry. I hand wash mine and only when I absolutely need to, just like with any other handmade clothing item. The yarn does not fall apart. I don’t have experience with bernat velvet but you’ll need to make sure you make test swatch (whether you sub your yarn or not!) to make sure that you obtain the proper gauge so that the sizing comes out as correct and as expected!
Hey! I’m at the very beginning of the project currently and just have a few questions.
I’m using a lighter weight yarn (4 I believe) and still using size seven needles. I’m not past the bottom ribbing part yet. I’m making a size small and thinking that the cast on isn’t quite long enough to make a size small sweater as described in the size chart. I was wondering if it is supposed to be substantially smaller at the beginning or my change in yarn weight would make it smaller? The length of my cast on with about an inch of ribbing is only 10 inches.
Thanks for the help!
Hi Riley! You will need to make a test swatch and measure your gauge to check and see if it matches the gauge listed in the pattern. You may need to play around with needle sizes to obtain the correct gauge. If you don’t meet the proper gauge, the sweater will not come out to the described size in the pattern. Most likely, if you are using the same size needle listed and a smaller yarn weight – your project will come out much smaller than expected.
Hi,
How many cast on stitches is needed for a size “S” or “M”?
Thanks!
Hi there! Sizes are listed as follows: XS, (S, M, L, XL, 2XL, 3XL), and cast on/stitch counts are listed in the corresponding way: CO 51 (59, 65, 71, 79, 85, 91). For a small you would cast on 59 stitches, and medium you would cast on 65. Be sure to knit a test swatch before you start and check to make sure your gauge matches what is listed in the pattern. If your gauge is off, your sweater will not come out to the expected size!
Hi ?
I watched you tutorial on how to make a sweater, im using the everyday bebe lux of himalaya first of all the himalaya is 272 yards and 4 m i wanted to know how much difference does it make and how many cm you have in the first part of the sweather the wide ?
Another thing is there a possibility of not changing needles? Thank you
Did you use a strand of the yarn to sew the seams? I’m wondering because this yarn is not stretchy at all and doesn’t seem to pull through other stitches all that well.
Hi there. I just started knitting your beautiful pattern for my daughter and she just told me she wants a round neck instead of a v. I was wondering if you could tell me how I could change this to a round neck.i would really appreciate your help. Thank you
My mom (an experienced knitter who’s made many, many sweaters over the years) tried this pattern with the exact yarn, needle size, and gauge specified. The sweater turned out awful… the sleeves were incredibly tight where they connected the shoulders and the whole sweater is a lot smaller than the end measurements said it would be. She’s not sure what went wrong, but the sweater is unwearable. We’ll be unravelling it to repurpose the yarn.
Hi Mandy! Knitting and gauge can be a little tricky. Even if gauge was checked and met prior to starting the project, your tension can change once you begin knitting your actual piece. If her tension got tighter as she was knitting the sweater, this would result in a smaller than expected finished piece. She might want to go back and check the gauge in multiple places on the front/back panels and sleeves to see what the finished gauge actually was. Also, the velvet yarn is a little tricky to work with and can be a bit difficult to keep tension consistent.
Gauge for knitting is essentially a math problem. For example, let’s say a listed gauge is 13 stitches is equal to 4 inches. If I’m making something that is eight inches wide, mathematically I would need to cast on 26 stitches (13 x 2) in order for the piece to measure 8 inches. And if my gauge is off in any way, my end result will be skewed. All of the cast on and stitch counts in the pattern are carefully calculated to make sure that if gauge is met consistently throughout the pattern, the sizing will come out to the expected measurements. I hope this helps! Please let me know if there’s any additional questions!
I have a little of the same problem. I knitted the small which usually fits, but the seam at the should was too tight. I’m now knitting a second one in Med. Any suggestions on how to alter so the seam actually drops down the arms and is more of slouchy fit as it says in description?
Hi there! I noticed that the yarn for this pattern has been discontinued. Can you recommend any possible substitutions? Thank you!
Hi Amy! This yarn here is similar: https://www.hobbylobby.com/Yarn-Needle-Art/Yarn-Tools/Yarn/Spa-Yarn-Bee-Velvety-Smooth-Aran-Yarn/p/81042332 or any chenille style yarn that is #4-medium weight (it will say the weight on the back of the label).