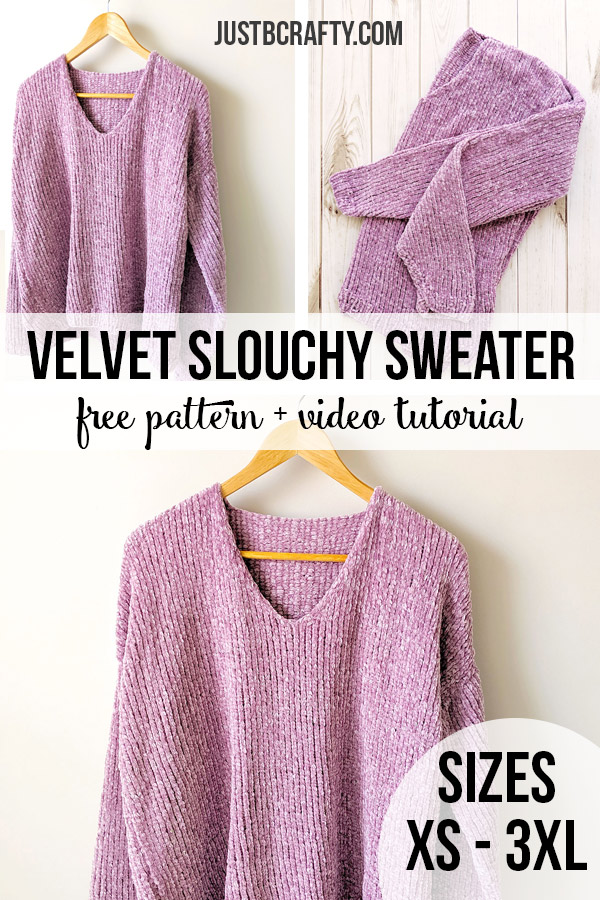
This post is Part 1 of a three part series on how to make the Velvet Slouchy V-Neck Knit Sweater. In Part 1 we will go over how to make the front and back panels of the sweater. Stay tuned for Part 2 were we will make the sleeves! The ad-free printable version of the complete pattern is available here.

Hello and welcome back to my blog! I’m so happy you’re here today, well I am always happy you’re here, but today is a little different because I am sharing a new project type that I haven’t yet shared before! Dun dun dun… a sweater! A sweater that can actually be worn *wait for it* …outside the house!
In all honesty I never thought I would be able to make something like this, let alone figure out how to design a pattern for it AND have it in multiple sizes! Did you know that there is a ton of math involved!? I unfortunately assumed as much and that’s what stopped me for so long lol!
Until I really sat down and drew up a design I finally realized calculating size measurements wasn’t too bad after all. It may be a little time consuming, but far from impossible and totally worth it!

This pattern will be broken up into parts…
This post is Part 1 of a three part series on how to make the Velvet Slouchy V-Neck Knit Sweater! I break it down step by step and even made video tutorials so that we can knit along together!
Below is the breakdown of the series and what you can expect to learn in each part:
Part 1 – Making The Front and Back Panels
In today’s post we will go over the following to get you started on your Velvet Slouchy V-Neck Knit Sweater:
- Sizing and fit
- All the materials you will need for this project
- Written pattern for the front and back sweater panels
- Video tutorial to use as a companion to the written pattern
Part 2 – Making The Sleeves
Part 2 of this project will cover the following information and will be released Tuesday, August 13th, 2019. Update: you can read about here!
- Written pattern for the sleeves
- Video tutorial on how to make the sleeves
Click here to view Part 2.
Part 3 – Assembly
Part 3 of this project will cover the following information and will be released on Tuesday, August 20th, 2019. Update: you can read about it here!
- Written pattern for assembly
- Video tutorial on how to assemble everything together
Click here to view Part 3.
To continue on with Part 1 of the tutorial, keep reading on below!

Velvet Slouchy V-Neck Knit Sweater Video Tutorial
In this video I will go over step by step how to make the front and back panels for the Velvet Slouchy V-Neck Knit Sweater. This pattern and tutorial is designed for advanced beginners and higher and assumes you already know how to complete the following skills:
- Casting on
- The knit stitch
- The purl stitch
- Knit in the front and back loop increase (kfb)
- Knit two together decrease (k2tog)
- Slip slip knit decrease (ssk)
- Casting off
With that said, once you’ve mastered the above skills, I am confident you can tackle this pattern!
To view the video tutorial, click on the video play button below!
Don’t have time for this now, but want to come back to the tutorial later? I have you covered…
Click here to save on Pinterest and check out it later!
Velvet Slouchy V-Neck Knit Sweater – Written Pattern: The Front and Back Panels
*This post may contain affiliate links. Please see my disclosures page for more information.
All patterns on this blog are for personal use only and may not be redistributed, copied, blogged, or sold as your own. You may sell items made by my patterns as long as the item is made by you personally (not mass produced) and that proper credit is given back to me and my site, Just Be Crafty. You may not use my photos for your online sales listings.
An ad-free printable PDF version of this complete pattern is available for $3.99 here.
OR… gain instant access to this pattern PDF as well as my entire PDF pattern library! Click here for more information.
Sizing & Finished Measurements
SIZES: XS, (S, M, L, XL, 2XL, 3XL)
Finished Measurements (in inches)
[table id=1 /]
Sizing Notes:
- The fit of this sweater is slouchy, relaxed and super comfy! Shoulders are drop seams and will lay past the shoulder on the arm. Arm is fitted around wrist and loosens up as it meets the shoulder.
- Sleeves are long and hang past wrist to mid hand, perfect for rolling to 3/4 length if desired.
- Size up or down depending on your preferred fit.
- Sweater is pictured in size XL.
- You will never want to take this sweater off!
This post may contain affiliate links. For more information please see my disclosures page.
Materials
- 29 inch circular knitting needles in US Size 7 and US Size 8
- (or grab this interchangeable set!)
- Yarn needle
- Gauge Checker
- Measuring tape
- Scissors
- Lionbrand Vel-Luxe in color Lilac, 5.3 oz / 246 yds each
- 3 (4, 4, 5, 5, 6, 7) balls
- Stitch markers
Difficulty
- Advanced beginner and higher. Click here to see all the skills you’ll need to know before tackling this project.
Gauge (after blocking)
- 13 stitches by 24 rows in Stockinette Stitch = 4 inches using US Size 8 needles
Key
- BO – bind off
- CO – cast on
- k – knit
- k2tog – knit two stitches together (decrease slants to the left)
- kfb – knit into the front and back loop increase
- p – purl
- ssk – slip slip knit (decrease slants to the right)
- sl – slip
- st – stitch

Front Panel – worked flat:
With US Size 7 circular needle CO 51 (59, 65, 71, 79, 85, 91)
[Ribbing]
Row 1: *k1, p1; repeat from * to last stitch, k1
Row 2: *p1, k1; repeat from * to last stitch, p1
Repeat Rows 1 and 2 until ribbing measures 2 inches from cast on edge. End after completing a Row 2 repeat.
Continue with US Size 8 circular needle.
[Body]
Row 1: k across row
Row 2: p across row
Repeat Rows 1 and 2 until piece measures 15 (16, 17, 18, 18, 19, 20) inches from cast on edge. End after completing a Row 2 repeat.
[Shaping the neckline]
Mark center stitch with a stitch marker; 26 (30, 33, 36, 40, 43, 46)
Knit across row until you reach the stitch marker. BO stitch with the stitch marker.
This BO stitch marks the center of v neck neckline. There should be 25 (29, 32, 35, 39, 42, 45) stitches on each side of the neckline. Replace stitch marker on needle directly in the middle separating the neckline sides.
Continue to knit across remainder of row.
Purl across up until the stitch marker.
You will now be working the neckline sides separately. Turn your work. (you can move the right side neckline stitches to a stitch holder or leave them on the circular needles and disregard for now – that’s what I did)
– Left side of neckline –
Row 1 (dec row): sl first st, k2tog, k across row; (24 (28, 31, 34, 38, 41, 44))
Row 2: p across row
Row 3: k across row
Row 4: p across row
Rows 5 – 24: Repeat Rows 1 – 4 six more times; (18 (22, 25, 28, 32, 35, 38))
Row 25: Repeat Row 1; (17 (21, 24, 27, 31, 34, 37))
Row 26: p across row
BO. Cut yarn and secure.
– Right side of neckline –
With front of work facing you, slide live stitches to right end of circular knitting needles. Attach yarn.
Row 1 (dec row): k across row until you reach the last 3 st, ssk, k1; (24 (28, 31, 34, 38, 41, 44))
Row 2: p across row
Row 3: k across row
Row 4: p across row
Rows 5 – 24: Repeat Rows 1 – 4 six more times; (18 (22, 25, 28, 32, 35, 38))
Row 25: Repeat Row 1; (17 (21, 24, 27, 31, 34, 37))
Row 26: p across row
BO. Cut yarn and secure. Your front panel should resemble the below image.

Back Panel – worked flat
With US size 7 needle CO 51 (59, 65, 71, 79, 85, 91)
[Ribbing]
Row 1: *k1, p1; repeat from * to last stitch, k1
Row 2: *p1, k1; repeat from * to last stitch, p1
Repeat Rows 1 and 2 until ribbing measures 2 inches from cast on edge. End after completing a Row 2 repeat.
Continue with size 8 needles.
[Body of Sweater]
Row 1: k across row
Row 2: p across row
Repeat Rows 1 and 2 until back panel measures 23 (24, 25, 26, 26, 27, 28) inches ending after completing a Row 2 repeat.
BO. Cut yarn and secure. Your back panel should resemble the below image.

Once your finished with Part 1 of the Velvet Slouchy V-Neck Knit Sweater check back next Tuesday, August 13th when Part 2 will be released. In Part 2 we will go over how to make the sleeves!
