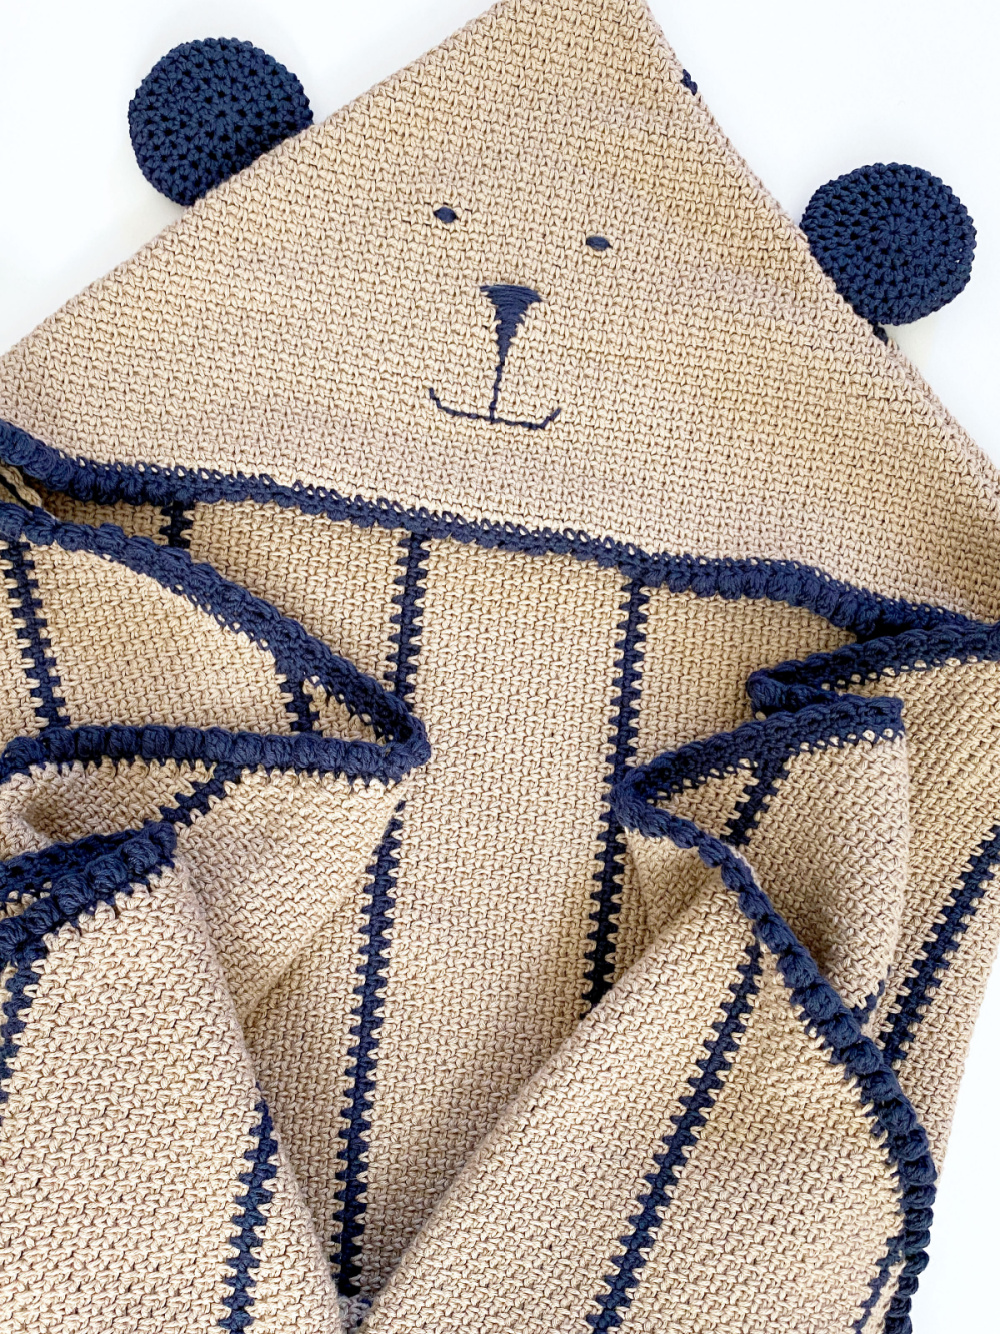
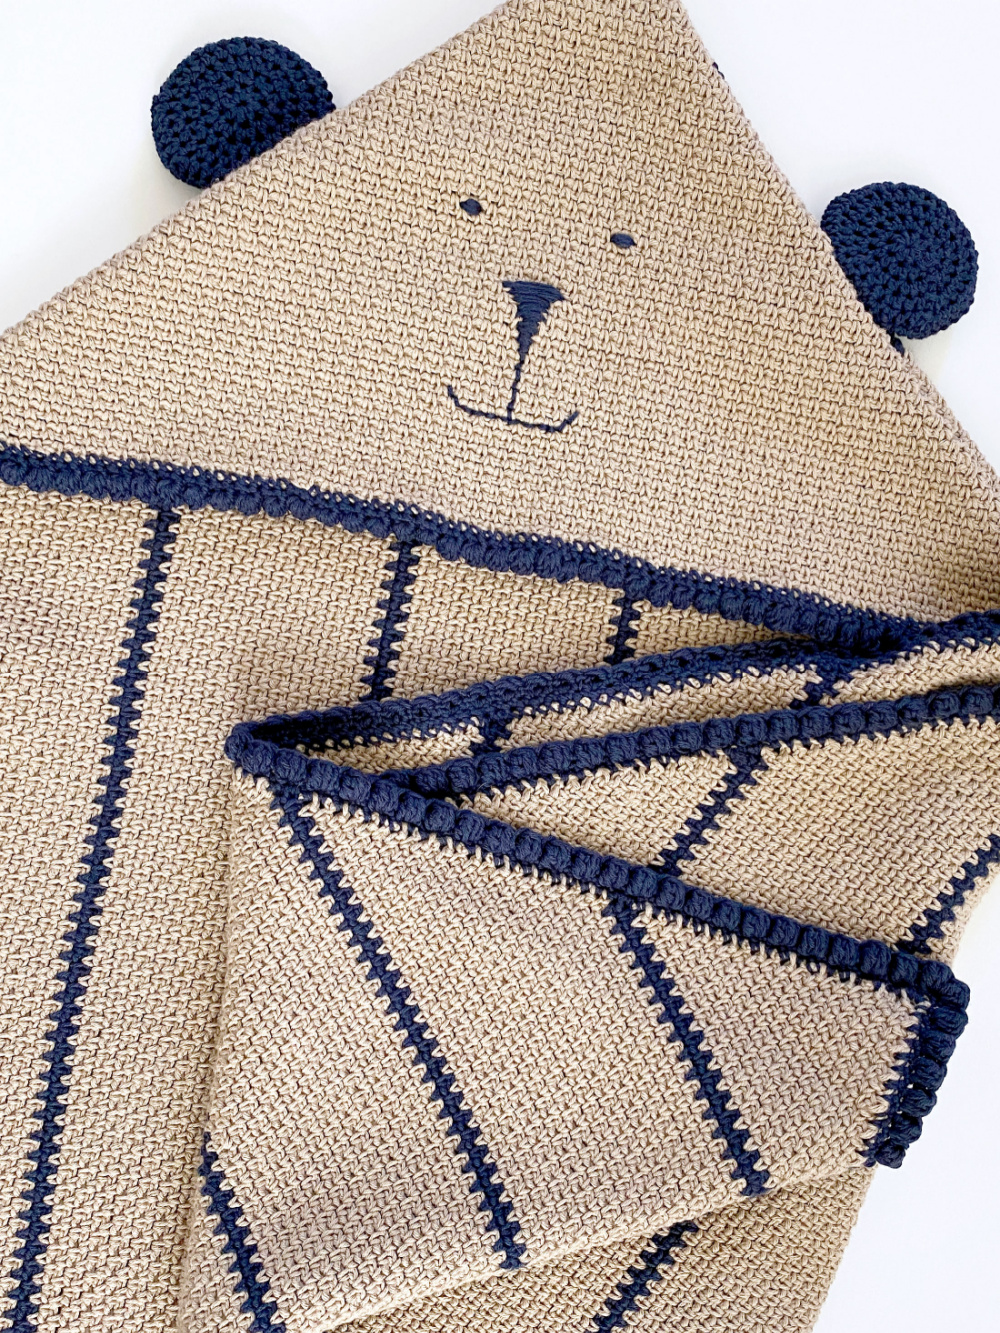
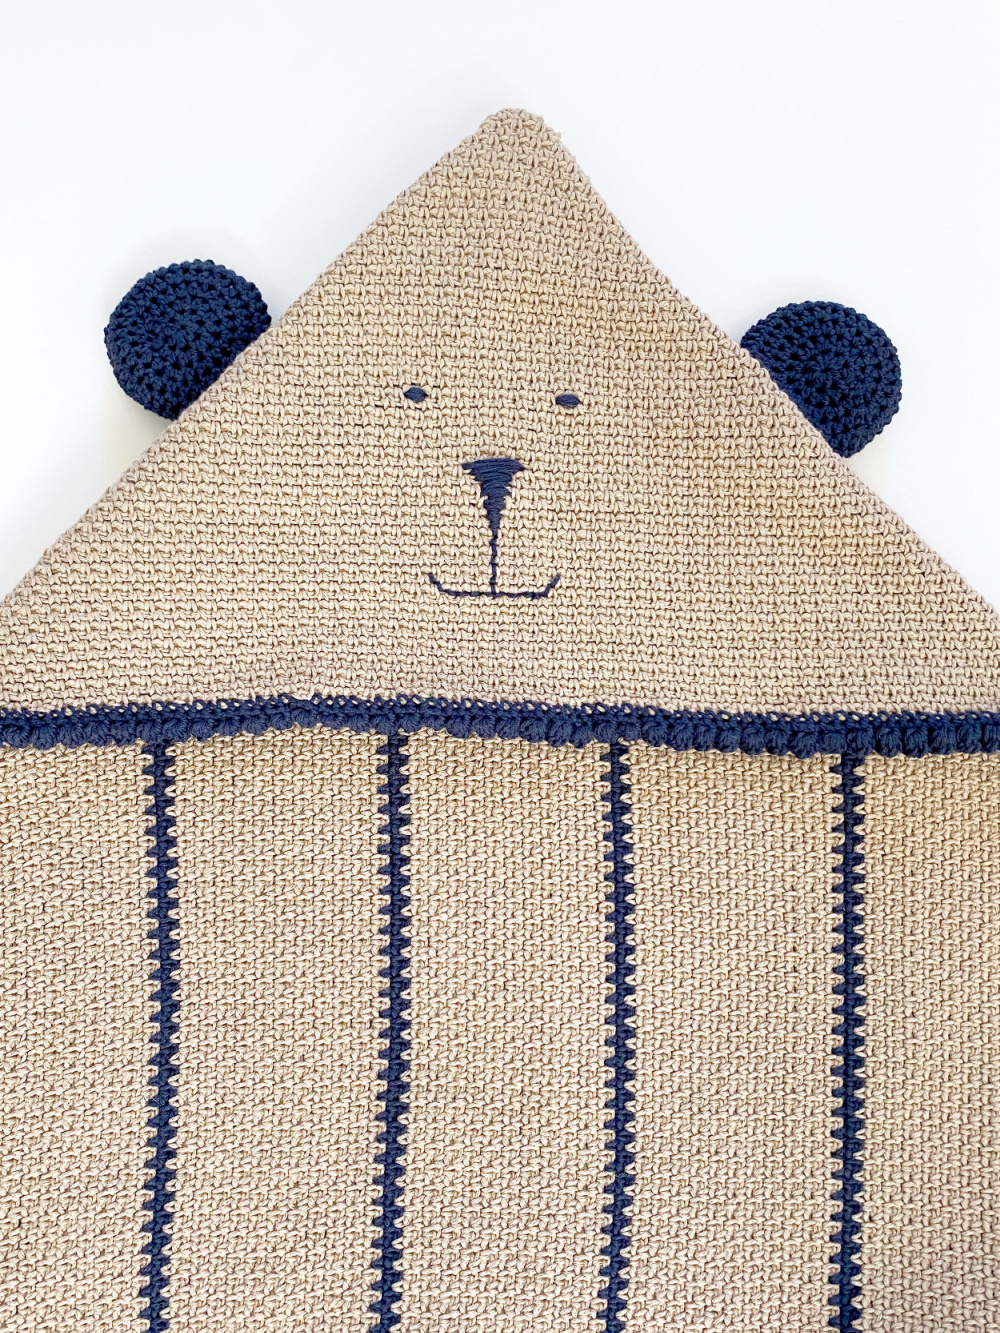
Cuddle Bear Hooded Lovey Pattern
The Cuddle Bear Hooded Lovey uses 100% organic cotton yarn for a baby soft feel with durability. This lovey will make for the perfect baby shower gift that’ll become a memorable heirloom for years to come!
Happy Saturday! I’m sharing a new pattern today that I think you will love! It’s the Cuddle Bear Hooded Lovey Pattern! AND its sooo cute!
I’m not sure about you, but I’m thinking that throughout 2021 and 2022 we are going to be seeing lots of bouncing new babies around as a direct result from quarantining!
So… I was thinking it might be a good idea to have a few baby patterns in the back pocket to keep ya ready for upcoming birth announcements and shower gifts! Keep scrolling to view the pattern for free or purchase the printable PDF!

CUDDLE BEAR HOODED LOVEY
SAFETY NOTE: This piece isn’t a toy and should be used only with constant adult supervision. Never leave a baby or child unattended with the Lovey or wrapped in the Lovey.
This post might contain affiliate links. If you make a purchase from one of my links, I may receive a small commission (at no additional charge to you). For more information please see my policies page. Thank you for your continued support and knitting/crocheting along with me!
Printable pattern options:
- Purchase the ad-free printable PDF pattern HERE from my Etsy shop.
- Join the Just Be Crafty Club! Gain instant access this pattern PDF download as well my ENTIRE PDF pattern library ad-free! Click HERE for more information!
FINISHED MEASUREMENTS & SIZING
- About 39 x 39 in. (99 x 99 cm)

GAUGE
- 28 sts + 27 rows = about 4 in. (10 cm) in pattern stitch (GAUGE NOTE: When checking gauge, both single crochets and chain-1s each count as a separate stitch.)
- BE SURE TO CHECK YOUR GAUGE.
MATERIALS
- Lion Brand A Star is Born: Oh Baby Yarn, in Tan, 13 balls (MC)
- 100% organic cotton, 2-Fine weight yarn
- Lion Brand A Star is Born: Oh Baby Yarn, in Navy, 4 balls (CC)
- 100% organic cotton, 2-Fine weight yarn
- 4.0 mm crochet hook
- Tape Measure
- Gauge Checker
- Yarn Needle
- Scissors
KEY (in US terms)
- CC = contrasting color
- ch = chain
- dec = decrease
- hdc = half double crochet
- inc = increase
- MC = main color
- prev = previous
- RS = right side
- sc = single crochet
- sk = skip
- sl st = slip stitch
- sp = space
- st(s) = stitch(es)
- WS = wrong side
- Yo = yarn over
PATTERN NOTES:
SAFETY NOTE: This piece isn’t a toy and should be used only with constant adult supervision. Never leave a baby or child unattended with the Lovey or wrapped in the Lovey.
BODY
- Body is worked in corner to corner (C2C) moss stitch.
EARS ONLY
- Each round begins with a ch 2 (ch 2 does not count as a stitch).
- Each round is worked in hdc. The pattern states which stitches will be increased / decreased.
- To end each round, join with 1st stitch of the round using sl st.
- Ear Increase: make 2 hdc in same stitch
- Ear Decrease: hdc 2 stitches together as if they are one
BORDER ONLY
- Bobble stitch = *yo, insert hook into st, draw up a loop, yo, pull through two loops on your hook; repeat from * until you have 5 loops on your hook, yo pull through all 5 loops on your hook. Pop bobble to the front or back as directed in the pattern.
CUDDLE BEAR HOODED LOVEY PATTERN
BODY
With MC ch 3
Row 1: In 3rd ch from hook, sc and hdc in same stitch; turn.
Row 2: ch 2, sc in 1st st, ch 1, sk a st, sc and hdc in top of turning ch from prev row; turn.
Row 3: ch 2, sc in first st, ch 1 *sc in next ch 1 sp, ch 1, sc and hdc in top of turning ch from prev row; turn.
Row 4: ch 2, sc in first st, ch 1 *sc in next ch 1 sp, ch 1; repeat from * through last ch 1 sp of row, sc and hdc in top of turning ch from prev row; turn.
Rows 5 – 22: Repeat Row 4
Fasten off MC. Attach CC.
Rows 23 – 24: With CC repeat Row 4
Fasten off CC. Attach MC.
Rows 25 – 46: With MC repeat Row 4
Fasten off MC. Attach CC.
Rows 47 – 48: With CC repeat Row 4
Fasten off CC. Attach MC.
Rep Rows 25-48, 5 times.
With MC repeat Row 4, 11 times.
Decrease rows begin.
Next Row (Decrease Row): ch 2, sk 1st st, sc in next ch 1 sp, *ch 1, sc in next ch 1 sp; repeat from * through last ch1 sp of row, hdc in top of turning ch from prev row; turn.
Continue working Decrease Row in MC for 10 more rows.
Fasten off MC. Attach CC.
With CC work Decease Row for 2 rows.
Fasten off CC. Attach MC.
Continue working Decrease Row, alternating between 22 rows of MC and 2 rows of CC until last completed row has 2 sc’s remaining.
Next Row: ch 2, sk 1st st, sc in next ch 1 sp, hdc in top of turning ch from prev row; turn.
Last Row: ch 1, hdc in top of turning ch from prev row.
Fasten off.
HOOD PIECE
With MC ch 3
Row 1: In 3rd ch from hook, sc and hdc in same stitch; turn.
Row 2: ch 2, sc in 1st st, ch 1, sk a st, sc and hdc in top of turning ch from prev row; turn.
Row 3: ch 2, sc in first st, ch 1 *sc in next ch 1 sp, ch 1, sc and hdc in top of turning ch from prev row; turn.
Row 4: ch 2, sc in first st, ch 1 *sc in next ch 1 sp, ch 1; repeat from * through last ch 1 sp of row, sc and hdc in top of turning ch from prev row; turn.
Repeat Row 4 for a total of 64 rows.
Fasten off.
EARS
Make 2.
SEE PATTERN NOTES.
Round 1: Make 8 hdc in magic ring (8)
Round 2: inc in every st around (16)
Round 3: inc in every 2nd st around (24)
Round 4: inc in every 3rd st around (32)
Round 5: inc in every 4th st around (40)
Round 6: hdc in every st around (40)
Round 7: dec in every 4th st around (32)
Round 8: dec in every 3rd st around (24)
Round 9: dec in every 2nd st around (16)
Round 10: dec in every st around (8)
Fasten off.
ASSEMBLY
Hood
With WS facing up, position Body piece so that stripes are vertical. Arrange Hood piece (WS facing up) on to topmost corner of Body. Line up edges and stitches evenly and use stitch markers to hold both pieces in place.
Using MC, sl st along edges to secure the Hood piece to the Body piece.
Fasten off.
Turn hood RS out.
Ears
With RS of body piece face up and working one ear at a time, measure approximately 5.5 in. (14 cm) down along one side of the Hood edge seam. Using CC, whip stitch to secure Ear along Hood seam.
Repeat for second ear taking care to ensure both ears are placed evenly.

BORDER
With RS of work face up and using CC, attach yarn to any corner (except hood corner).
Round 1: ch1, make 3 sc in same corner sp and sc evenly around body edge making 3 sc in each corner sp. Once you reach the hood, sc evenly along hood brim edge and continue until reaching the end of the round; join with 1st st of the round using sl st.
Round 2: ch 1, sc in every stitch around, making 3 sc in each corner st; join with 1st st of the round using sl st.
Bobble Stitch Round
SEE NOTES.
Round 3: ch 2, bobble stitch in 1st st, ch 1 sk a st, *bobble stitch into next st, ch 1, sk a st; repeat from * to end of the round; join with 1st of the round using sl st.
As you work bobble stitch, use your fingers to pop bobbles to the front while working around the body edge. When working along the hood brim, pop bobbles to the back as you work so that the bobbles appear on the front of the hood.
FINISHING
Use photo below as a guide.
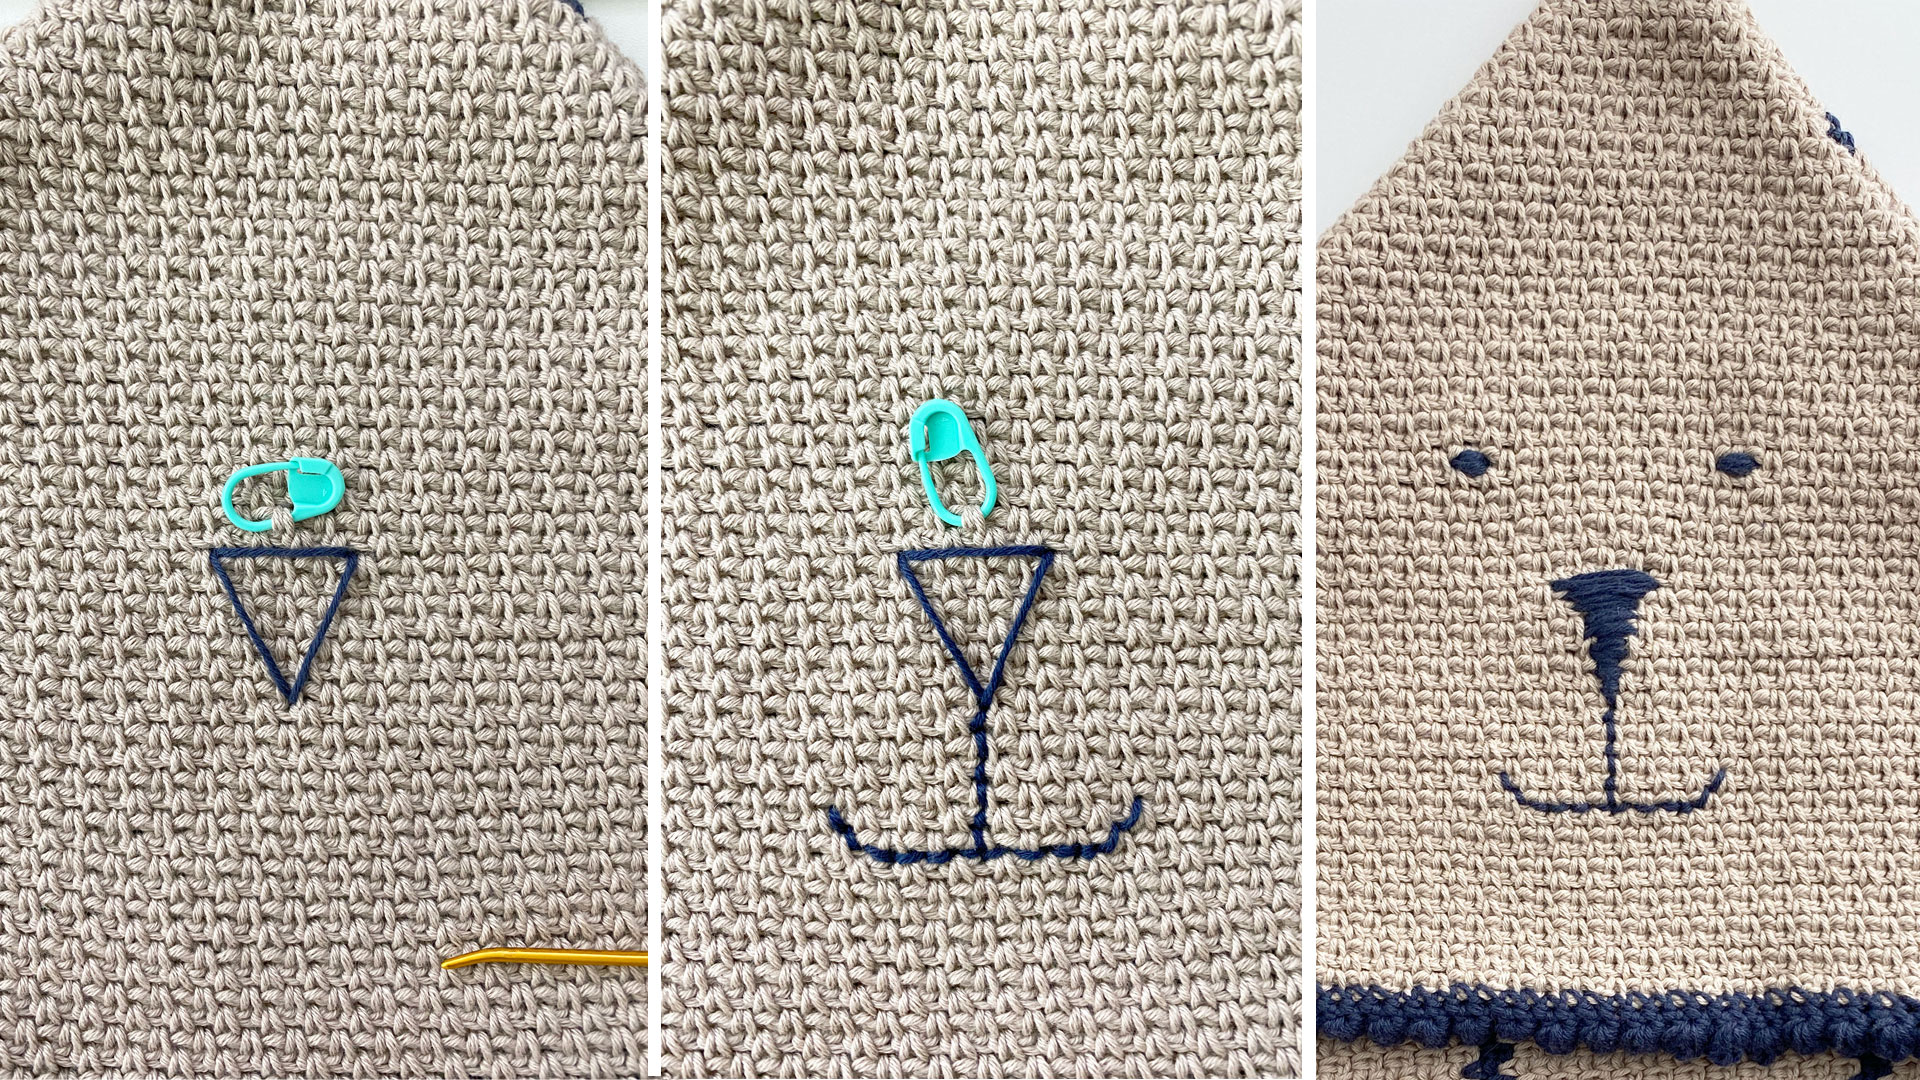
Outline the nose
Measure 5.5 in. (14 cm) down from the top of hood and mark center hood stitch with a stitch marker to use as a guide.
Thread yarn needle with CC and stitch a simple 3 stitch triangle that is centered under stitch marker and approximately 4 single crochets wide by 6 rows long. End triangle with last stitch positioned at the bottom of the nose.
Do not fill in nose. Continue to mouth.
Stitch on the mouth
Use backstitch to embroider the mouth to the hood directly under the nose, making center mouth line 6 rows long and the smile about 5 stitches out from the center on each side.
Fasten off.
Fill in the nose
Using the 3 stitch triangle as a guide, thread yarn needle with CC and make long stitches back and forth over the triangle and through the underside of the hood to fill in nose. Continue stitching until entire nose is filled in.
Fasten off.
Eyes
Place eyes approximately 4.5 in. (11 cm) down from the top of the hood and align where desired. Place stitch markers on corresponding stitches to mark eye spots.
Working one eye at a time, thread yarn needle with CC and stitch around the chosen stitch for eye placement until eye is desired thickness. Repeat for second eye.
Weave in ends. Enjoy!