Okay, so picture this. You’re already running five minutes late for yoga, you’ve got your water bottle in one hand, your keys in the other, and your yoga mat is tucked under your arm just about to roll off and hit the floor. We’ve all been there.

That’s exactly what pushed me to design this crochet yoga mat strap! I wanted something that would keep my mat secure without me having to think about it, and I wanted to make it myself. So here we are!
This free crochet yoga mat strap pattern is beginner friendly, works up fast, and makes for the cutest little handmade accessory. No matter if you’re a yogi who crochets or a crocheter who does yoga (hi, same), this one’s for you!
Why Make Your Own Yoga Mat Strap?
I know what you’re thinking, can’t I just buy one? Sure! But where’s the fun in that?
Here’s why making your own yoga mat strap is super fun:
- It’s completely customizable. Pick any color you want. Match your mat, your bag, your water bottle, even! A store bought yoga mat strap isn’t going to do that for you. You can also alter the length of your strap too!
- It’s a super quick project. This is not a big commitment, friend. You can finish this in about an hour while watching something on TV.
- It makes a thoughtful handmade gift. Know someone who does yoga? A handmade yoga mat carrying strap is such a great gift idea for birthdays, holidays, or even just because!
- It’s practical AND pretty. Functional crochet projects are my favorite, and this one delivers on both fronts.


What Makes This Yoga Mat Strap Pattern Work So Well
When I was designing this, I had a few non negotiables. It needed to be adjustable (because not all yoga mats are the same diameter!), it needed to be sturdy enough, and it needed to be easy enough that a beginner could make it without getting frustrated.
I’m really happy with how it came together. The strap has a nice, structured feel to it and it’s super easy to swing over your shoulder and go!
It’s also a great project for practicing more consistent tension, which is always a good skill to build!
The Best Yarn for a Crochet Yoga Mat Strap
For this type of project, you want a yarn that has some structure to it. I recommend a 100% cotton or cotton-blend yarn in a worsted weight.
Here’s why:
- So your strap will hold its shape even with the weight of the mat. It will stretch a bit, but it is super durable, which matters when when you’re on the go!
- It also looks super polished and effortlessly boho. The stitch definition is beautiful!
My favorite cotton yarn is Lily Sugar’n Cream, and I’ve used it for years. It’s my go to for bags and dishcloths, and now this beautiful yoga mat strap!
Save This Pattern For Later!
Not ready to crochet just yet? No worries, pin this crochet yoga mat strap to your favorite crochet board on Pinterest so you can find it when you’re ready!

Is This Pattern Good for Beginners?
Yes! I designed this yoga mat strap DIY with beginners in mind. If you know how to chain, and half double crochet, that’s everything you need to know to make this. The most fiddly part is just crocheting around the wooden rings. But if you have an “I can do this!” attitude, you can totally do it!
There are no tricky stitch counts to track and no shaping involved. It’s really just working in rows, which makes it a meditative project. (Very fitting for a yoga accessory, right!?)
If you’re newer to crochet and want a little extra support, I’ve got a full video tutorials to walk you through each skill step by step, as a prerequisite to the actual project tutorial. Click the links below to watch the tutorials and get fully up to speed at your own pace!
- How to make a slip knot
- How to make a foundation chain
- how to half double crochet into a chain
- How to half double crochet
- How to fasten off
- How to weave in your ends
Video Tutorial
Follow along with me in the video below! I walk you through the whole pattern from start to finish.
Disclosure
*This post may contain affiliate links. I may earn a small commission when purchases are made through these links (at no additional cost to you!). Please see my disclosures page for more information.
All patterns on this blog are for personal use only and may not be redistributed, copied, blogged, or sold as your own. You may sell items made by my patterns as long as the item is made by you personally (not mass produced) and that proper credit is given back to me and my site, Just Be Crafty. You may not use my photos for your online sales listings.

Purchase the Digital Version! In an Easy To Read, AD-FREE & Printer Ready Format!
Sizes
- One Size
- See Finished Measurements & Sizing for details.
Materials
Here’s everything you need to make your own yoga mat strap.
Yarn:
- #4-medium weight, 100% cotton yarn
- 240 yds
- 142 g
- 218 m
Suggested Yarn:
- 2 balls Lily Sugar’n Cream Yarn (pictured in Ecru and Denim) #4-medium weight, 100% cotton
- each ball is 120 yds / 71 g / 109 m
- Or, 1 ball if you grab a Lily Sugar’n Cream Yarn Super Size – 4 oz skein
Suggested Hook:
- Main Hook: 5 mm (from this set)
- Or size needed to obtain gauge
Notions:
- 2 Wooden rings (2.2″ outer diameter, 2/5″ thickness, link is for set of 10)
- Scissors
- Yarn Needle
- 3 locking stitch markers
Abbreviations
- ch chain
- hdc half double crochet
- st(s) stitch(es)
- YO yarn over
Gauge
- 5.25 rows = about 2″ (5 cm) measured over half double crochet
- Stitch gauge is not important for this pattern.
Finished Measurements & Sizing
This pattern is written in one size, and will fit just about any mat you’d like to carry. The strap will stretch with use.
Finished Yoga Mat Strap Measurements:
- About 1.25 x 56″ (3 x 142 cm) not including wooden rings.
Customization:
- The strap can be customized to any length. Feel free to add or take away length from the three straps before braiding. Just note, if you are planning to make a larger strap you will need more yarn. Also, the finished strap will stretch so I recommend trying the pattern as written to see how it performs for you before customizing the size.
- The braid shrinks the straps final length by about 4″ (10 cm).


Notes
Below are important notes about this pattern.
Construction:
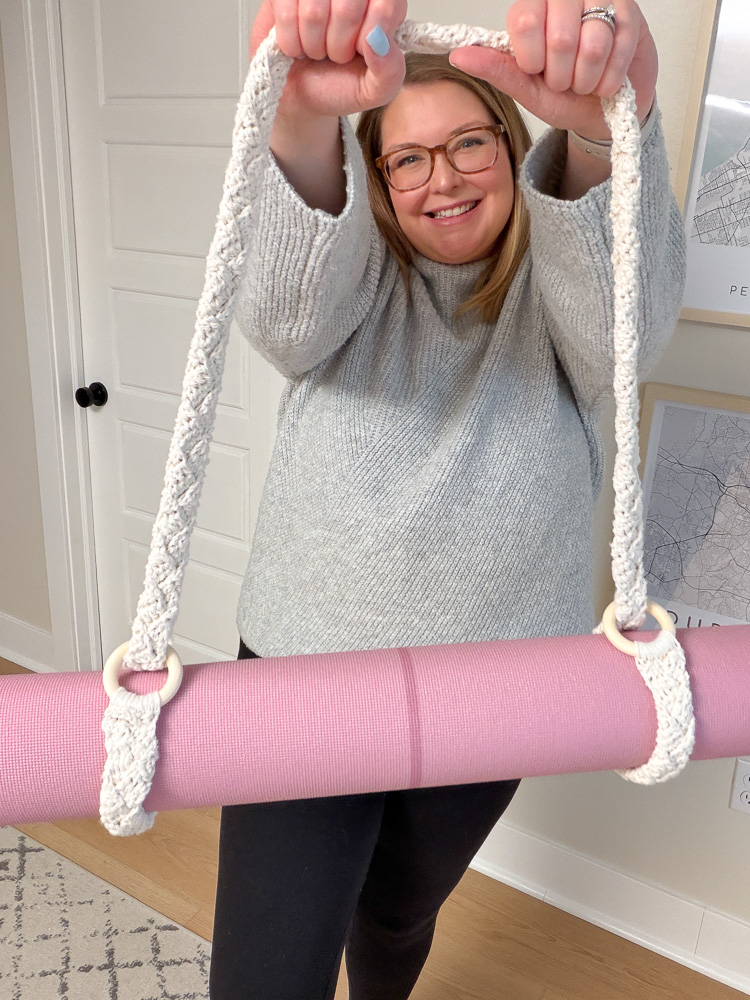
You’ll start out by crocheting around one of the wooden rings. You’ll then divide the stitches into three sections, and crochet each of them separately. You’ll then braid the three sections together to create the main strap, crochet the ends into a single row to hold the braid, and finish off by crocheting around the second wooden ring.
Yoga Mat Strap – Free Written Pattern Instructions
Read complete pattern and NOTES before beginning.
Setup:
Starting with a slip knot on your hook, work 9 hdc stitches around the wooden ring.
We now have 9 stitches. We are going to divide these stitches equally into three sections (three stitches each) to create the straps we will later braid. We will work each strap one at a time, starting with Strap 1.
Strap 1
You’ll be working across the first 3 stitches only.
Row 1: Ch 2 (does not count as a st), starting in first st, hdc in the next 3 sts, turn. (3)
Row 2: Ch 2 (does not count as a st), starting in the first st, hdc in all 3 sts across, turn. (3)
Repeat Row 2 until the strap measures about 60″ (152 cm).
For me, this was about 161 rows. Make note of your row count so that you do the same thing for the other two straps.
Cut yarn leaving a 6″ (15 cm) tail. Pull up a loop, and place a locking stitch marker in the loop.
This step differs slightly from the video tutorial, where I fasten off. However, I highly recommend using this stitch marker method instead, as it makes leveling out your straps at the end much easier!
Strap 2
You’ll now be working across the second set of 3 stitches only. Insert hook into next available stitch on the wooden ring and attach yarn.
Row 1: Ch 2 (does not count as a st), starting in same st, hdc 3 sts across, turn. (3)
Row 2: Ch 2 (does not count as a st), starting in first st, hdc in all 3 sts across, turn. (3)
Repeat Row 2 until strap measures about 60″ (152 cm). (Make sure you crochet the same number of rows you did for Strap 1.)
Cut yarn leaving a 6″ (15 cm) tail. Pull up a loop, and place a locking stitch marker in the loop.
Strap 3
You’ll now be working across the remaining 3 stitches only. Insert hook into next available stitch on the wooden ring and attach yarn.
Row 1: Ch 2 (does not count as a st), starting in same st, hdc 3 sts across, turn. (3)
Row 2: Ch 2 (does not count as a st), starting in first st, hdc in all 3 sts across, turn. (3)
Repeat Row 2 until strap measures about 60″ (152 cm). (Make sure you crochet the same number of rows you did for Straps 1 & 2.)
Cut yarn leaving a 6″ (15 cm) tail. Pull up a loop, and place a locking stitch marker in the loop.
Tip: To making braiding easier, weave in the starting ends by the wooden ring now. Leave the bottom ends alone until the end!
ASSEMBLY
It’s now time to braid the 3 straps together to make one large strap.
The Braid
Step 1:
For the first braid rotation, we are going to keep the strands flat, front facing, and will not flip them to expose the back (see video instruction for a visual).
Keeping the straps flat, take the left strap and cross it over the middle strap. Then, take the right strap and cross it over the new middle strap.
Step 2:
For the rest of the braid, we will now fold the straps over as we go, so the back side of the strap faces up.
Take the left strap and fold it over the middle strap. Then take the right strap and fold it over the new middle strap.
You want the braid to be firm. Not too tight, and not too loose.
Step 3:
Repeat Step 2 until you reach the bottom of the straps. At the end, the straps will likely not be the exact same length.
Rotate work so that the end of the braid is positioned towards the top.
Step 4:
Remove the stitch marker(s) from the longer strap(s) and gently rip back the stitches until all three straps are exactly even. Use a locking stitch marker or two to hold the braid in place. Fasten off each of the straps.
Step 5:
With work flat out in front of you, attach yarn to right most stitch, ch 2, and hdc across all 9 sts, turn. (9)
Attaching the Strap To the Second Wooden Ring
Step 1:
Grab your second wooden ring. Place your yarn-feeding hand behind the ring, and your hook-hand in front of the ring.
Step 2:
YO, insert hook into first stitch AND into the wooden ring. Draw up a loop around the ring and back through the stitch. YO, pull through all loops on your hook.
Step 3:
YO, insert hook into next stitch AND into the wooden ring. Draw up a loop around the ring and back through the stitch. YO, pull through all loops on your hook.
Step 4:
Repeat Step 3 to end of row. (9)
Cut yarn and fasten off.
FINISHING
Weave in all remaining ends. Watch the video to learn how to put it on your yoga mat!
Enjoy!

More Crochet Projects You’ll Love
If you’re looking for more crochet projects to pair with your yoga mat strap, you’re going to love these projects below!
- The Crochet Exfoliating Bath Mitt – a spa-worthy self-care project that works up so fastThe Crochet Exfoliating Bath Mitt
- The Pop Rock Scrunchie Pattern – a perfect stash buster that makes the best handmade giftThe Pop Rock Scrunchie Pattern


Frequently Asked Questions
What yarn is best for a crochet yoga mat strap?
A worsted or bulky weight cotton or cotton-blend yarn works best. You want a yarn with structure that won’t stretch under the weight of your mat. Avoid super soft, drapey yarns for this project.
Can I adjust the length of this yoga mat carrying strap?
Yes! The pattern includes instructions for adjusting the length so it works as both a shoulder strap and a hand carry loop. I’ll walk you through how to customize the fit for your mat size.
How long does this project take?
Most crocheters finish this in one or two evenings! It’s a really quick project—perfect if you want a fast, satisfying make without a huge time commitment.
Is this pattern good for beginners?
Absolutely. If you know how to chain and single crochet, you can make this yoga mat strap. There’s no complicated shaping or stitch counting involved. Just grab your hook and get going!
Can I sell items made from this pattern?
Yes! You can sell finished items made from this pattern as long as they are handmade by you personally (not mass produced) and you credit Just Be Crafty. Please see my pattern permissions page for full details.
Now go grab your hook, pick out a fun color, and let’s make something! And when you finish your yoga mat strap, I’d love to see it. Tag me on Instagram @justbecraftyblog and use #justbecrafty so I can see your makes!