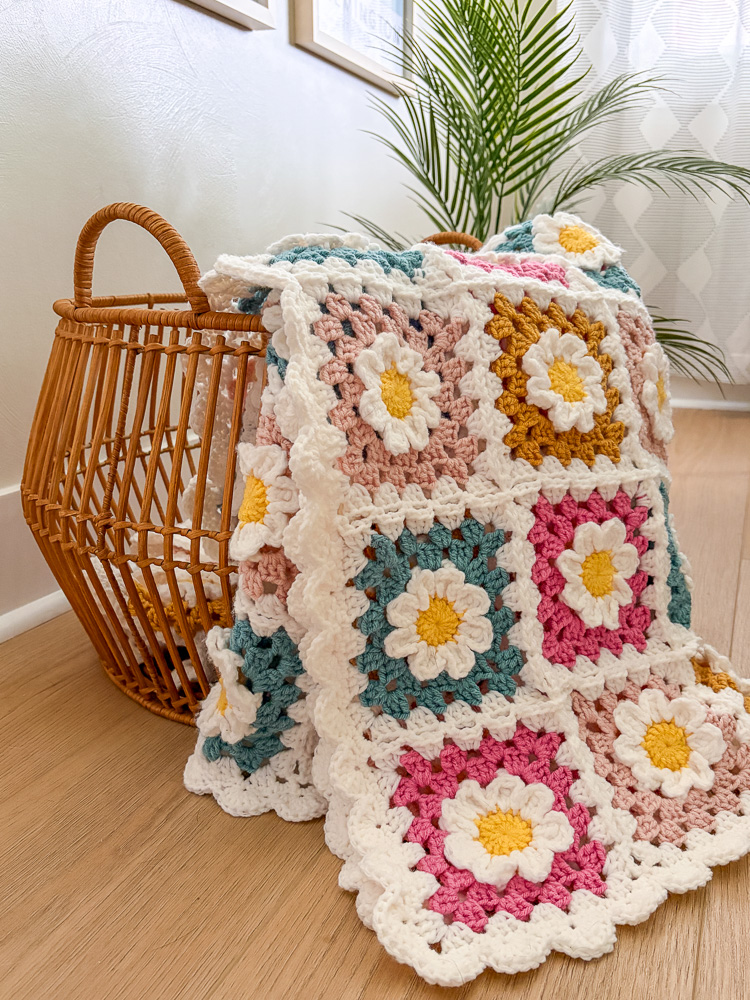
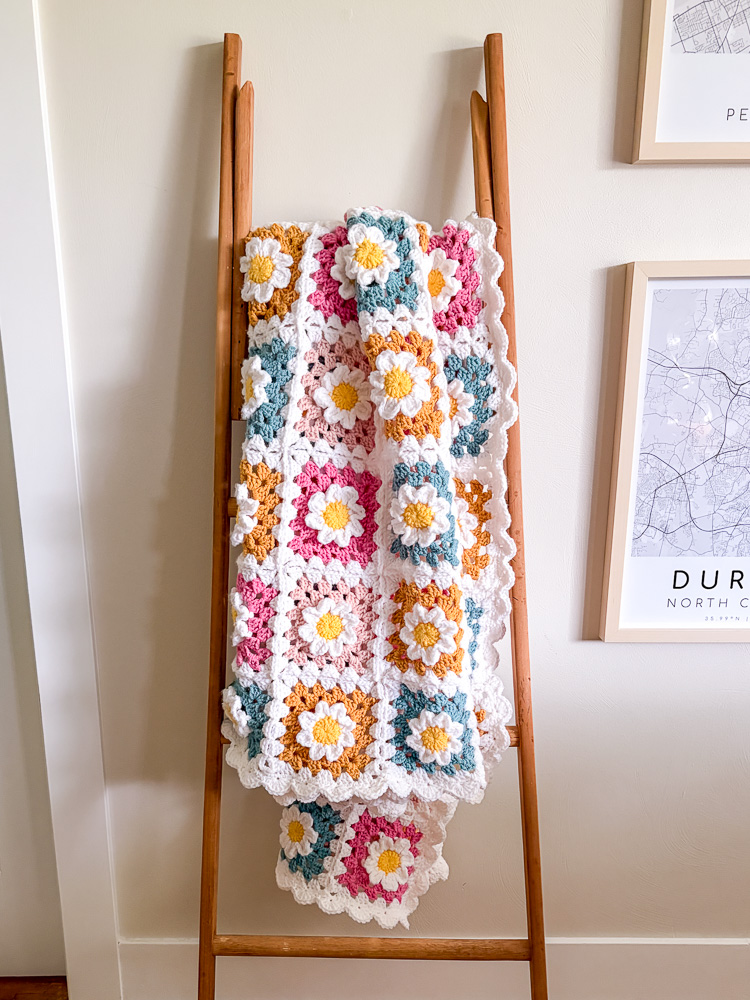
I have been sitting on this one for a while, and I am so excited to finally share it with you. This flower granny squares blanket has been one of the most fun things I’ve ever designed and I’m so proud of how it turned out. Each square features a daisy that appears to sit on top of each of the granny squares!
The pattern is written in two sizes, a Baby Blanket and a Throw, and uses a continuous are joined together by using the join as you go method!
Why You’ll Love These Flower Granny Squares
I know there are a lot of granny square blanket patterns out there. But here’s why this one is worth your time.
- The flowers are 3D! This is not your standard floral granny square. The daisy petals appear to sit on top of the granny square (but it’s not!), giving the finished blanket a gorgeous texture you just want to run your hands across. It photographs beautifully too.
- No sewing squares together. The Join-As-You-Go method means the squares attach as you go. By the time you crochet your last square, your blanket is essentially done.
- Two sizes in one free pattern. Baby Blanket and Throw are both written right here, 56 squares for the baby size and 99 for the throw.
- The color options are endless. Written with four contrasting colors with white petals, white to join and make the border, these flower granny squares can be made in any color combo you’d like!
- The scalloped border. The scalloped border adds an elegant touch to the end of the final blanket.
Save This Pattern For Later!
Not ready to start just yet? Pin this flower granny squares pattern to your crochet board on Pinterest so you can find it when you’re ready!

About the 3D Daisy Granny Square Design
Each flower granny square starts with a daisy center worked in a magic ring, then a round of triple cluster stitch petals. Hidden chains are then added to the back of the flower, giving you the foundation to work two traditional dc granny rounds around it, turning that gorgeous 3D daisy into a neat, joinable square.
The finished squares measure about 4.5″ x 4.5″ each when blocked.
Is This Pattern Good for Beginners?
I’d call this one Intermediate or Advanced Beginner and here’s why.
The individual flower and granny square steps are very approachable. If you know how to work into a magic ring, make a dc, and follow a basic granny square pattern, you already have most of the skills you need. The triple cluster stitch, which creates the petals sounds intimidating but it’s really just a variation on a standard crochet stitch. I break it down step by step in the pattern notes and walk through it in the full YouTube video tutorial as well.
The part that earns the intermediate label is the Join-As-You-Go assembly. It takes a little spatial thinking, especially for the first couple of rows. That’s exactly why I’ve included cheat sheets in the pattern, printable grid sheets for both sizes so you can track exactly where you are and never lose your place.
If you’re a beginner who has made a few projects and is ready for something more exciting, this is the one. It will stretch your skills beautifully and leave you with something genuinely stunning.
The Special Stitch: Triple Cluster Stitch
The star of the show in these flower granny squares is the triple cluster stitch and it’s what creates the flower petals.
It’s a four-step stitch worked into the same stitch multiple times, finished by pulling through all loops on your crochet hook at once. Full step-by-step instructions are included in the pattern notes, and the video tutorial shows you exactly what it looks like in motion.
Once you get the rhythm of it, it goes really quickly and watching those petals pop up is genuinely one of the most satisfying things in crochet.
A Note on Batching Your Squares
This is my number one tip for this blanket and I feel strongly enough about it to put it right here before you even start: make your squares in batches.
Crochet all your yellow centers first using your magic ring. Then go back and add all the petals using the triple cluster stitch and sl st joins. Then work all the dc granny rounds. Weave in your ends as you go.
Working in batches keeps the project from feeling overwhelming, gets you into a rhythm with each technique, and means your squares will be perfectly consistent when it comes time to join. You will genuinely thank yourself later especially on a throw blanket with 99 squares!
Yarn for This Blanket
This blanket uses a #4 medium weight, 100% acrylic yarn and I used Loops & Threads Soft Classic from Michaels throughout. It’s one of my go-to yarns for blankets because it’s affordable, widely available, has beautiful stitch definition, and comes in a huge range of colors.
The US terms pattern calls for white as your main color, with five contrast colors for the petals. You’ll need more white than anything else — about 1,770 yards for the baby size and 2,124 for the throw — but each contrast color ball goes a long way since the petals themselves are small.
Pro tip: grab all your yarn in one trip if you can. Dye lots vary between purchases and you want everything to match across the full blanket.
Video Tutorial
The Join-As-You-Go method is one of those things that is so much easier to understand once you can see it happening. I have a full YouTube video tutorial walking you through every step the flower, the granny rounds, the joining process, and the scalloped border. Click play below!
Grab the free sample Cheat Sheet Here (as seen in the video tutorial).
Grab the Digital Version! An easy to read, ad-free PDF!
Purchase the Digital Version! In an Easy To Read, AD-FREE & Printer Ready Format!
Disclosure
*This post may contain affiliate links. I may earn a small commission when purchases are made through these links (at no additional cost to you!). Please see my disclosures page for more information.
All patterns on this blog are for personal use only and may not be redistributed, copied, blogged, or sold as your own. You may sell items made by my patterns as long as the item is made by you personally (not mass produced) and that proper credit is given back to me and my site, Just Be Crafty. You may not use my photos for your online sales listings.
3D Daisy Granny Square Blanket Pattern Written Pattern:
Read complete pattern and notes before beginning.
Materials
Here’s everything you need to make your own 3D Daisy Blanket!
Yarn
- #4-medium weight, 100% acrylic yarn
- Yards
- MC / White: 1770 (2124) yds
- CC1 / Yellow: 354 (354) yds
- CC2 / Gold: 354 (708) yds
- CC3 / Pink: 354 (708) yds
- CC4 / Blush: 354 (708) yds
- CC5 / Blue: 354 (708) yds
- Grams
- MC / White: 990 (1188) g
- CC1 / Yellow: 198 (198) g
- CC2 / Gold: 198 (396) g
- CC3 / Pink: 198 (396) g
- CC4 / Blush: 198 (396) g
- CC5 / Blue: 198 (396) g
- Meters
- MC / White: 1620 (1944) m
- CC1 / Yellow: 324 (324) m
- CC2 / Gold: 324 (648) m
- CC3 / Pink: 324 (648) m
- CC4 / Blush: 324 (648) m
- CC5 / Blue: 324 (648) m
- Yards
Suggested Yarn
- Michaels Loops and Threads Soft Classic; 100% acrylic, #4-medium weight yarn
- Each ball is 354 yds / 198 g / 324 m
- 5 (6) balls White / MC
- 1 (1) ball Butter Yellow / CC1
- 1 (2) balls Mustard / CC2
- 1 (2) balls Pink / CC3
- 1 (2) balls Blush / CC4
- 1 (2) balls Arctic / CC5
- Each ball is 354 yds / 198 g / 324 m
-
- Alternative for MC / White
- 3 balls of Loops and Threads Color Craft (each ball is 812 yds / 453.6 g / 742 m) – I used this.
- Alternative for MC / White
Hook
- 5.5 mm (from this set)
- Or size needed to obtain gauge
Notions
- Scissors
- Yarn Needle
- 4 stitch markers
- Blocking Boards and T-pins
- Steamer (or spray bottle with plain water)
Gauge
- 1 completed square (daisy center plus two granny rounds) = about 4.5 x 4.5″ (11.5 x 11.5 cm) blocked.
- Be sure to check your gauge!
Finished Measurements
This pattern is written in two sizes: Baby Blanket and Throw Blanket
Finished Square Measurment
- Each finished square = about 4.5 x 4.5 “ (11.5 x 11.5 cm)
Baby Blanket Finished Measurement
- Measures about 40 x 44“ (98 x 112 cm) not including border
Throw Blanket Finished Measurement
- Measures about 50 x 60“ (126 x 154 cm) not including border
Abbreviations (US Terms)
- CC contrasting color
- ch chain
- dc double crochet
- MC main color
- RS right side (front of work)
- sc single crochet
- sp space
- sl st slip stitch
- st(s) stitch(es)
- tcs triple cluster stitch (see NOTES)
- tr triple crochet (also called treble crochet)
Notes
Below are important notes about this project.
Construction
The granny squares are joined using a continuous join as you go method. First, you will crochet the daisy centers and then the petals. You’ll then add a round of chains around the back of the flower for the granny rounds to attach to. From there, you will work two granny rounds to turn the flower into a square. The squares will then be attached by working an additional round around each square to continuously join them together.
Special Techniques
Triple Cluster Stitch (tcs):
- Step 1: YO twice, insert hook into next st, draw up a loop. YO, pull through two loops. YO pull through 2 loops.
- Step 2: YO twice, insert hook into same st, draw up a loop. YO, pull through two loops. YO pull through 2 loops.
- Step 3: Repeat Step 2 one more time. At the end of this step you should have 4 loops on your hook.
- Step 4: YO, pull through all 4 loops on your hook.
Batching
To make this project feel less overwhelming, I highly recommend making your squares in batches (for example, batches of 7(9) in order to complete one full row of a Baby (Throw) Blanket). Crochet all the yellow centers, then add all the petals, then work the two granny rounds. Weave in your ends as you go! You will thank yourself later!
Blocking
I highly suggest blocking your squares before joining them. As you finish a batch of squares, pin them to your blocking boards and steam them (or lightly spray with water) and allow them to fully dry. Blocking ensures all your squares are the exact same size, which makes the join as you go process much smoother. Plus, blocking will help your flower petals open up.
Cheat Sheets
The Join As You Go method can feel like a maze. To keep track of where you are in the blanket grid, refer to the Cheat Sheets.
- Free Sample Cheat Sheet:
Scalloped Border
When working the final scalloped border, the stitch count will likely not be perfect. In the last few inches of the round, you may need to manipulate the border slightly. Instead of skipping exactly 2 stitches between scallops, you may need to skip 1 or 3 to make the final scallop or stitch fit. You may need to fudge it slightly. No one will notice!
How Many Squares to Make of Each Color
Throw Blanket (99 total)
- CC2 (Gold): 25 squares
- CC3 (Pink): 24 squares
- CC4 (Blush): 26 squares
- CC5 (Blue): 24 squares
- Baby Blanket (56 total)
Baby Blanket (56 total)
- CC2 (Gold): 16 squares
- CC3 (Pink): 14 squares
- CC4 (Blush): 11 squares
- CC5 (Blue): 15 squares
3D Daisy Blanket Pattern – Starts Here:
Read complete pattern and NOTES before beginning.
THE GRANNY SQUARES
Making The Flower
Round 1: Begin with CC1. In magic ring, ch 3 (counts as a dc), make 15 more dc in magic ring. (16)
Do not join yet.
Cut yarn. Insert hook into the top of the starting ch 3 of the round, draw up a loop with MC, and sl st to join.
Round 2: *Ch 4, tcs into next st, ch 4 and sl st into next st; rep from * 6 more times. Ch 4, tcs into next st, ch 4 and slip st into the starting join. (8 petals)
Draw final loop to the back of the work. Do not cut yarn.
Adding The Chain Round To The Back of The Flower
Round 3: Ch 2, *Sl st into a central and upper strand on the back of the next petal. Ch 3 and repeat from * around. End this round by placing a sl st into the first sl st of round. Cut yarn and fasten off.
Weave in all ends.
You should have 8 ch spaces behind your crochet flower. To make the granny rounds easier to visualize, place one stitch marker in every other ch space. The ch spaces with stitch markers indicate where corners will go.
The Granny Rounds
Use CC2 / CC3 / CC4
Round 1:
Step 1: With the flower facing RS up, insert hook (from front to back) into a ch space with a stitch marker in it. With CC2, CC3, CC4 or CC5 make slip knot and slide onto your hook.
Step 2: Pull slip knot to tighten on hook, pull up through the ch sp and chain 6. (This ch 6 counts as a dc plus a ch 3.)
Step 3: Make 3 dc in same ch sp. Ch 1. (This partially forms Corner 1. We will finish this corner at the end of the round. Remove stitch marker.)
Step 4: Make 3 dc in next ch sp. Ch 1.
Step 5: Make (3 dc, ch 3, 3 dc) in next ch sp. Ch 1. (Forms Corner 2. Remove stitch marker.)
Step 6: Repeat Steps 4-5 one more time. (Forms Corner 3. Remove stitch marker.)
Step 7: Repeat Step 4.
Step 8: Make 2 dc into Corner 1. Sl st into the 3rd ch of the starting ch 6. Sl st into the corner sp.
Round 2:
Step 1: Ch 6 (counts as a dc plus a ch 3.) Make 3 dc in same ch sp. Ch 1.
Step 2: Make 3 dc in next ch sp. Ch 1. Make 3 dc in next ch sp. Ch 1.
Step 3: Make (3 dc, ch 3, 3 dc) in next corner ch sp. Ch 1.
Step 4: Make 3 dc in next ch sp. Ch 1. Make 3 dc in next ch sp. Ch 1.
Step 5: Repeat Steps 3-4 one more time. Make 2 dc into Corner 1. Sl st into the 3rd ch of the starting ch 6. Sl st into corner sp.
Step 6: Cut yarn and fasten off. Weave in all ends. Block squares as you go.
ATTACHING YOUR SQUARES: JOIN AS YOU GO
Use the Cheat Sheet to help keep track of where you are at! Watch the video for visual help.
Squares should always be worked RS up.
Row 1:
Step 1 (First Square): Grab Square 1. Attach MC to any corner and ch 6 (counts as a dc plus a ch 3.). Make 3 dc in same corner. Work the granny round as usual per the established pattern for the first 3 sides. When you reach Corner 4, do not crochet a full corner. Make 3 dc and stop. (The final side will remain unworked.)
Step 2 (Attaching Next Square): Ch 3. Grab Square 2. Make 3 dc in any corner of Square 2. Sl st into next cluster sp on Square 1. Ch 1. *Make 3 dc into next cluster sp on Square 2. Sl st into next cluster sp on Square 1. Ch 1. Repeat from * until you reach the corner. Crochet this corner, the top edge, the next corner, and side edge of Square 2 as usual. End Square 2 with 3 dc in remaining corner sp.
Step 3: Repeat Step 2 for each square along the row (replacing square numbers numerically as you go) until the last square of the row remains unattached.
Step 4 (Final Square of Row 1): Ch 3. Grab Square 7 (9). Make 3 dc in any corner of Square 7 (9). Sl st into next cluster sp on Square 6 (8). Ch 1. *Make 3 dc into next cluster sp on Square 7 (9). Sl st into next cluster sp on Square 6 (8). Ch 1. Repeat from * until you reach the corner. Crochet this corner, and the top edge as usual per the pattern, ending with 3 dc in Corner 3. (Remaining two sides are unworked.)
Row 2:
Note: We are now attaching the bottom of Row 2 to the top of Row 1.
Step 1: Ch 3. Grab Square 8 (10). Make 3 dc in any corner. Sl st into the next cluster space of Square 7 (9). Ch 1. Make 3 dc into next cluster space on Square 8 (10). *Sl st into the next cluster sp on Square 7 (9). Ch 1. Make 3 dc in the next cluster sp of Square 8 (10). Repeat from * until you get to next corner of Square 8 (10) and make 3 dc in that corner. Sl st into the corner of Square 6 (8) (skipping over Square 7’s (9’s) corner sp). Ch 1.
Step 2: Repeat Step 1 across the row (moving to the left, and replacing square numbers numerically as you go) until last square of the row remains unattached.
Step 3 (Final Square of Row 2): Grab Square 14 (18). Work in the established pattern until you get to Corner 2, making 3 dc in that corner. Sl st into corner of Square 1. Ch 3. Make 3 dc in same corner of Square 14 (18), and work the remaining 3 sides in the established granny square pattern, ending by making 3 dc in the 4th corner.
All Row 2 squares are now attached to Row 1, but their side seams are hanging freely.
Securing Row 2 Side Seams
Step 4: Ch 2. Sl st into unattached corner of Square 2. Ch 3. Make 3 dc in the first corner of Square 13 (17). Sl st into the next cluster sp of Square 14 (18). Ch 1. *Make 3 dc into the next cluster sp of Square 13 (17). Sl st into next cluster sp of Square 14 (18). Ch 1. Repeat from * to the next corner. Crochet this corner, the top edge, the next corner, and the side edge as usual. End Square 13 (17) with 3 dc in the remaining corner sp.
Step 5: Repeat Step 4 across the row until you reach the final square of the row [Square 8 (10)].
Subsequent Rows
Repeat the instructions for Row 2 until all squares have been attached (replacing square numbers numerically as you go), ending before completing “Securing Side Seams” steps for the final row.
Securing the Final Row [Row 8(11)]
The top edge of the final row will be a finished edge. Continue in the established pattern across row, but sl st into the top corner of the previous square as you work (so that the top edge is continuously joined with no corners hanging freely). The last square of this row will be Square 50 (91).
Working the Remaining 2 Raw Blanket Edges
Work the outer corner of Square 50 (91) as usual. Make 3 dc, ch 1 in each cluster space as you go down along the side of the blanket. At each intersection between squares (ch 3, sl st into the join between squares, ch 3). Work the bottom blanket corner as usual, and repeat along the remaining raw edge. Finish the blanket join by making 2 dc into the very first blanket corner of Square 1. Sl st into the 3rd ch of the starting ch 6. Sl st into the corner sp.
Do not cut yarn.
BORDER
Round 1: Ch 1 (does not count as a st), and make 5 sc into same corner. Sc around the entire blanket as follows: make 1 sc in each st and ch 1 sp, 2 sc in each ch 3 intersection sp, and 5 sc in each of the remaining three blanket corners. Join the round into the first st of the round with a sl st.
Round 2 (Scallop): Ch 1, sc in the first st, sk 2 sts, make 7 dc into next st. *Sk 2 sts, make 1 sc in next st, sk 2 sts, make 7 dc in next st; repeat from * to the end of the round. (See scalloped border note on page 9. Your stitch count will not be perfect here, and that’s ok.) Join with the first st of round using a sl st. Fasten off.
Weave in all remaining ends. Give the full blanket a gentle steam to block.
Enjoy!
Frequently Asked Questions
What are flower granny squares?
Flower granny squares are traditional granny squares with a crochet flower worked into the center. In this pattern, the daisy is three dimensional the petals are raised off the granny square, giving the finished blanket a gorgeous textured look that flat floral squares just can’t match.
What stitch makes the 3D petals?
The petals are made using a triple cluster stitch, a special technique worked into the same stitch multiple times and finished by pulling through all loops on the hook at once. Full instructions and a video walkthrough are included.
Is this pattern good for beginners?
This pattern is rated Intermediate / Advanced Beginner. The individual steps including the magic ring, dc granny rounds, and sl st joins are very approachable. The Join-As-You-Go assembly is the most challenging part, but included cheat sheets and a full YouTube video tutorial make it very manageable.
What yarn is best for flower granny squares?
A smooth #4 medium weight acrylic yarn works beautifully as it gives clean stitch definition that makes those 3D petals really stand out. I used Loops & Threads Soft Classic, which is widely available at Michaels and very affordable for a larger blanket project.
What does Join-As-You-Go mean?
Join-As-You-Go (JAYGo) is a method of attaching your granny squares as you crochet them rather than sewing them together at the end. By the time your last square is finished, your blanket is fully assembled. The pattern includes detailed written instructions, cheat sheets, and a video tutorial to guide you through it.
How many squares do I need?
The Baby Blanket uses 56 squares total and the Throw uses 99 squares. The pattern includes a breakdown of how many squares to make in each petal color for both sizes.
Can I sell items made from this pattern?
Yes! Finished items may be sold as long as they are handmade by you personally, not mass produced, and proper credit is given to Just Be Crafty. Please see my pattern permissions page for full details.
More Crochet Patterns You’ll Love
If you’re a granny square fan, here are a few more favorites from Just Be Crafty:
- The Dainty Daisy Granny Square Blanket — my most popular pattern and the flat-flower sister to this one. A wonderful place to start before tackling the 3D version!
- The Free Crochet Flower Pattern — the standalone 3D daisy in two sizes, perfect for using up scraps or adding to hats and bags
- The Jumbo Easy Crochet Blanket — a big, cozy, beginner friendly blanket that works up so fast
Now go grab your yarn, print out your cheat sheets, and let’s make something that will genuinely stop people in their tracks. Tag me on Instagram @justbecraftyblog and use #justbecrafty when yours is finished, I cannot wait to see your flowers! 🌼


