Spooky Skeleton Baby Costume Pattern
This Spooky Skeleton Baby Costume is so cute and fun! The pattern is designed to be oversized so your favorite little one can be layered up and warm under the costume!

Hello and welcome back to my blog! I have a super fun new crochet project to share with you today – The Spooky Skeleton Baby Costume Pattern!! And you haven’t even heard the best part yet… It glows in the dark!
Yes, you just read that right… I said GLOW-IN-THE-DARK!
The Yarn
The skeleton portion of this project is made with Lion Brand Yarns DIY Glow and it really glows in the dark! Its super cute and kinda creepy, so perfect for Halloween, right!? DIY Glow Yarn is 100% polyester and a medium-4 weight.
Although the yarn is polyester it feels and looks just like a standard cotton yarn like Lily’s or Peaches & Cream, but much softer. A closer comparison is probably Hobby Lobby’s I Love This Cotton Yarn, if you’ve happened to try that one.
I found that the yarn glows best if you let it soak up natural light during the day. My craft room gets a lot of sun, so I just set my project near the window during the day and that was enough to bring out the glow at night!
The main body is worked up in Lion Brand’s Basic Stitch which is a standard 100% acrylic med-4 weight yarn.
Sizing and Fit
This pattern is designed to fit one size – size – 3 – 6 months. Fit is a bit oversized so your little one can be bundled up under the costume for maximum warmth!
Be sure to let me know if you give this yarn and pattern a try in the comments below!!
SPOOKY SKELETON BABY COSTUME PATTERN
This pattern was made in collaboration with Lion Brand Yarn. This post contains affiliate links. For more information please see my disclosures page.
A printable PDF version of this pattern is available for purchase here in my Etsy Shop.
OR… Join the Just Be Crafty Club and gain instant access to this pattern PDF as well as my entire PDF pattern library! Click here for more information.
SKILL LEVEL – Intermediate
MATERIALS
- Lion Brand DIY GLOW (Art 206)
- #098B Natural Ecru, 2 balls (CC)
- Lion Brand BASIC STITCH (Art 201)
- #153 Black, 3 balls (MC)
- 5.5 mm hook (or size to obtain correct gauge – I use this set!)
- Yarn needle
- Scissors
- Stitch markers
SIZE
- 3 – 6 mo.
FINISHED MEASUREMENT
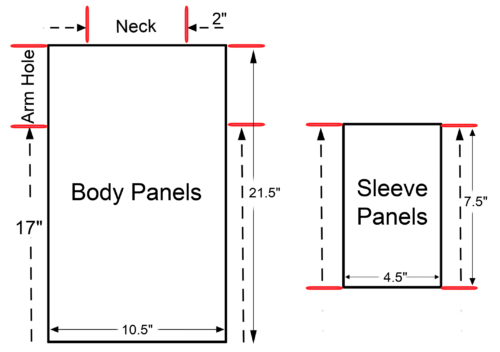
- Body piece (flat): About 21.5 in. x 10.5 in. ( 54 cm. x 27 cm.)
- Hat circumference (flat): About 7 in. (18 cm.)
GAUGE
Body Piece
- 17 sts over 19 rows = about 4 in. (10 cm.) in sc.
Hat
- Rounds 1 – 6 of hat pattern = about 4 in. (10 cm.)
BE SURE TO CHECK YOUR GAUGE.
KEY (STANDARD US TERMS)
- ch = chain
- BPDC = back post double crochet
- FPDC = front post double crochet
- hdc = half double crochet
- sc = single crochet
- sl st = slip stitch
- st = stitch
- RS = right side (outside/front of work)
- WS = wrong side (inside/back of work)
PATTERN NOTES
Body Piece
- Intarsia grid is worked in sc. Each row starts with a ch 1 (ch 1 does not count
as a stitch). - Starting with chart row 1, work back and forth in rows. Cross off rows as you go to keep your place.
- Work colors separately (do not crochet over unused colors). To help with this
divide yarn balls into several smaller balls and work with multiple yarn balls at a
time. - Color changes – Upon reaching last stitch before next color change, begin sc
but stop before completing last yarn over. Yarn over with new color to
complete sc.
Hat
- Each round begins with a ch 2 (ch 2 does not count as a stitch).
- At the end of each round, join with 1st st (not the starting ch 2) of round using a
slip stitch.
BODY – FRONT PANEL
Click here for SKELETON BODY chart
With MC, ch 41
Follow skeleton body intarsia grid. See PATTERN NOTES.
Row 1: Starting in 2nc ch from hook, sc across row following intarsia grid using
MC and CC; turn. (40)
Rows 2 – 94: Ch 1, sc across row following intarsia grid using MC and CC; turn. (40)
Fasten off.
BODY – BACK PANEL
With MC, ch 41
Row 1: Starting in 2nc ch from hook, sc across row; turn. (40)
Rows 2 – 94: Ch 1, sc in each stitch across; turn. (40)
Fasten off.
SLEEVES – FRONT PANEL
Click here for LEFT SLEEVE chart
Click here for RIGHT SLEEVE chart
Make 2. Follow intarsia grids for right arm & left arm. See PATTERN NOTES.
With MC, ch 18
Row 1: Starting in 2nc ch from hook, sc across row following intarsia grid using
MC and CC; turn. (17)
Rows 2 – 30: Ch 1, sc across row following intarsia grid using MC and CC; turn. (17)
Fasten off.
SLEEVES – BACK PANEL
Make 2.
With MC, ch 18
Row 1: Starting in 2nc ch from hook, sc across row; turn. (40)
Rows 2 – 94: Ch 1, sc in each stitch across; turn. (40)
Fasten off.
ASSEMBLY
Sleeves
Working one sleeve at a time, grab one SLEEVE – FRONT PANEL and one SLEEVE – BACK PANEL. Place front panel on top of back panel with RS touching and starting edges positioned towards the bottom.
Using MC and a yarn needle, line up the panels and use whip stitch to sew sides of sleeve panels together to form sleeves.
Fasten off.
Repeat process for second sleeve.
BODY – Side Edges
Place BODY – FRONT PANEL on top of BODY – BACK PANEL with RS touching and starting edges positioned towards the bottom.
Using MC and a yarn needle, start in one of the bottom corner edges, line up your stitches and use whip stitch to sew this side of the body piece closed up to approximately 17 inches (leaving 4.5” remaining unstitched at the top for the arm hole).
Fasten off.
Repeat on the opposite side edge.
ATTACHING SLEEVES TO BODY
With WS facing out lay body piece and sleeve pieces flat out in front of you (with skeleton sides facing up).
Line up sleeve openings with body piece arm holes and pin in place with stitch markers. Using MC and a yarn needle, work one side at a time. Use whip stitch to attach sleeve to arm hole opening.
Fasten off.
Repeat this process to attach the second sleeve.

FINISHING
Neckline
Round 1: Attach MC to any stitch on the neck opening. Ch1, starting in same st as ch 1, sc in each st around. Join with 1st st of round using sl st.
Round 2: Ch 2, *FPDC around next st, BPDC around next st; repeat from * to end of round. Join with 1st st of round using sl st.
Fasten off.
Wrist Cuff
Round 1: Attach MC to any stitch on the wrist opening. Ch1, starting in same st as ch 1, sc in each st around. Join with 1st st of round using sl st.
Round 2: Ch 2, *FPDC around next st, BPDC around next st; repeat from * to end of round. Join with 1st st of round using sl st.
Repeat process on second wrist cuff.
Fasten off.
Weave in all ends. Turn work RS out.
HAT
See PATTERN NOTES.
With CC, make 8 hdc in magic loop
Round 1: 2 hdc in each st around (16)
Round 2: *2 hdc, 1 hdc in next st; repeat from * to end of round (24)
Round 3: *2 hdc, 1 hdc in each of next 2 stitches; repeat from * to end of round (32)
Round 4: *2 hdc, 1 hdc in each of next 3 stitches; repeat from * to end of round (40)
Round 5: *2 hdc, 1 hdc in each of next 4 stitches; repeat from * to end of round (48)
Round 6: *2 hdc, 1 hdc in each of next 5 stitches; repeat from * to end of round (54)
Rounds 7 – 14: hdc in each st around (54)
Round 15: ch 2, *FPDC around next st, BPDC around next st; repeat from * to end of round. Join with 1st st of round using sl st.
Round 16: Repeat Round 15
Fasten off.
Weave in ends.




No Chart?
Hi Judy! You will find the charts by clicking the designated links in the pattern. The main body chart can be found by clicking the link titled “Click here for Skeleton Body Chart” in the BODY – FRONT PANEL section of the pattern. You’ll find similar links for the sleeves in the Sleeves section.