Get cozy this fall season with these adorable velvet crochet pumpkins! Whether you’re new to crocheting or have been for a while, this project is perfect for adding a touch of handmade warmth and softness to your fall decor. With their luxe texture and cute, chic appearance, you’ll have a whole pumpkin patch crocheted up in no time flat!
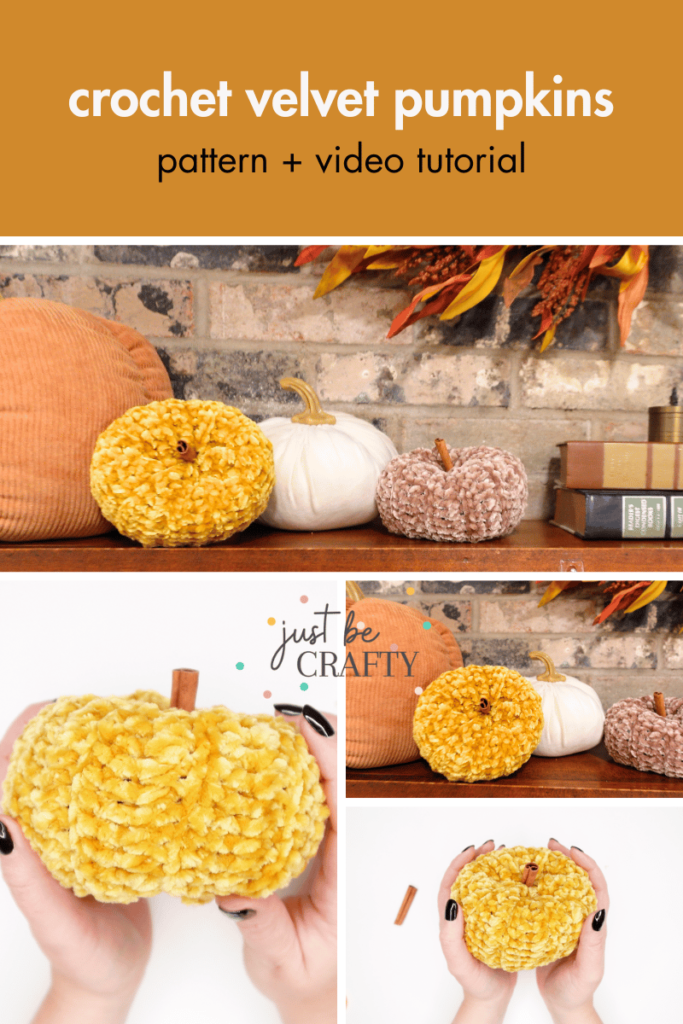
These plush pumpkins are the ideal pattern for anyone looking to make something both functional and decorative. In this post, I’ll show you everything you need to know about making your own velvet pumpkin – from the materials you need to step-by-step instructions for creating a perfectly shaped pumpkin.
Why Velvet Crochet Pumpkins?
If you’ve already you’ve already made my regular crochet pumpkins, you’re gonna love this velvet version. The rich, velvety texture gives these pumpkins a plush, high-end look that will stand on your mantel, shelf or tablescape. Here are a few reasons why velvet yarn is an amazing choice:
- Luxe Texture: Velvet yarn is super soft and gives your pumpkins a cozy feel that’s perfect for snuggling into fall.
- Great for Gifting: Handmade velvet pumpkins make for great gifts to give to friends and family during the autumn season. (Think host/hostess gifts!)
- Stylish Decor: These pumpkins add a bit of a modern twist to traditional fall decor, great for centerpieces, mantel displays, or even as part of your Thanksgiving table setting.
Let’s get started with what you’ll need!
Techniques used in this pattern
This pattern utilizes the following skills. Don’t worry if you’re new to crochet, I’ve included tips and a video tutorial below to help you along the way!
- chaining
- half double crochet
- half double crochet in the back loop only
- slip stitch
- whip stitch
- weaving in ends
Once you’ve mastered these basic skills, I’m confident you can tackle this pattern with ease. If you’re a complete beginner, I highly suggest starting with my more beginner-friendly crochet pumpkin pattern before trying out this velvet version. It’s equally cute and a bit easier for those just getting the hang of things! I only say this because velvet yarn can be a bit tricky to work with.
Video help
For those who learn better visually (me included!), I’ve created a video tutorial to walk you through the entire velvet crochet pumpkin pattern. You can follow along step-by-step by clicking the play button below!
Velvet Crochet Pumpkin – Written Pattern
This pumpkin project is not a toy. Due to small pieces, children should be supervised around this project or the finished pumpkin.
Prefer a PDF version? You can purchase the ad-free, printable PDF pattern here from my shop for easy reference, or gain access to this pattern along with my entire PDF pattern library! Click here for more information.
*This post may contain affiliate links. Please see my disclosures page for more information.
All patterns on this blog are for personal use only and may not be redistributed, copied, blogged, or sold as your own. You may sell items made by my patterns as long as the item is made by you personally (not mass produced) and that proper credit is given back to me and my site, Just Be Crafty. You may not use my photos for your online sales listings.
Materials
- Yarn
- #5 bulky weight velvet yarn – approx. 38 yrds
- Suggested Yarn
- Bernat Velvet Yarn, 100% polyester (315 yds / 300 g / 288 m)
- Golden Moss and Mushroom
- Bernat Velvet Yarn, 100% polyester (315 yds / 300 g / 288 m)
- Suggested Hook
- 6.0mm (I use this set)
- Notions
- Miscellaneous & Embellishments
Gauge
12 stitches over 8 rows worked in hdcblo = approximately 4 in. x 4 in. (10 cm x 10 cm)
Finished Measurements & Sizing
- One size
- This pattern creates a finished pumpkin that is approximately 4.5 in. wide x 2.5 in. tall. See NOTES section on how to customize pumpkin size.
- Want to customize your pumpkin’s size? No problem! Simply adjust the foundation chain length and follow the tips below.
Abbreviations
- ch chain
- hdc half double crochet
- hdcblo half double crochet back loop only
- sl st slip stitch
- st stitch
Notes
CUSTOMIZING THE SIZE
One of the great things about this pattern is how easily it can be customized. You can make your pumpkin any size you’d like by adjusting the foundation chain length.
Size Tip
To customize the size, start with a foundation chain of any length. Crochet in pattern until your piece’s length is about 2x its width. For example, if your piece’s width is 5 inches, you’ll want to continue working until it’s 10 inches in length.
Using this simple method, you can create an entire pumpkin patch of different sizes!
TIPS FOR CINCHING THE TOP AND BOTTOM CLOSED
After whip stitching around the top and bottom of the pumpkin be sure to pull gently on the yarn to cinch these holes closed, taking care to not break the yarn.
If you do accidentally break the yarn, try again by using one of the following methods:
- Attach a new piece of velvet yarn and try again
- Use two strands of velvet yarn (to give it more strength)
- Use a piece of scrap acrylic or wool yarn from your stash that is a coordinating color.
Velvet Crochet Pumpkin Pattern starts here:
BODY
With a long tail (about an arm’s length and a half), ch 20
Row 1: Starting in 3rd ch from hook, hdc in each ch across, turn. (18)
Row 2: ch 2, hdcblo, turn. (18)
Rows 3 – 23: repeat Row 2
Working yarn should be on the same side as your starting yarn tail.
Do not cut yarn.
ASSEMBLY
Fold crochet piece in half so that the starting and ending edges are touching.
Line up your stitches, ch 1 and sl st the edges together to form a cylinder shape.
Fasten off leaving a long tail (about an arm’s length and a half long).
ASSEMBLY – BOTTOM
Thread yarn needle and whip stitch around the top edge. Gently pull tail to cinch closed, taking care to not break the yarn.
TIP: If you do accidentally break the yarn try again with a new piece of yarn and re-whip stitch the top and gently pulling to close the hole. If you still are having a hard time with the yarn breaking, grab a scrap piece of wool, or acrylic yarn in a similar color and repeat process. OR, try using two strands of the velvet yarn to give it added strength.
Stitch closed any remaining hole. Secure yarn and fasten off.
ASSEMBLY – TOP and FILLING THE PUMPKIN
Thread yarn needle with the other yarn tail and whip stitch around the top edge. Fill pumpkin with a couple handfuls of fiber fill to your desired plumpness. Pull yarn tail to cinch closed. (If having issues with yarn ripping when cinching closed, repeat suggested TIP above.)
You will have a small hole remaining open at the top. Leave this small hole here, but make sure its a tight hole! We’ll us it later for the cinnamon stick stem!
Secure yarn, but do not cut tail yet.
SHAPING THE PUMPKIN
With tail and yarn needle still attached, insert yarn needle into the pumpkin (near the center) and pull through to the bottom of your pumpkin (also near the center), gently pull to tighten.
Pull yarn needle back up through the top in a different spot (still near the center) and back down through the bottom again. Repeat this one or two more times squishing the pumpkin as you go. This will give your pumpkin that unique/realistic pumpkin shape.
Knot to secure shape. Pull yarn tail back through to the inside of your pumpkin and hide tail. Secure any remaining tails and pull to the inside of the pumpkin to hide tail.
FINISHING
Using proper safety precautions, cut cinnamon stitch down to desired size, and insert into the top hole of your pumpkin to create a stem. Use hot glue to secure in place if you so choose.
Enjoy!
Frequently Asked Questions
Can I use a different yarn?
Of course! While velvet yarn adds a unique texture, you can easily swap it out for any bulky or worsted-weight yarn. Just note that the texture and finished look will be different. If you’re looking to use a different yarn, you might like this pumpkin pattern instead!
How do I wash my velvet crochet pumpkin?
I oddly get this question a lot, but I would say spot clean your pumpkin the best you can, and if you can’t just make a new one! They are meant to be decor pieces that sit on your shelf, mantel or table and aren’t meant to be played with.
Before you go!
Crocheting these velvet pumpkins is not only super fun and cozy, but it’s also a great way to add soft, stylish decor to your home. With their luxe texture and simple construction, these pumpkins are a great project for crocheters of any experience level.
Whether you’re making one for yourself or multiples as gifts, your velvet crochet pumpkin will be a hit this fall season. Looking for more? Be sure to check out these fun projects too!


Love this pattern?